
MMS User Guide
Enter MMS Platform
Go to https://merchant.shoalter.com/login
select Language
enter login ID (registered email)
enter password
click "Continue"

Create a Single Product
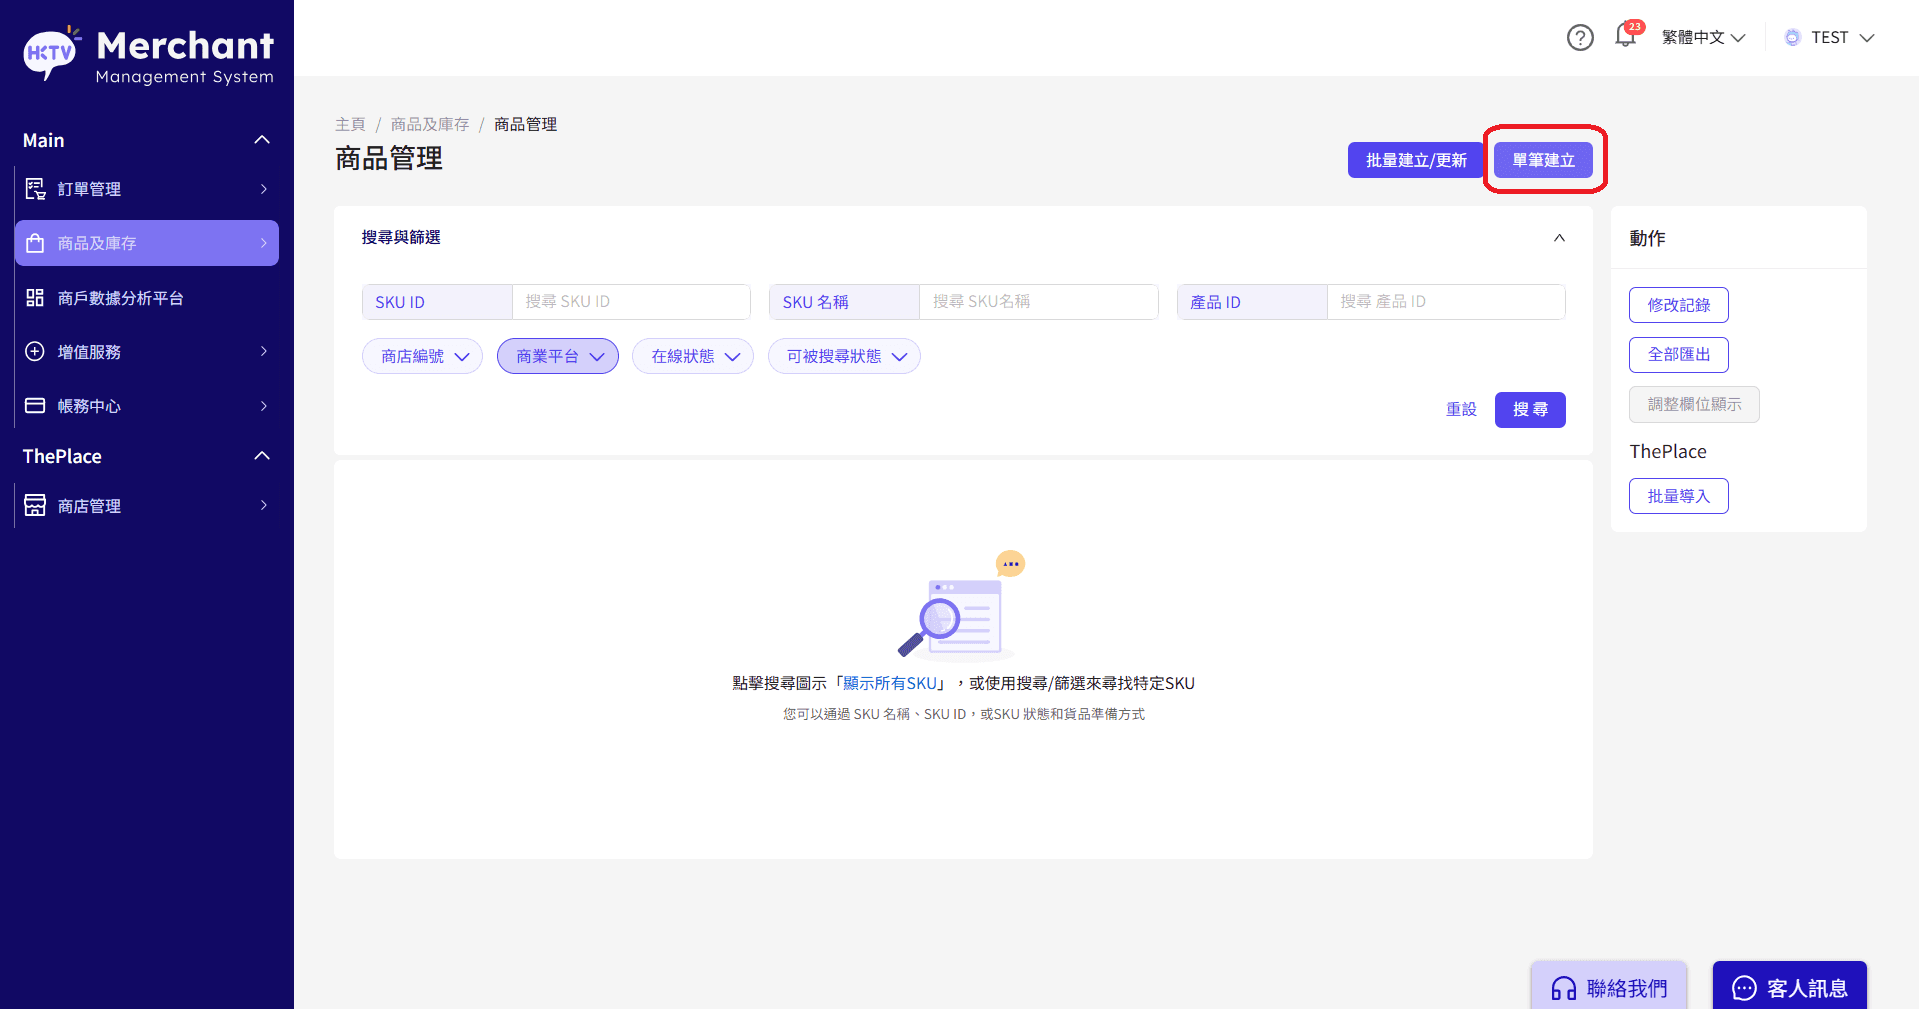
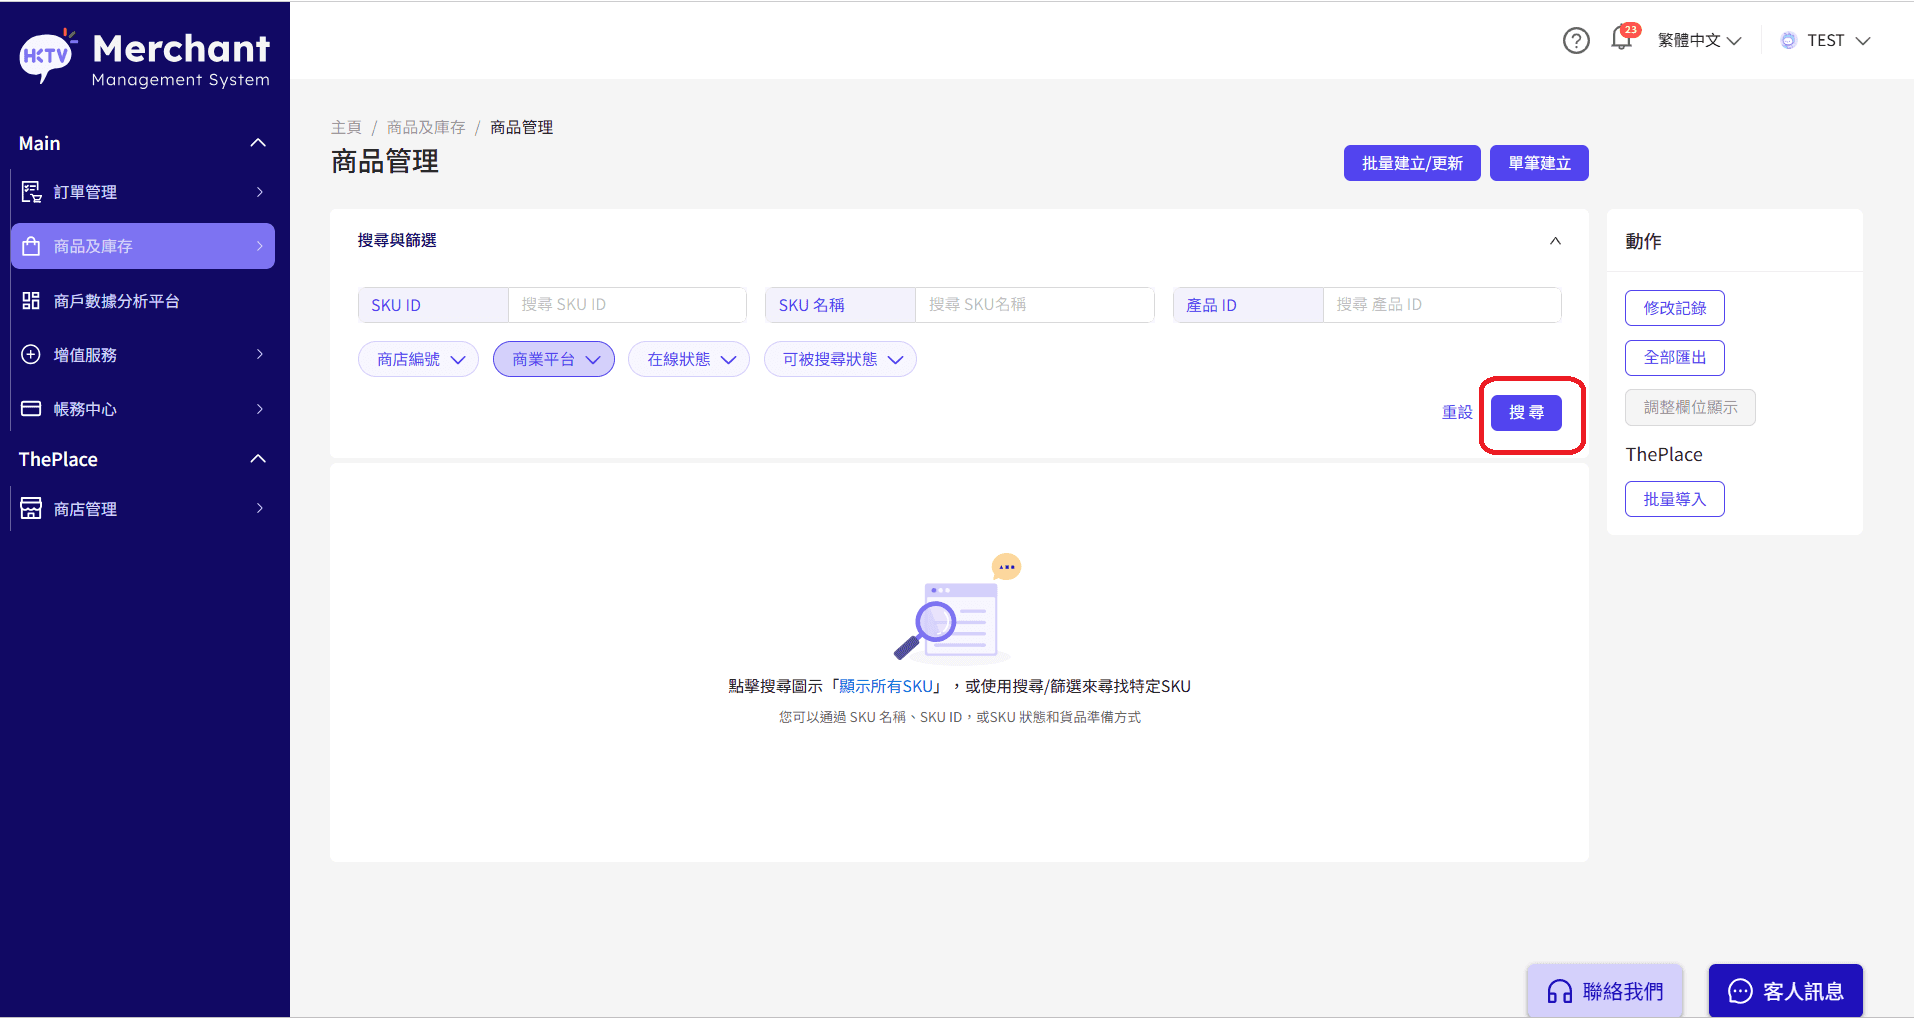
Click "Products and Inventory" in the sidebar
Click "Product Management"

Click "Single Create" to create a new SKU
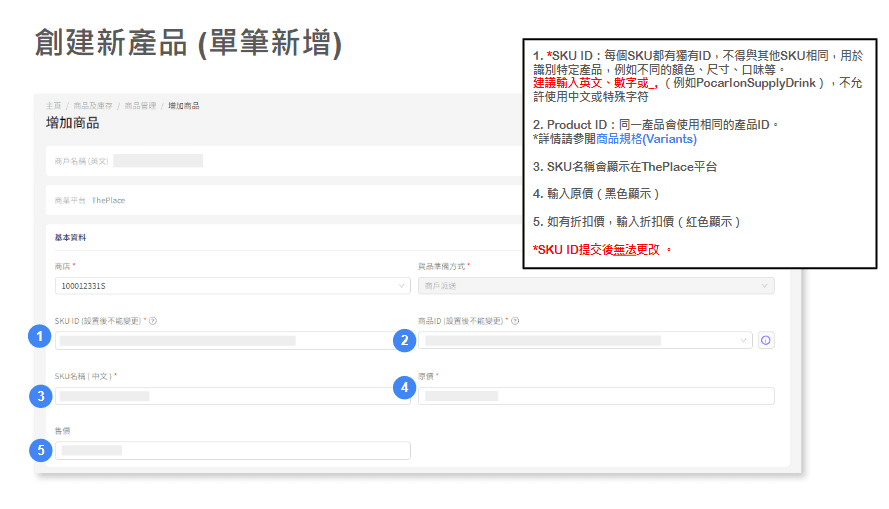
Fill in Product Information in "Create Product" page:
*SKU ID: Each SKU has a unique ID and must not be the same as other SKUs. It is used to identify specific products, such as different colors, sizes, flavors, etc.
It is recommended to enter English, numbers or _, (such as Waterbottle_black)
*Chinese or special characters are not allowed.
*SKU ID cannot be changed after submission.
Product ID: Same product will use the same product ID.
*For details, please refer to the Product Variants
SKU Name (Chi) will be displayed on the "ThePlace" platform
Enter the original price (displayed in black).
If there is a discount price, enter the Selling Price box (price will be displayed in red)
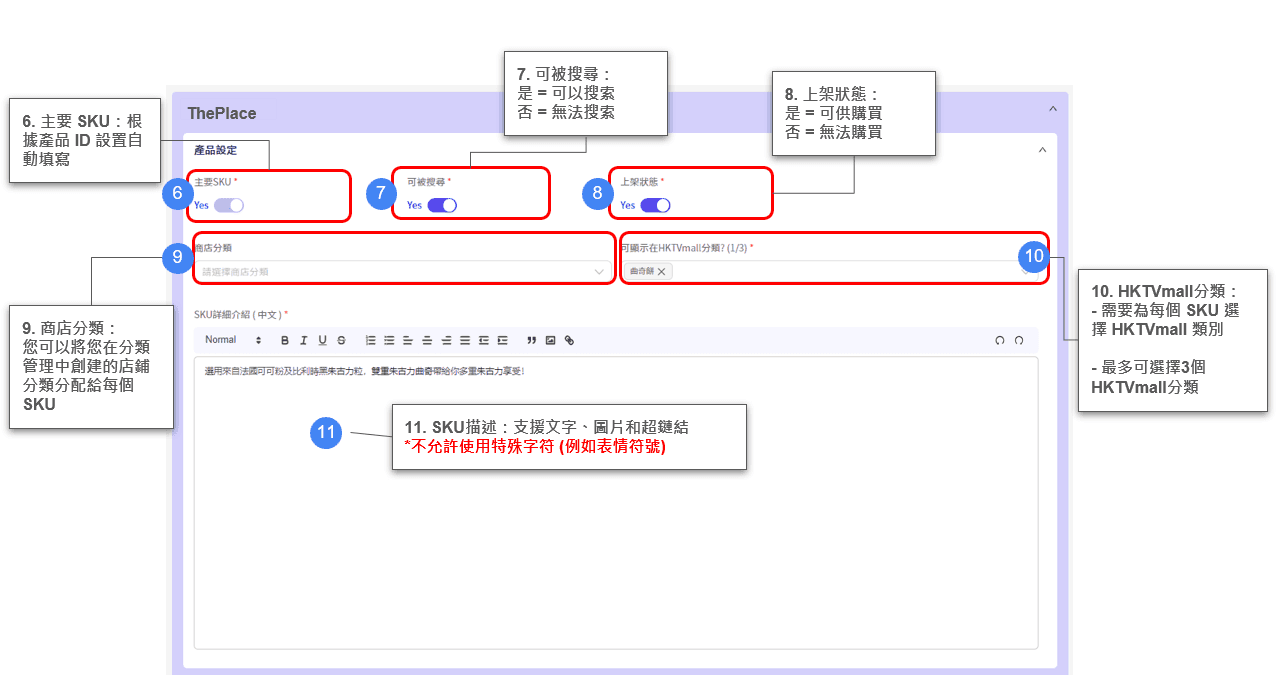
Main SKU: Automatically fill in according to product ID settings
Visibility : Yes = can be Searched; No = cannot be Searched
Online Status : Yes = Available for Purchase; No = Cannot be Purchased
Store category: You can assign the product category created in "Catergory" to each SKU
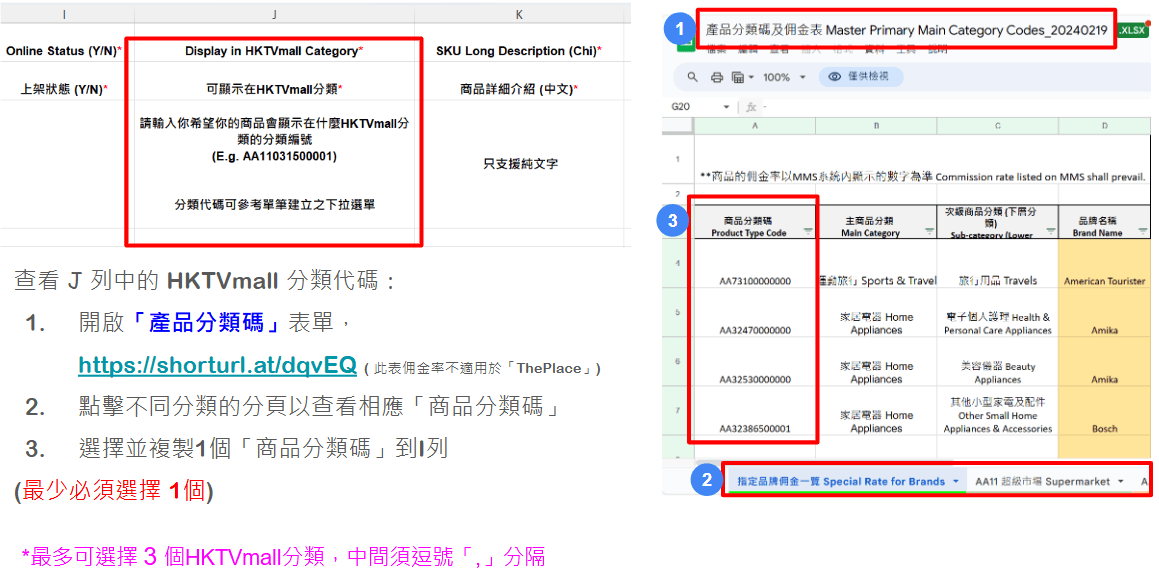
Display in HKTVmall category: You need to select HKTVmall category for each SKU, up to 3 HKTVmall categories
SKU Long Description: Support text, pictures and hyperlinks
*Special characters are not allowed (such as emojis)
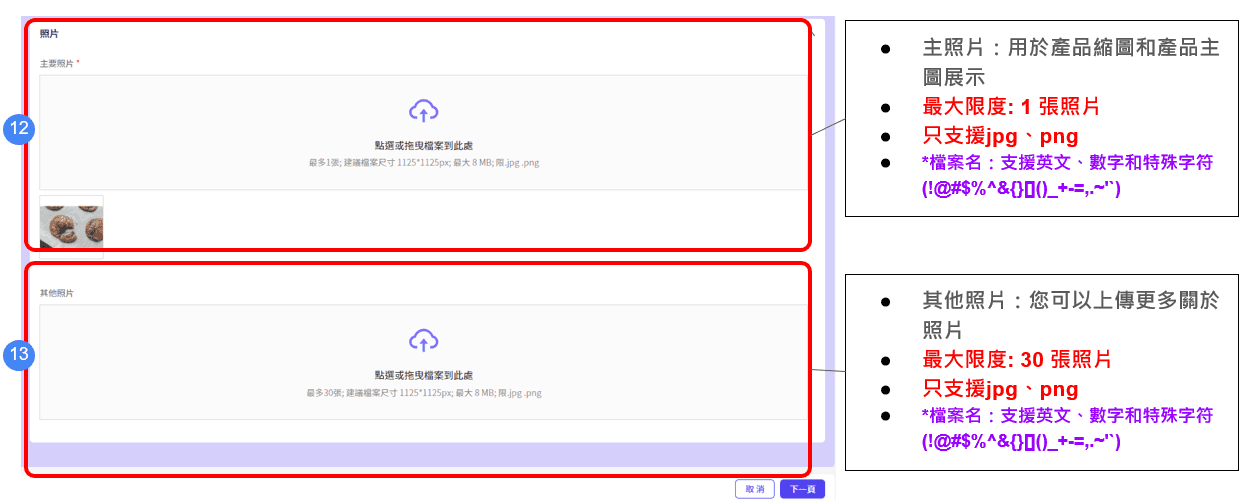
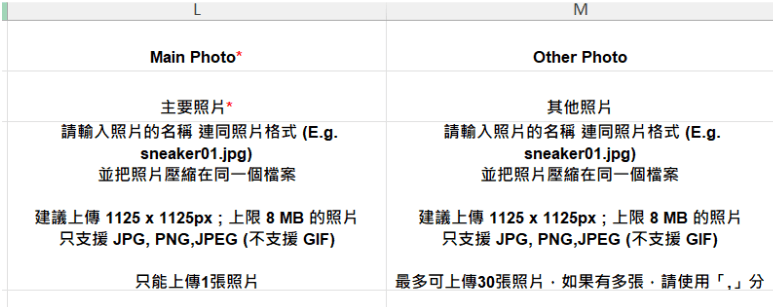
Main photos:
- It is used for product main photos display
- Maximum: 1 photoOther photos
Maximum: 30 photos*Supports only jpg and png file
*File name supports English, numbers and special characters (!@#$%^&{}[]()_+-=,.~'`)
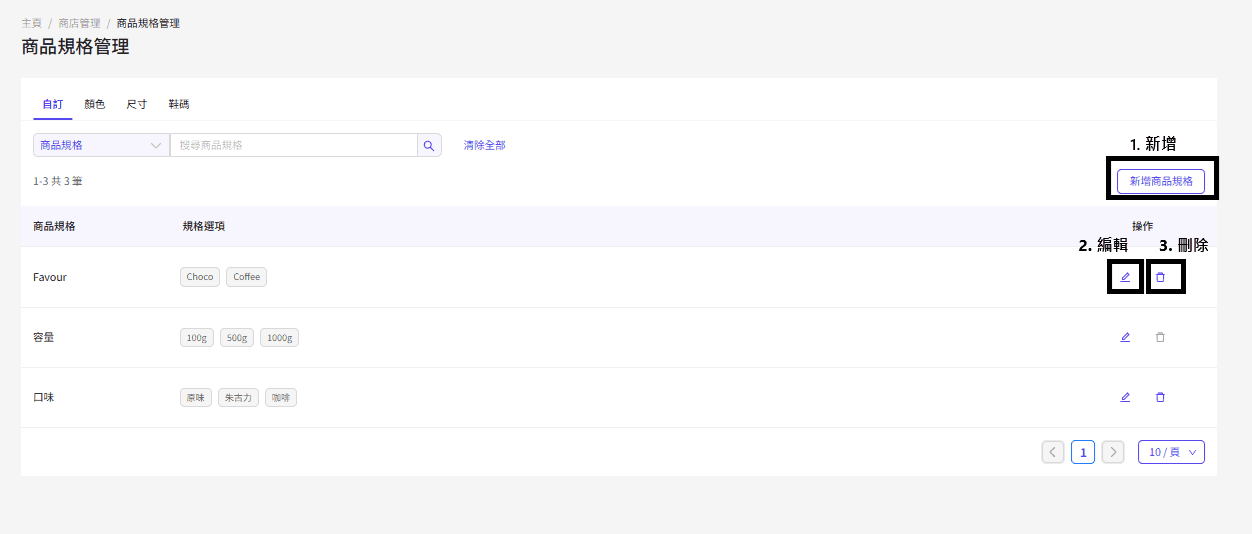
Variant Management
Merchant should fill in all product details before setup variants
Click「Yes」
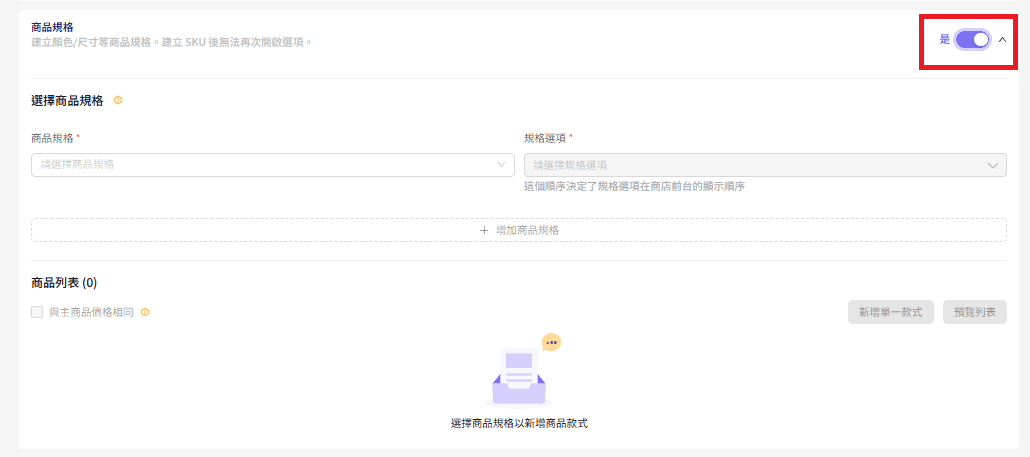
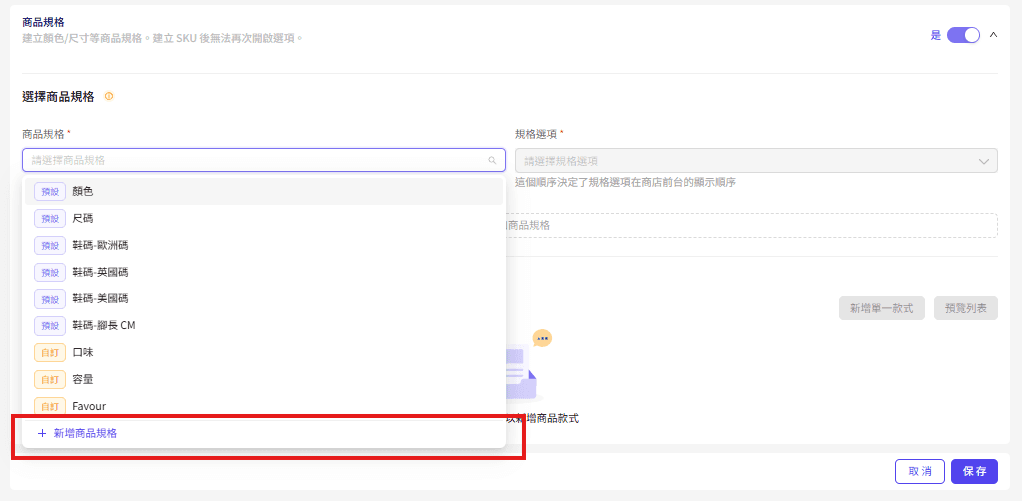
1 : Select Default Product Variants
Merchants can set up Product Variants based on the following default options:
Color (e.g., Red)
Size (e.g., S, M, L)
Shoe Size (including European size EU, UK size, etc.)
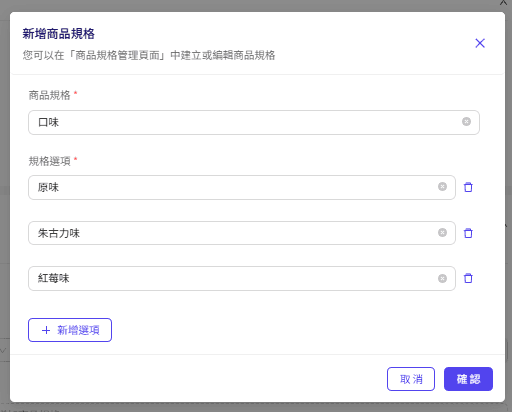
Choose the Corresponding Variant Options to Add
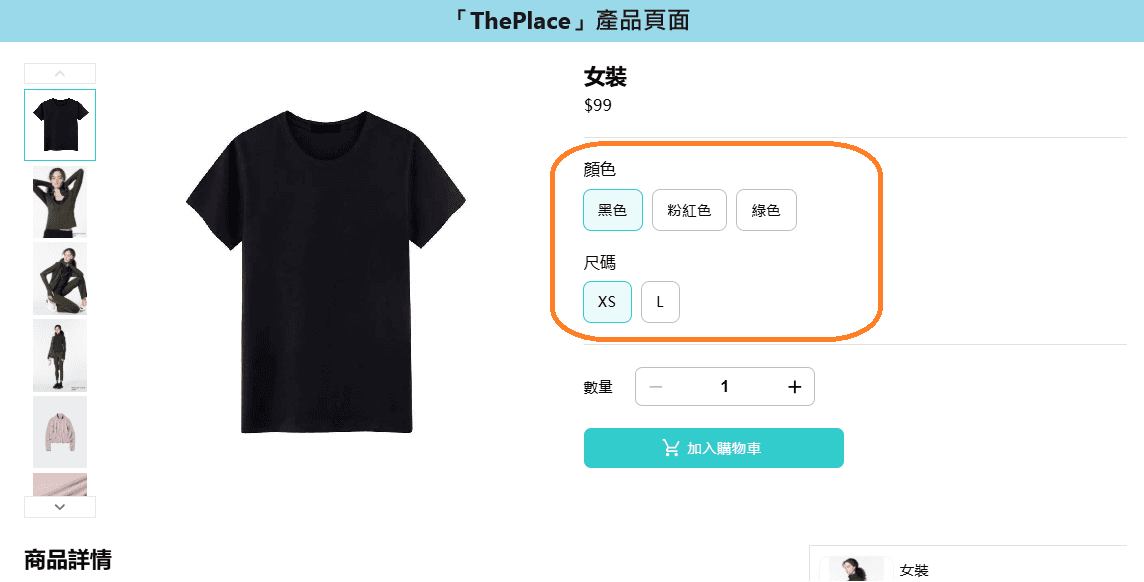
*The order of these options determines how they will be displayed on the storefront.
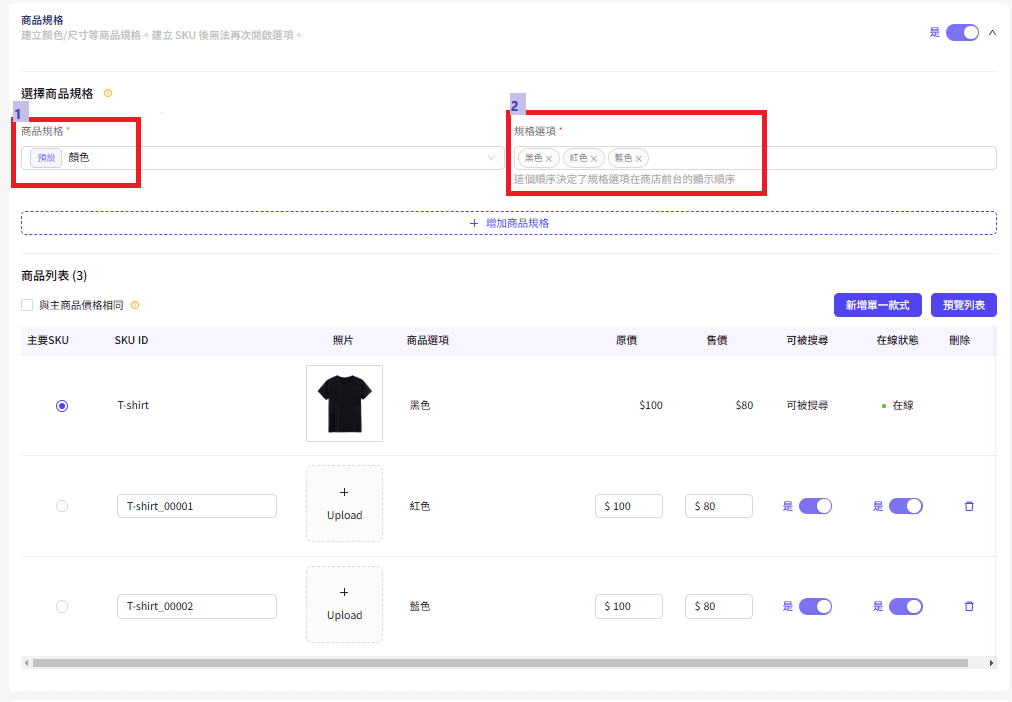
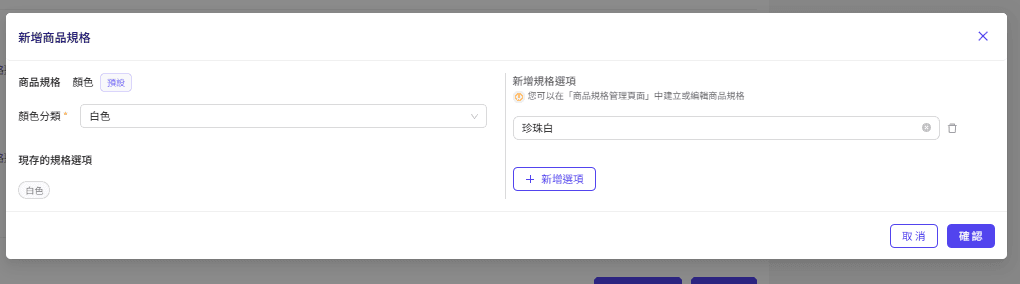
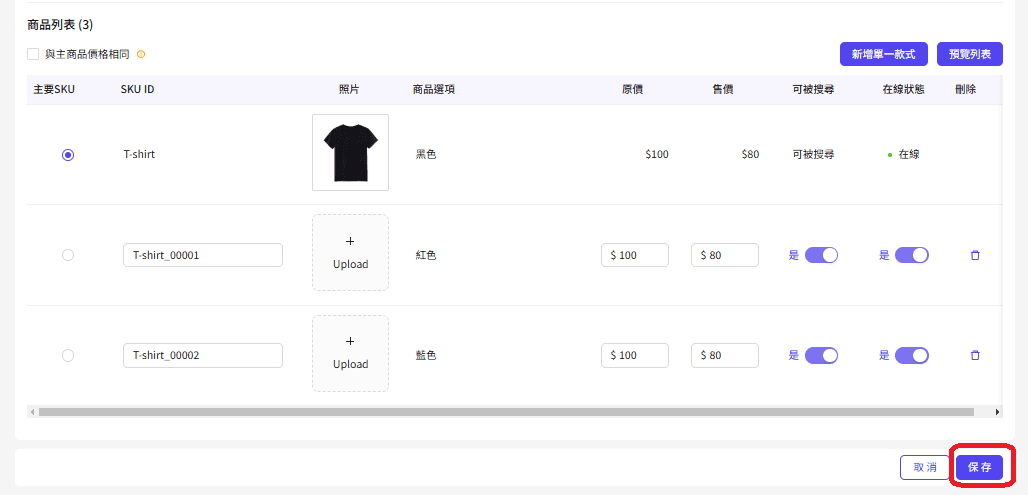
Check the Product List
Merchant can view the newly added Product Options.
Click "Save" after completion
Inventory Setting
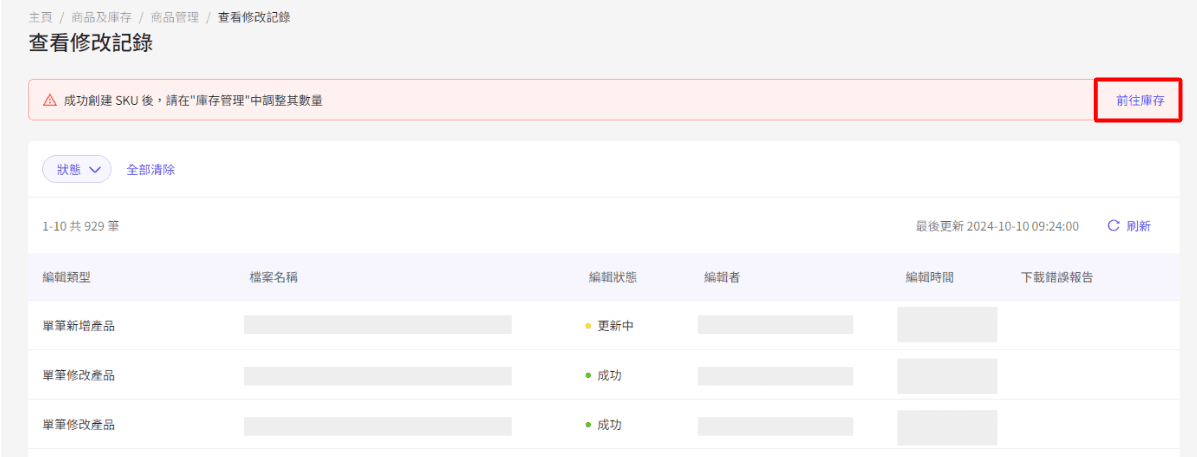
After completing the product setup, the system will directly navigate to the "View/Edit History" page.
Click "Go to Inventory" to continue the setup.
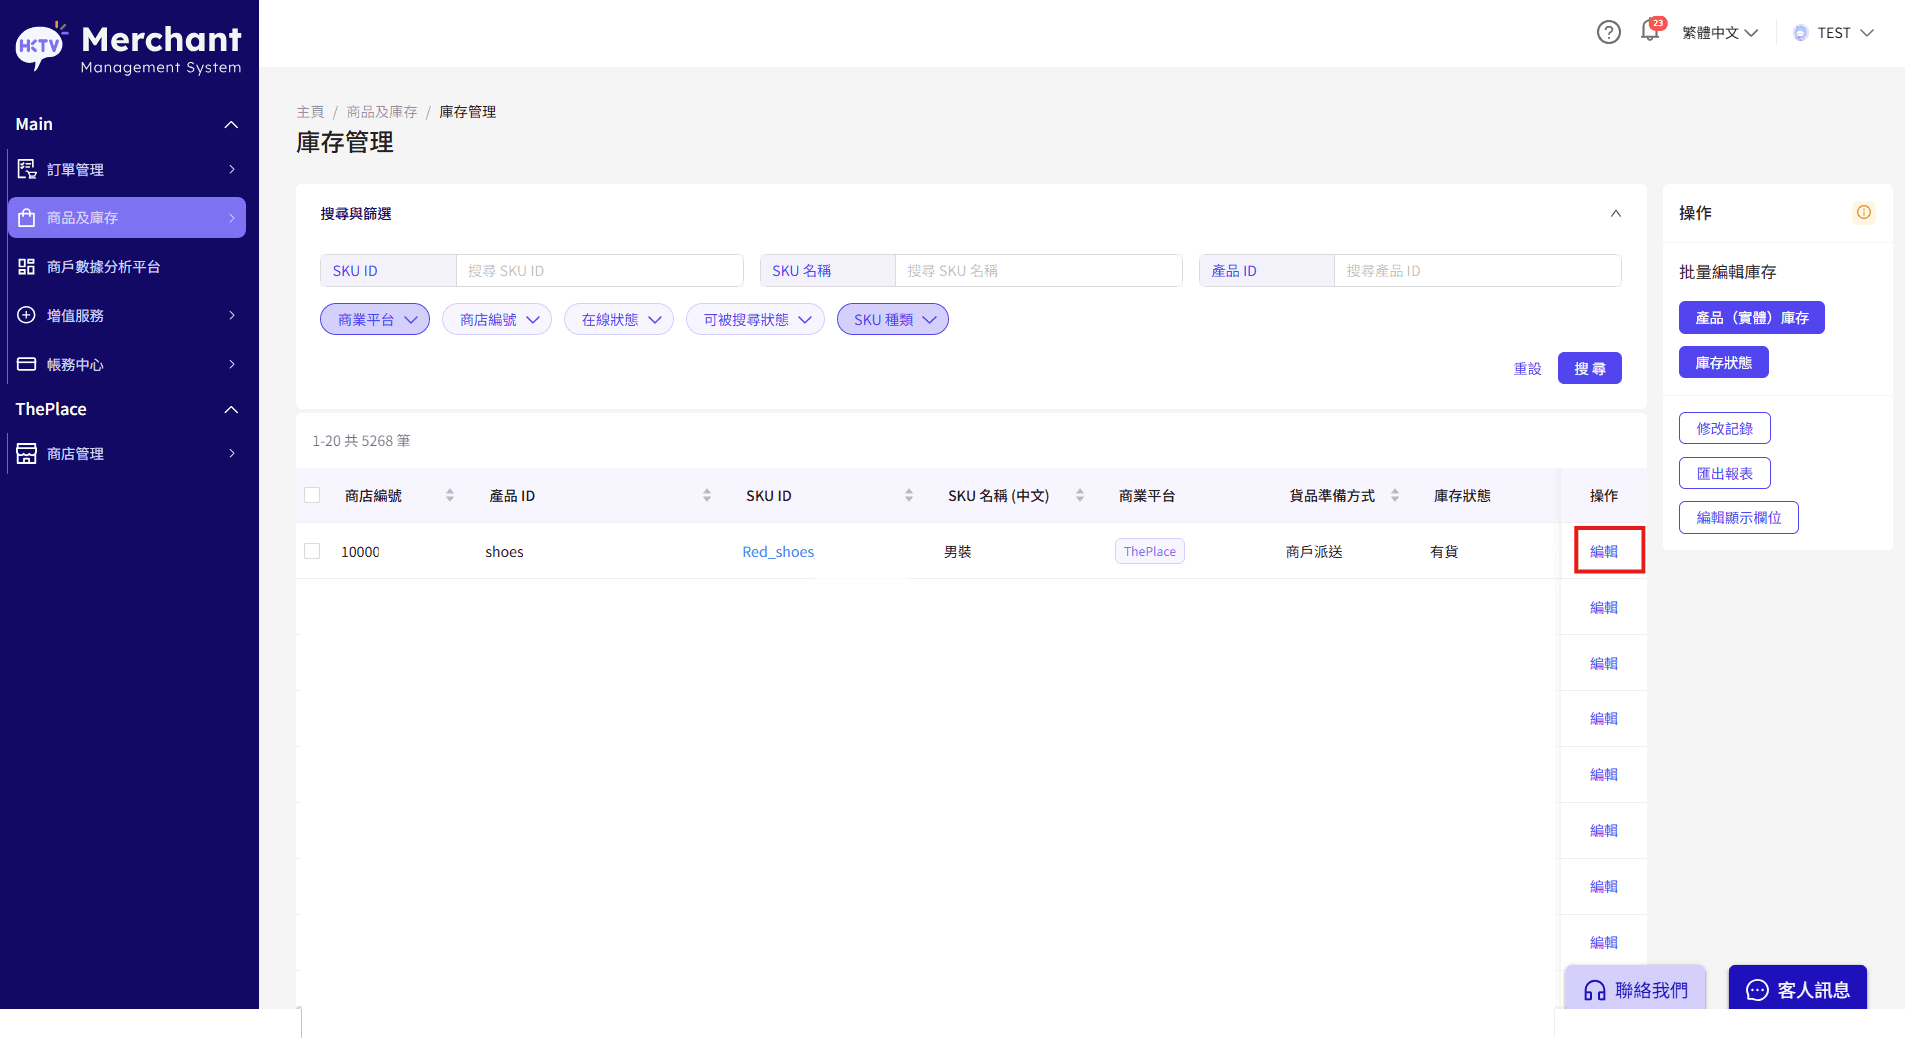
Click "Search" to view all products.
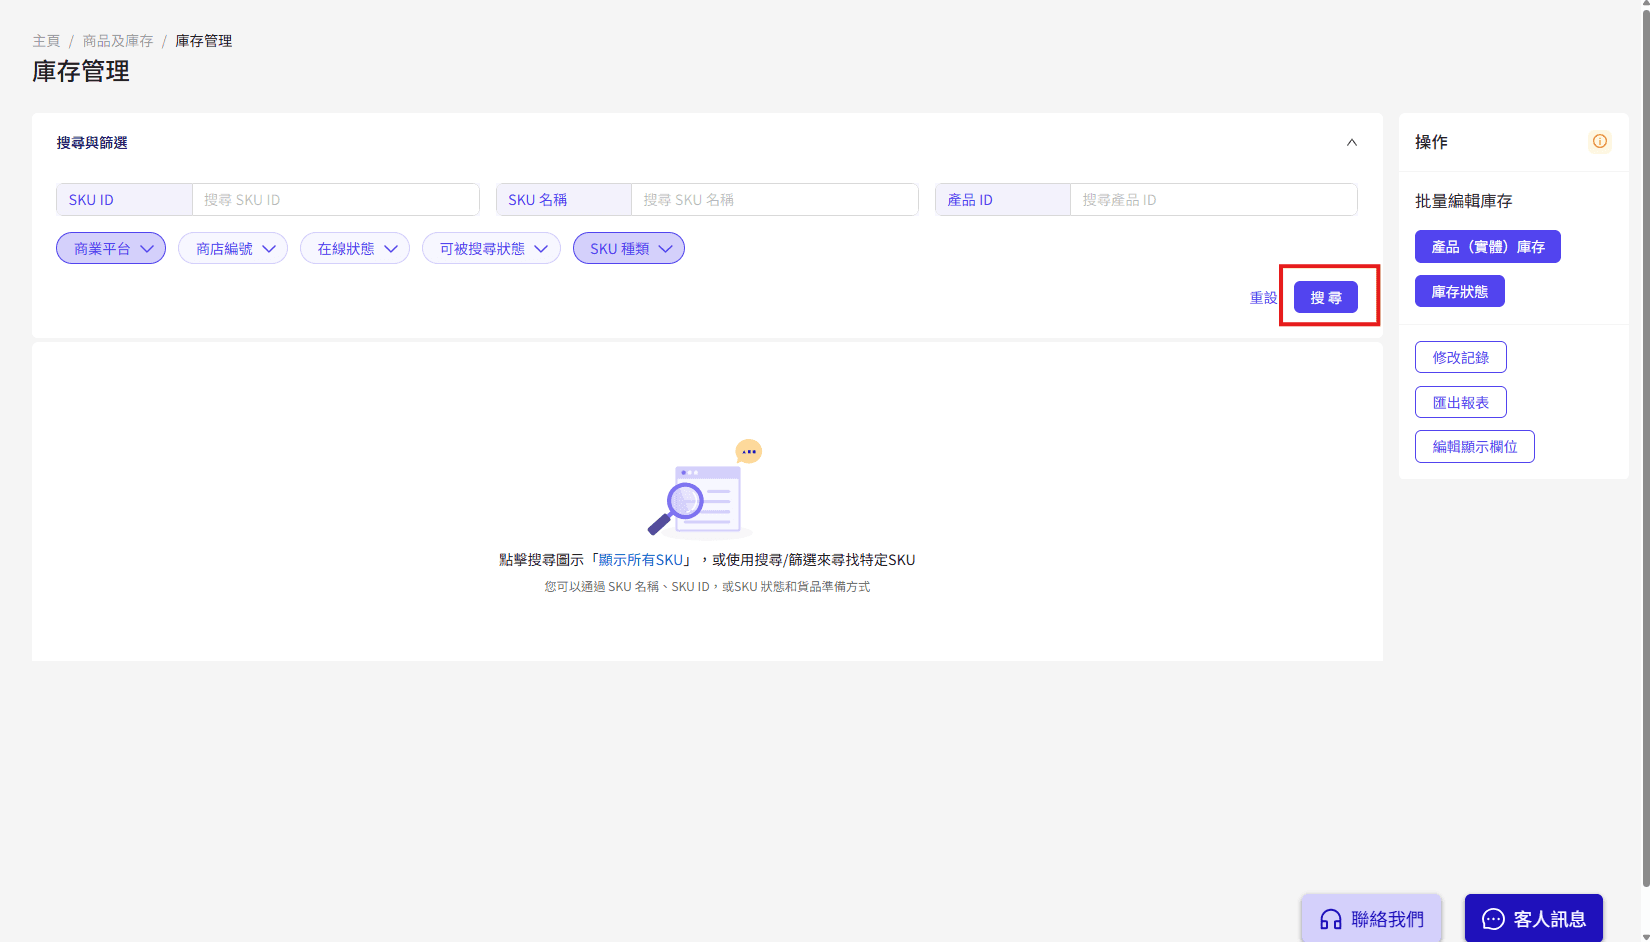
Select the product that needs an inventory update
Click "Edit" to enter the inventory settings page.
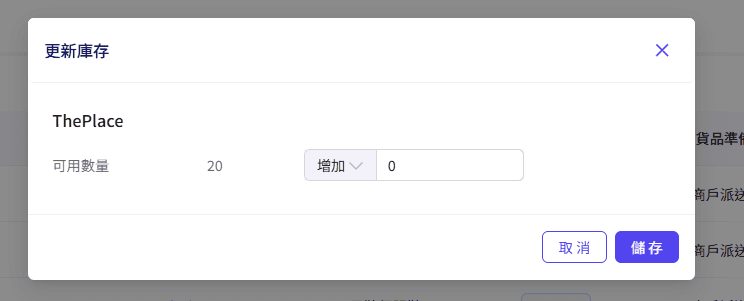
Add: Increase the available quantity in the existing inventory.
Deduct: Decrease the available quantity in the existing inventory.
Set: Change the inventory available for sale (sellable stock).
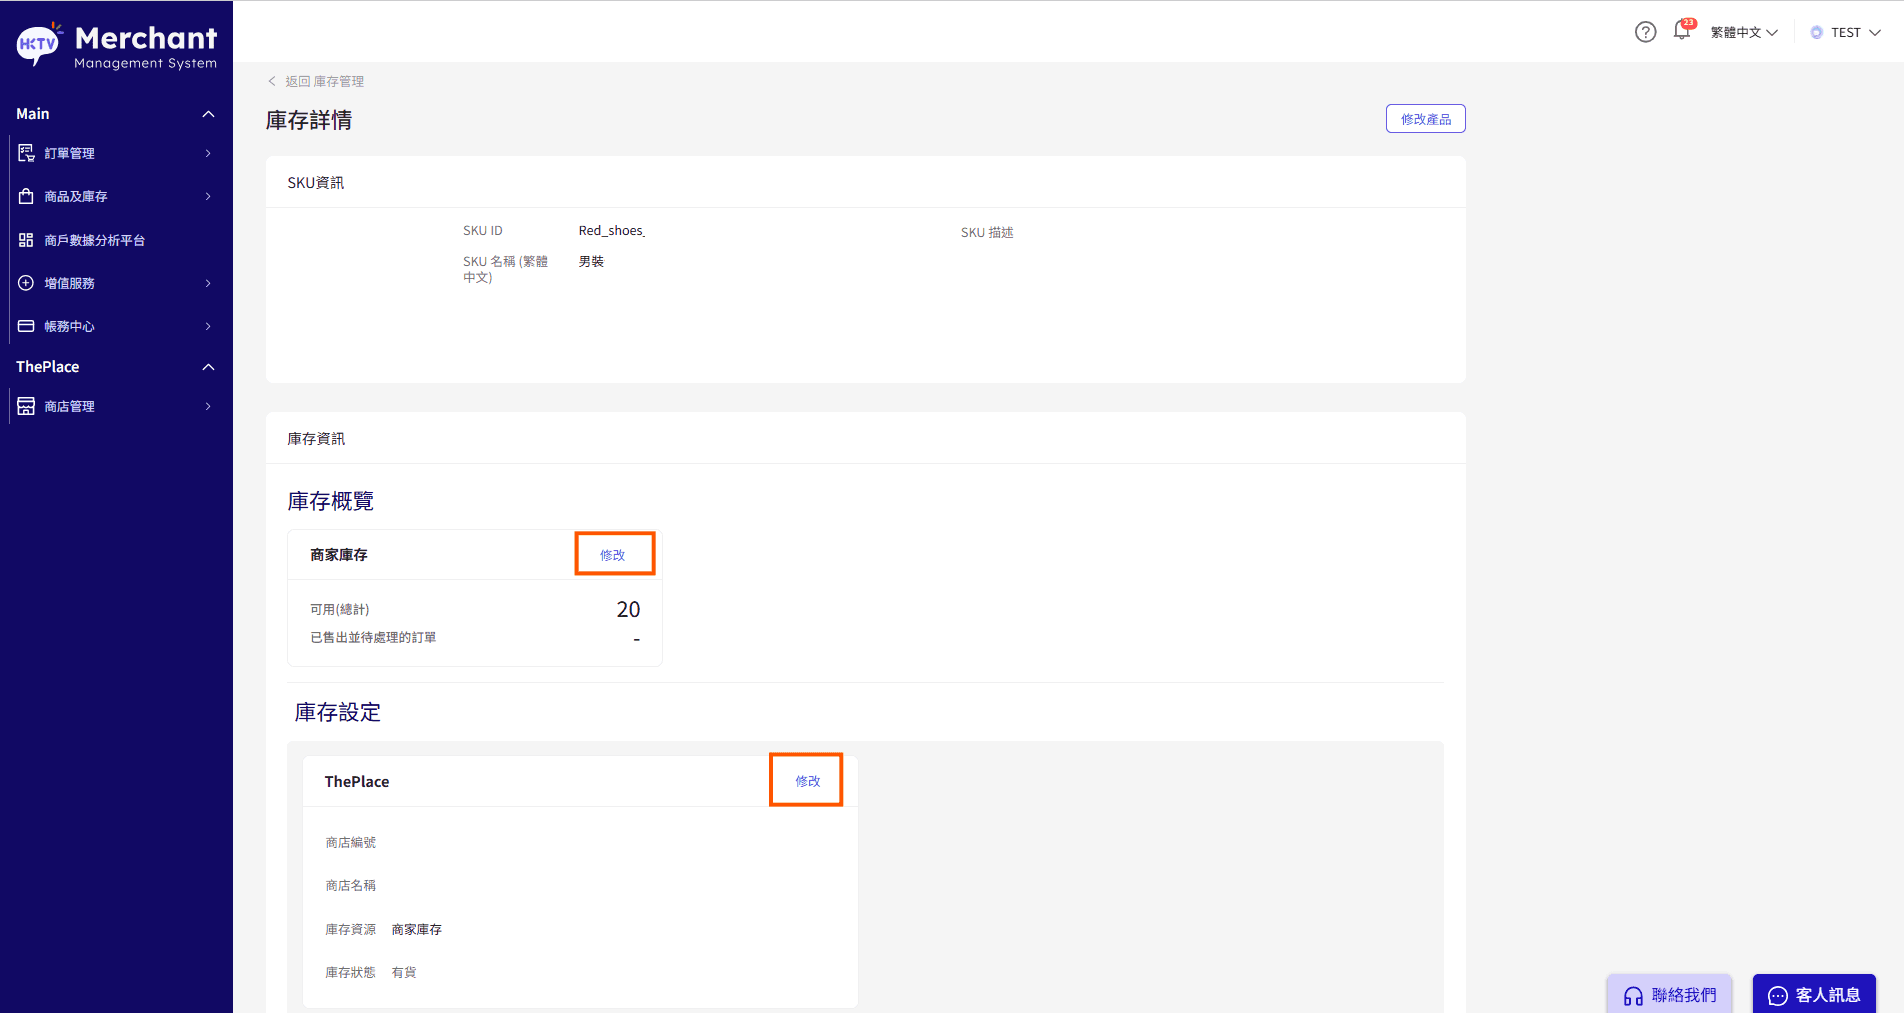
Merchants can also click on the SKU name to access the inventory details page for an inventory overview:
Add: Increase the available quantity in the existing inventory.
Deduct: Decrease the available quantity in the existing inventory.
Set: Modify the inventory available for sale (sellable stock).
Inventory Settings:
Available = Inventory is available for sale.
Forced OOS = Out of stock.
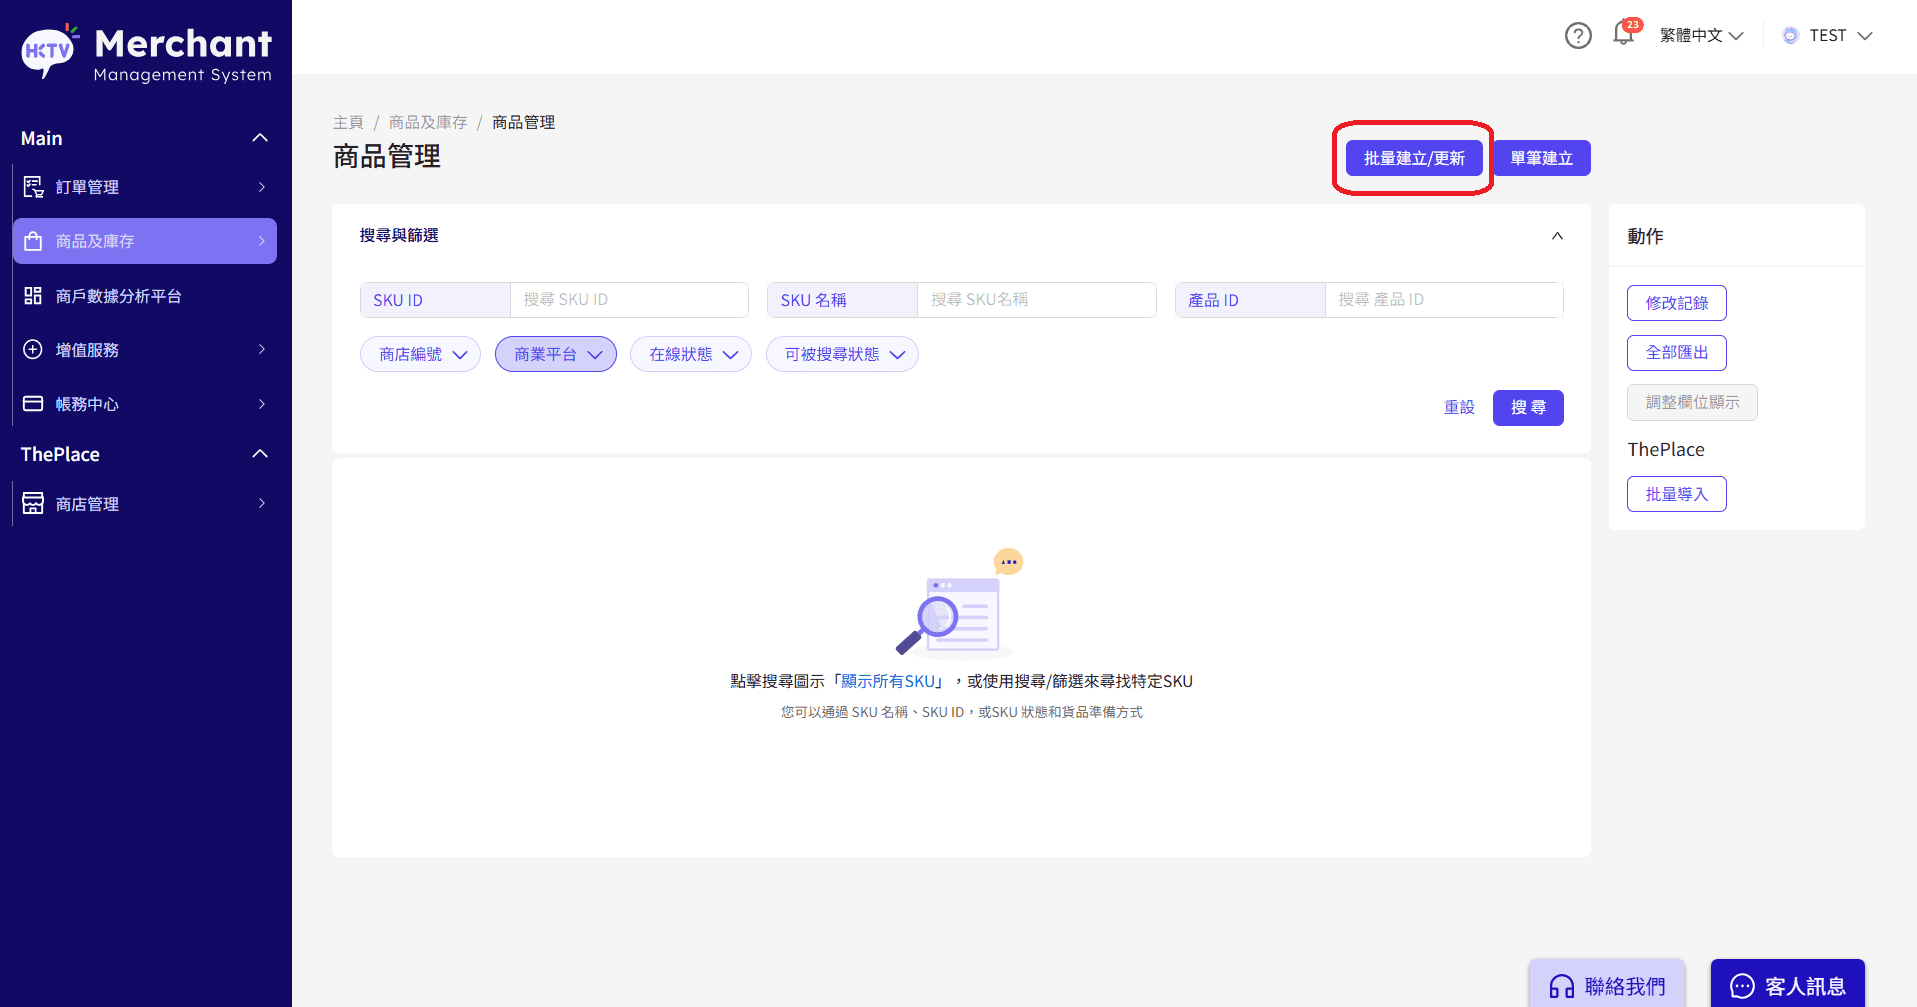
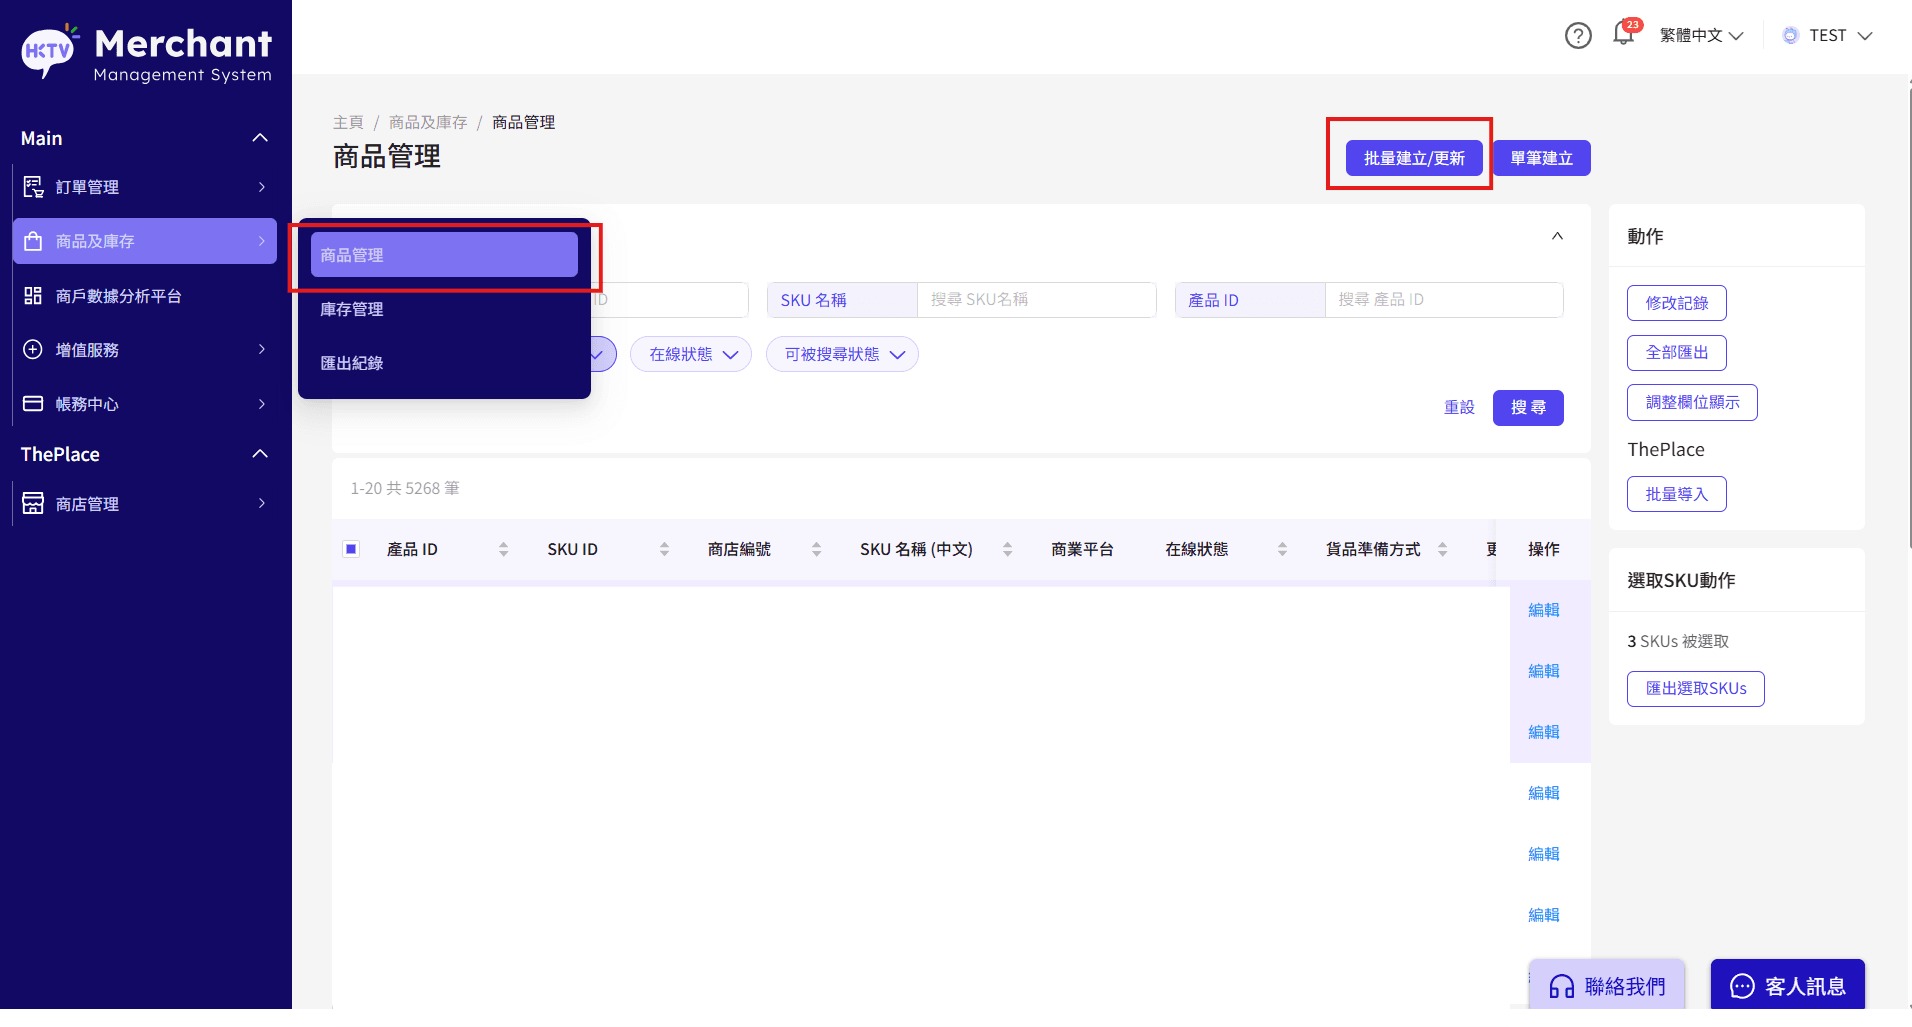
Batch create products
Click the "Batch Upload/Edit" button to upload product files
*Merchants from HKTVmall and Shopline platforms can apply Product Clone to ThePlace. If you are an existing HKTVmall merchant/Shopline user, you can contact your RM or email to enquiry@theplace.shop to assist.
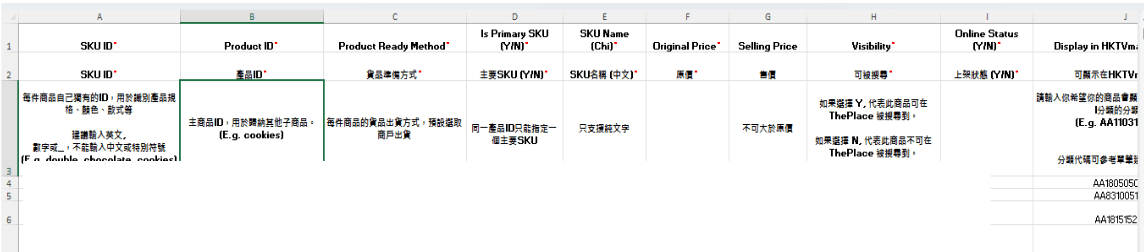
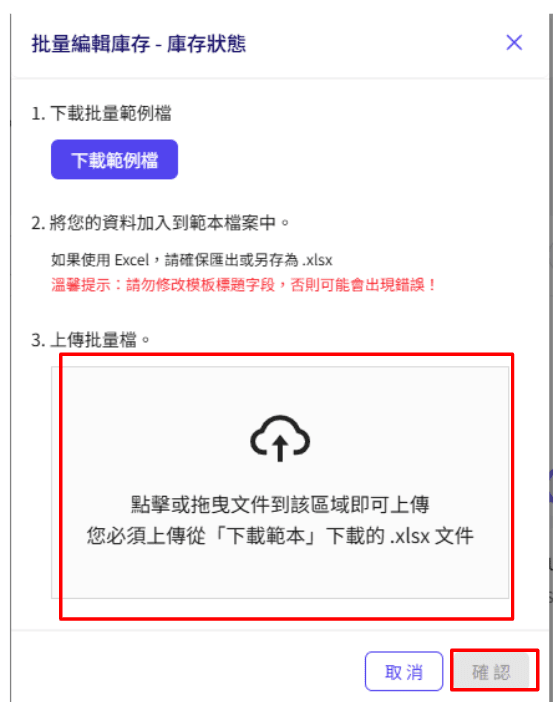
In the batch option layout 1. Click "Batch Create" and select the store number [1000xxxxS] 2. Press "Next" 3. Click the "Download Sample File" button to obtain the latest version of the template
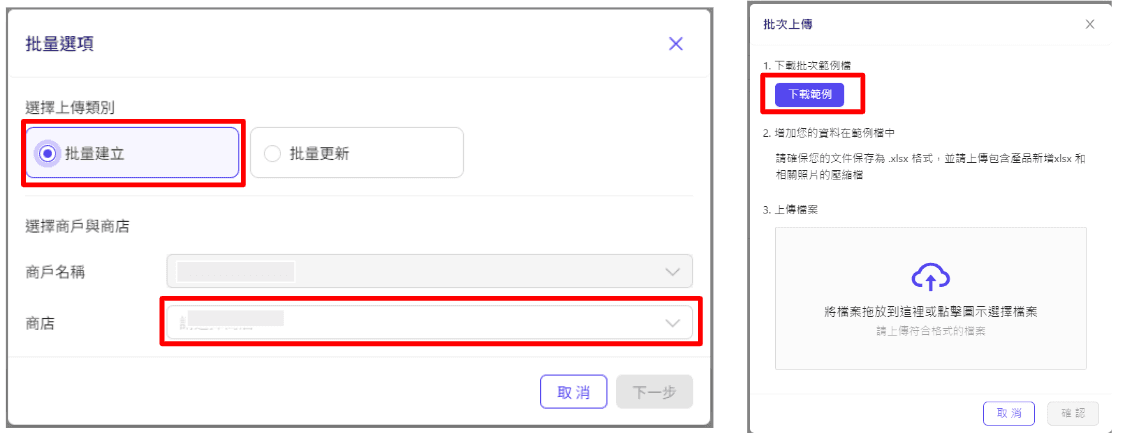
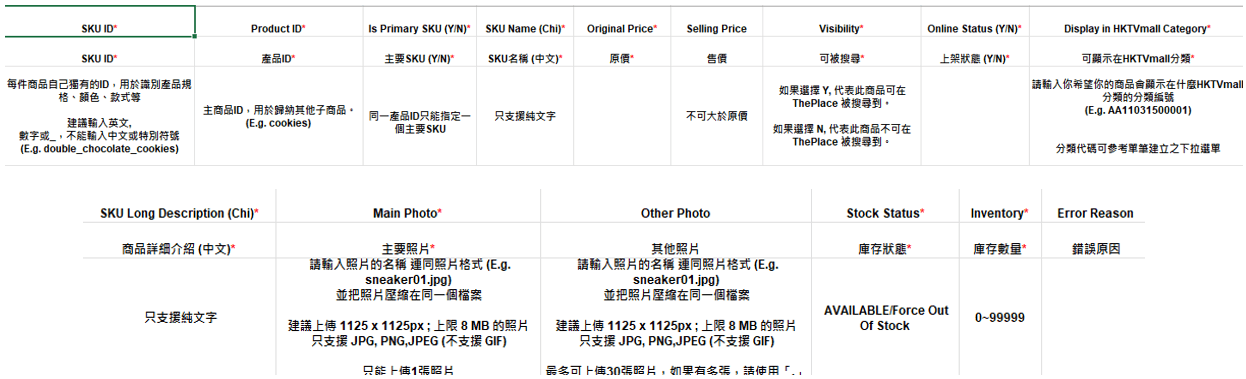
Starting from the fourth row (the maximum limit of each upload is 200MB) * is a required item
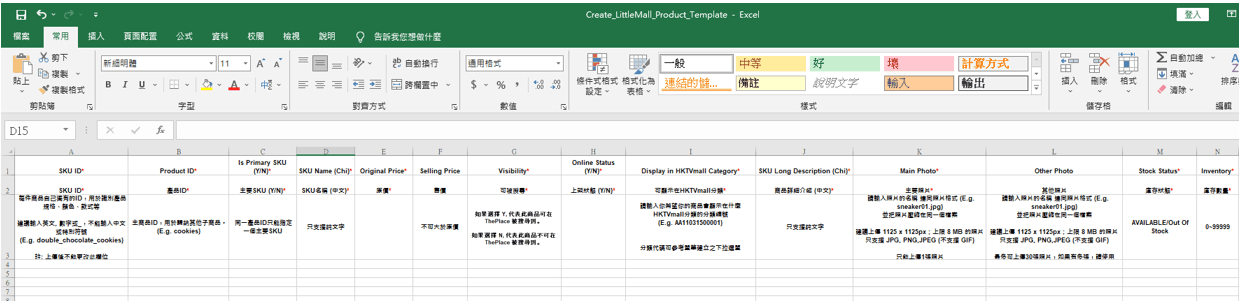
View the HKTVmall classification code in column J: Open the "Product Classification Code" form https://shorturl.at/dqvEQ (This table commission rate does not apply to "ThePlace"). Click the pages of different categories to view the corresponding "Product Classification Code" and copy 1 "Product Classification Code" to column I* You can select up to 3 HKTVmall categories, separated by comma ","
In *Main Photos and other Photos columns, please enter the photo name (the input format must be xx.jpg/png/jpeg)* as required items
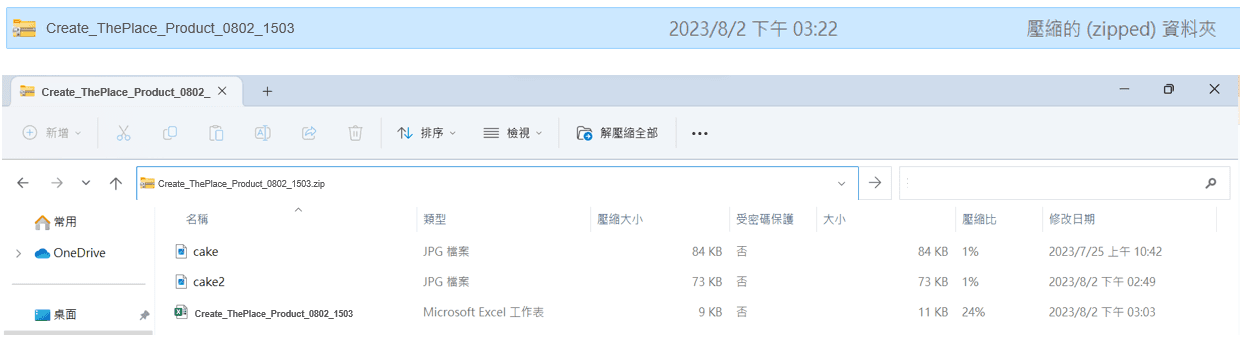
Compress Excel and photos into a file.
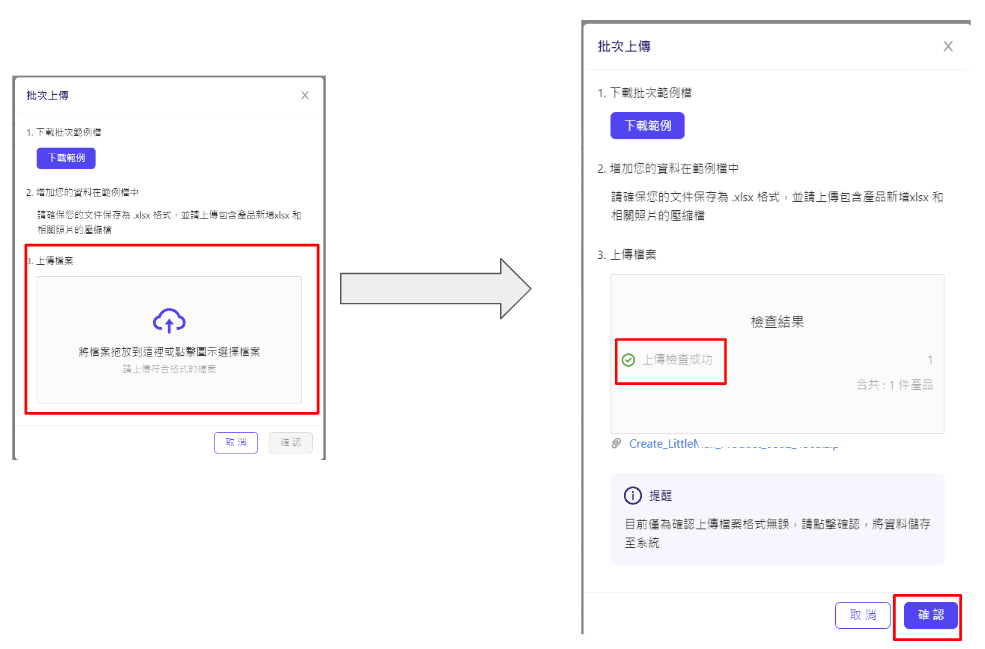
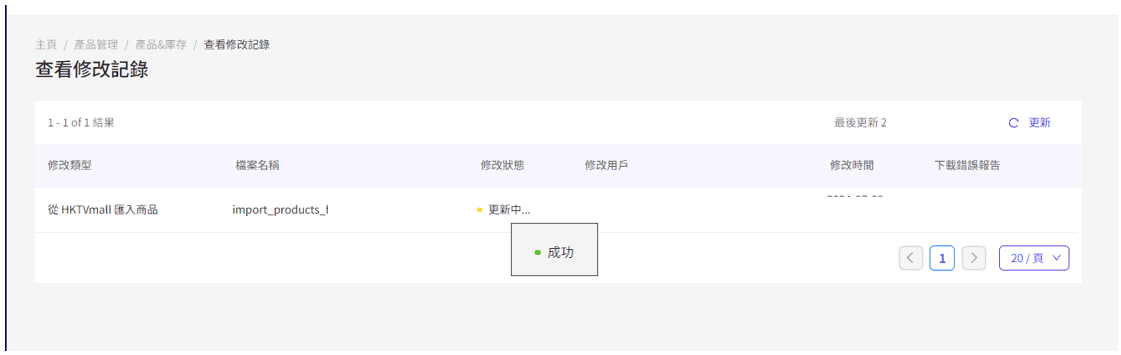
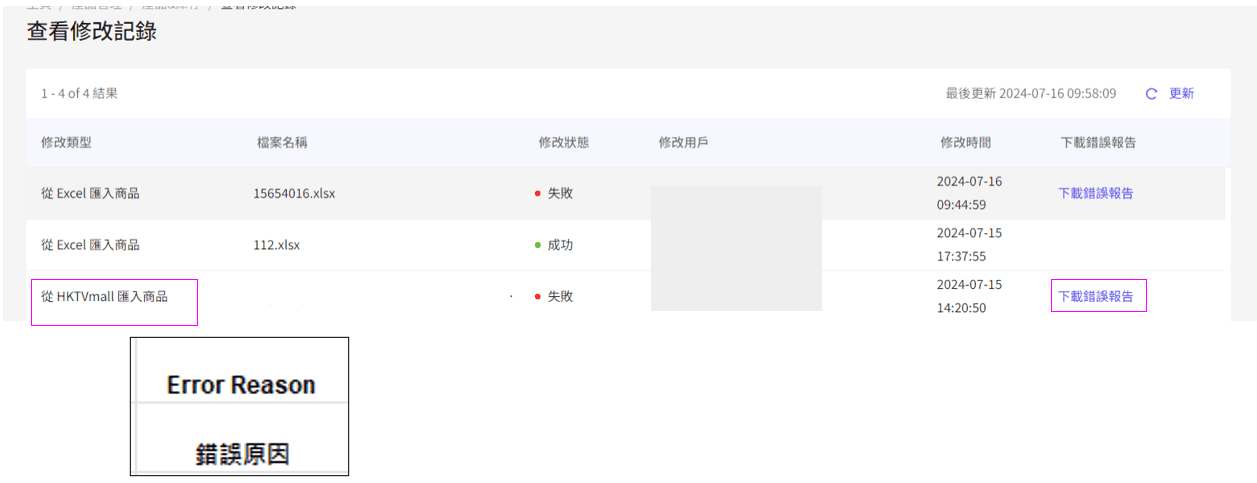
After confirmation, it will jump directly to the "View Modify Record" page. It takes about five minutes to add a new product (depending on file size). If the product is successfully created, you will see the status change to "Success".
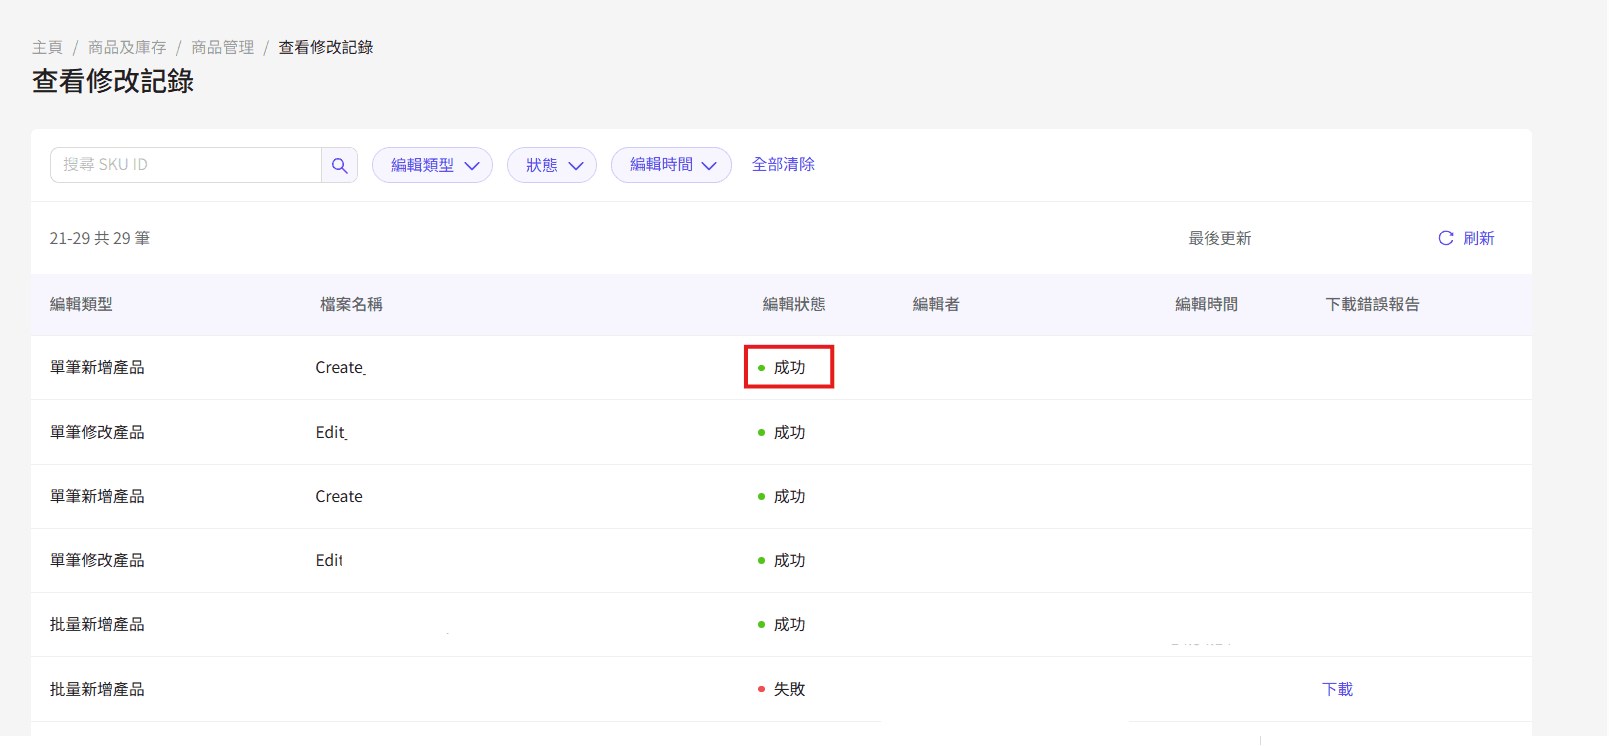
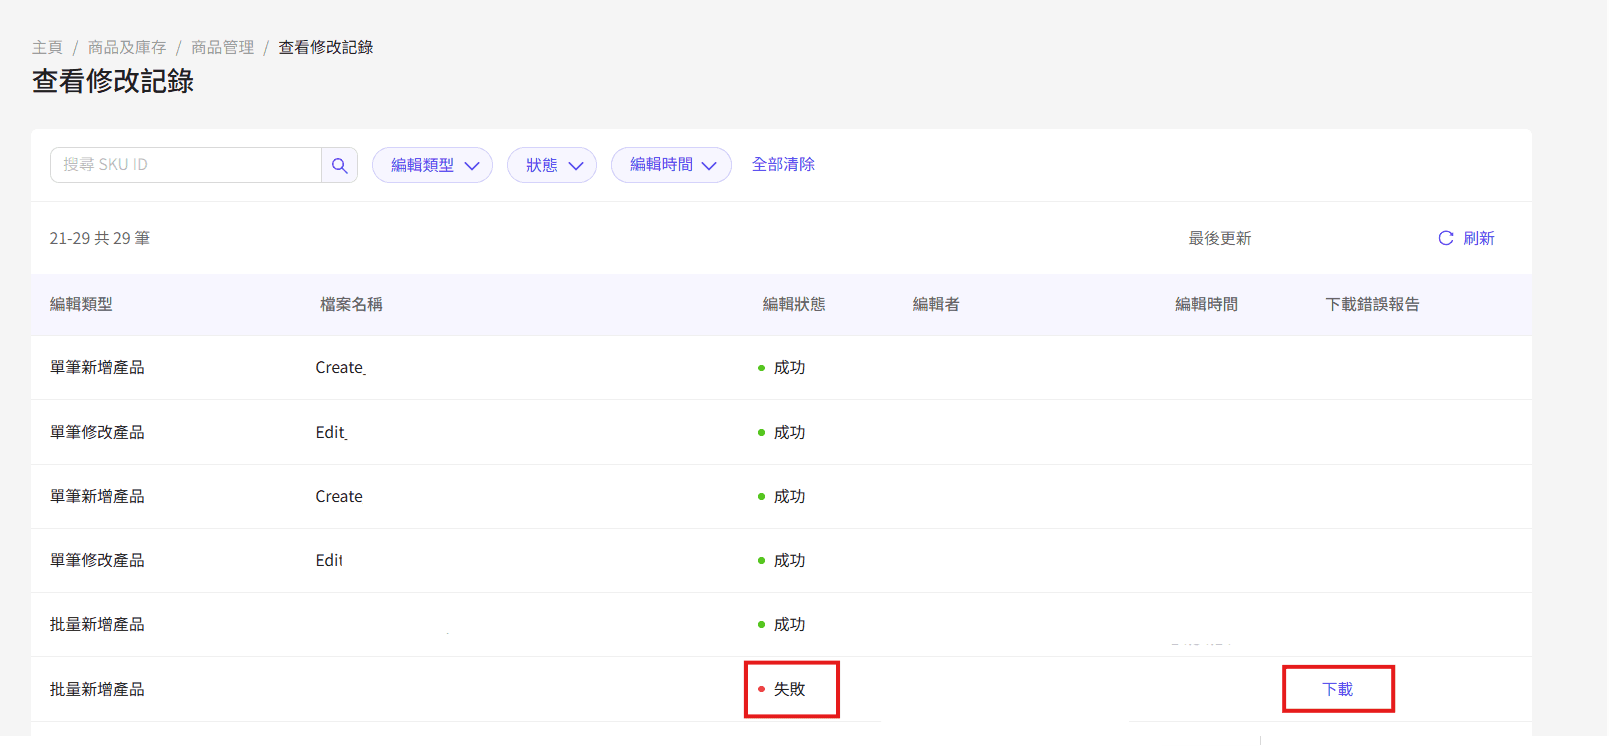
If batch new additions cannot be created successfully, you can download the error report from the View Modify Records page.
Product and inventory management
Modify the product
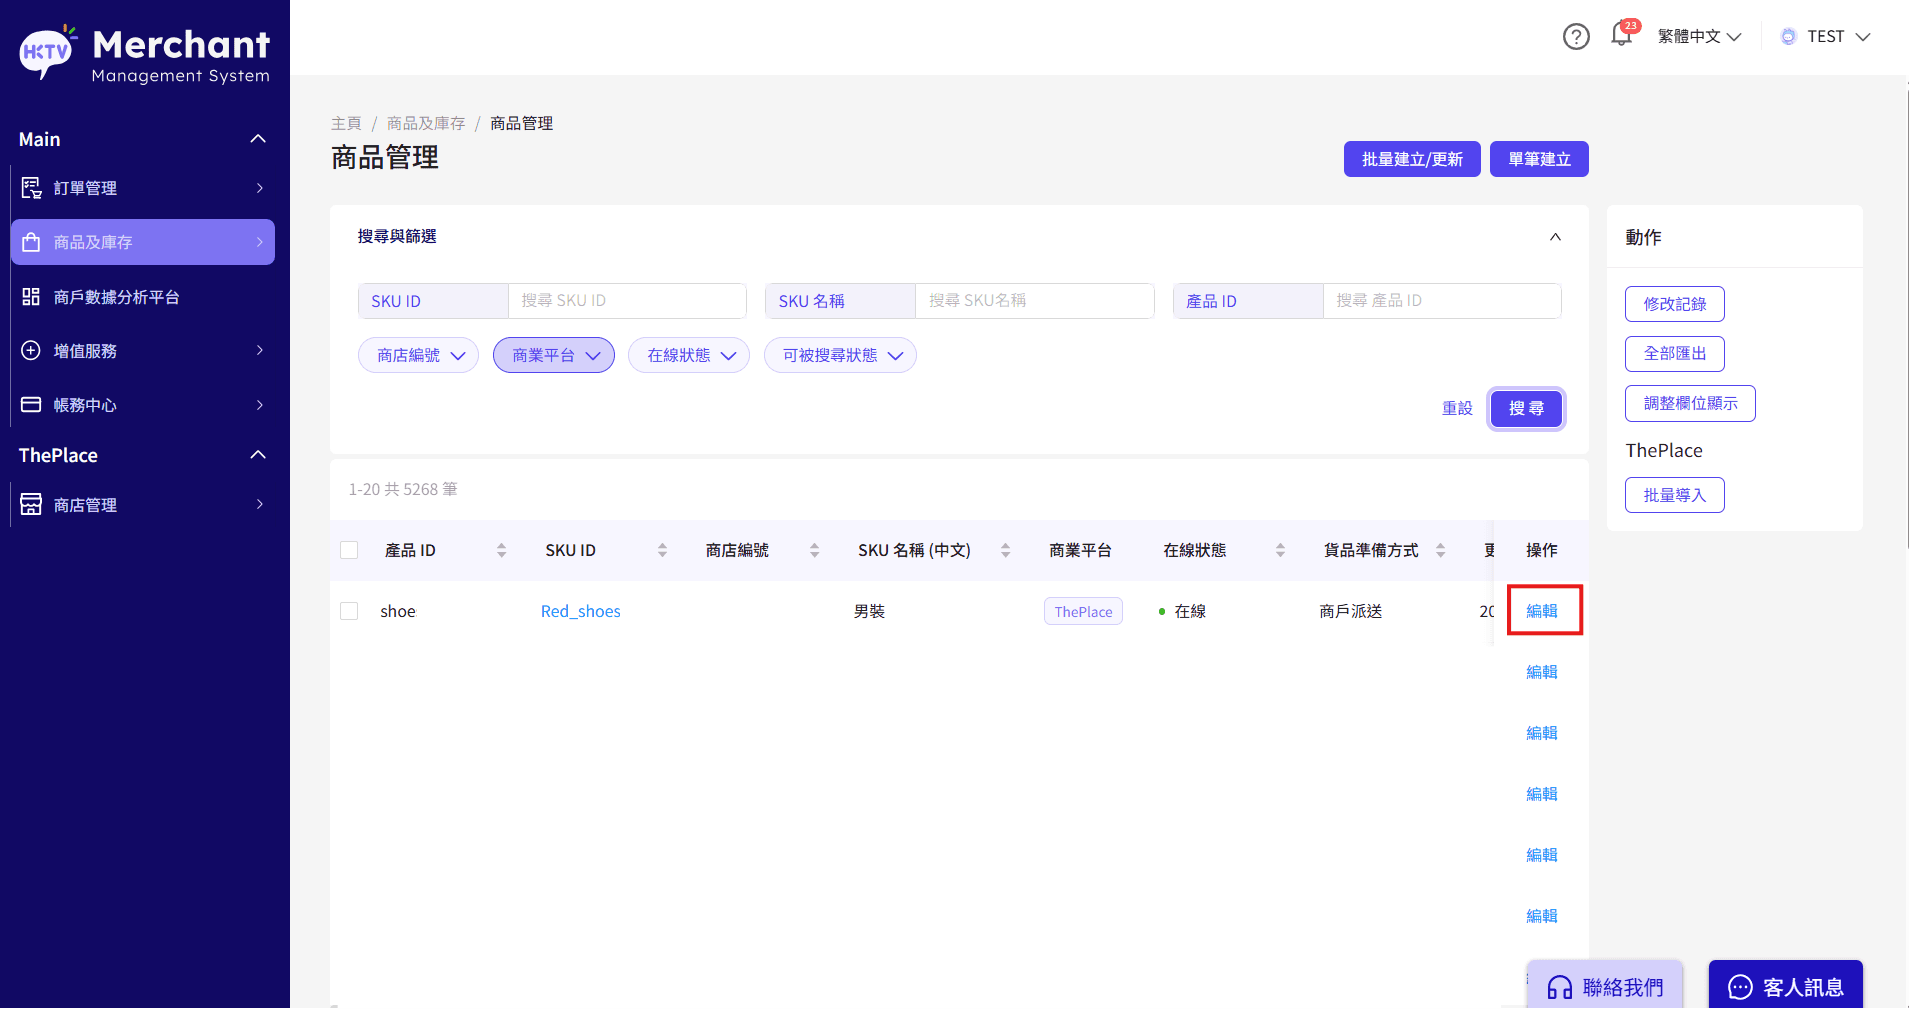
Modify product information 1. Go to "Products and Inventory" > "Product Management" 2. Click "Search" to view all products
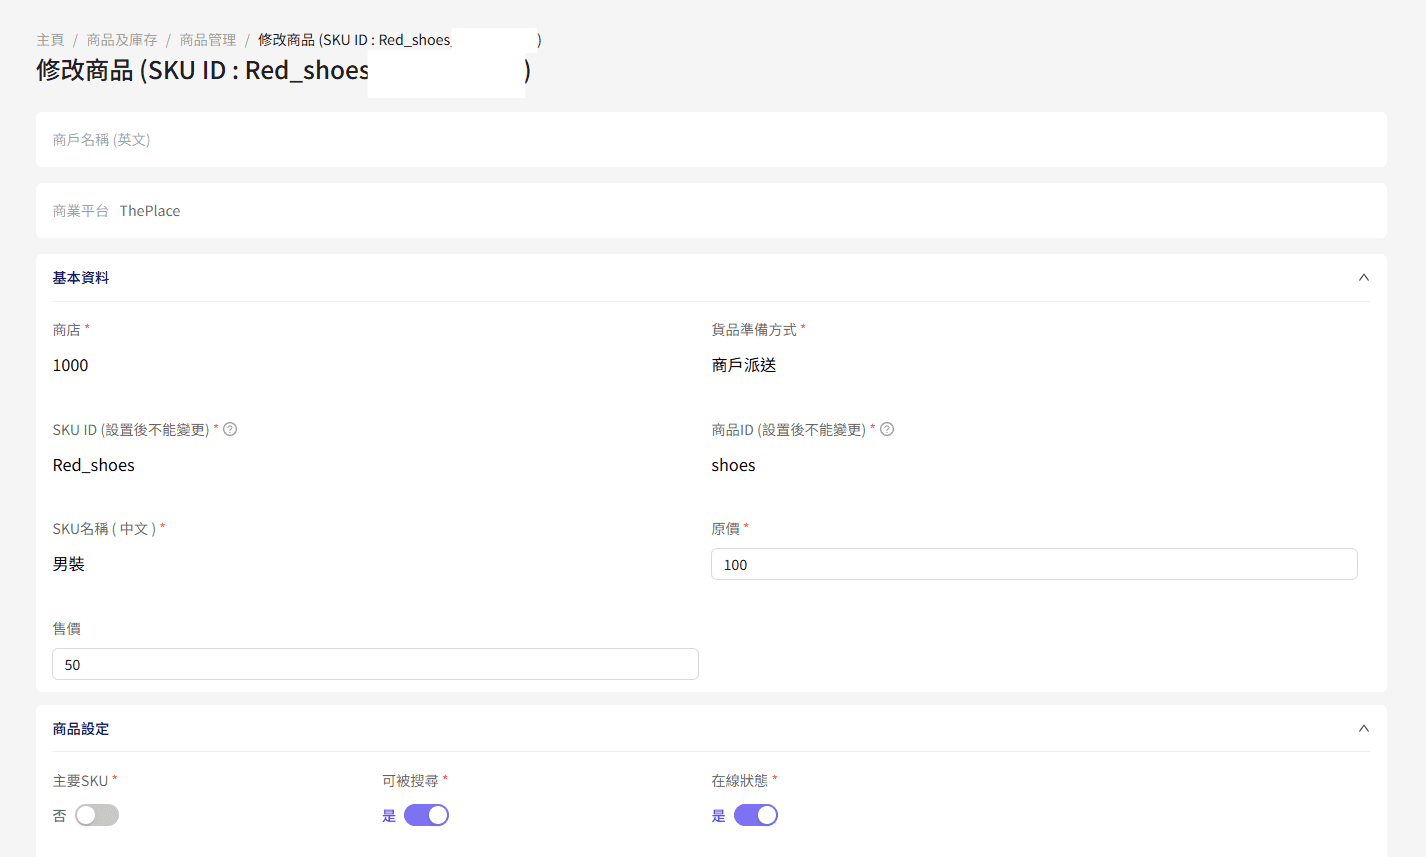
Click "Editor" to change product details
Product information 1. Product information can be modified (SKU name, original price, selling price, product description, etc.) 2. Product settings (can be searched, online status, etc.) * Products with established product specifications, the SKU name needs to be modified from the main SKU
Modify inventory
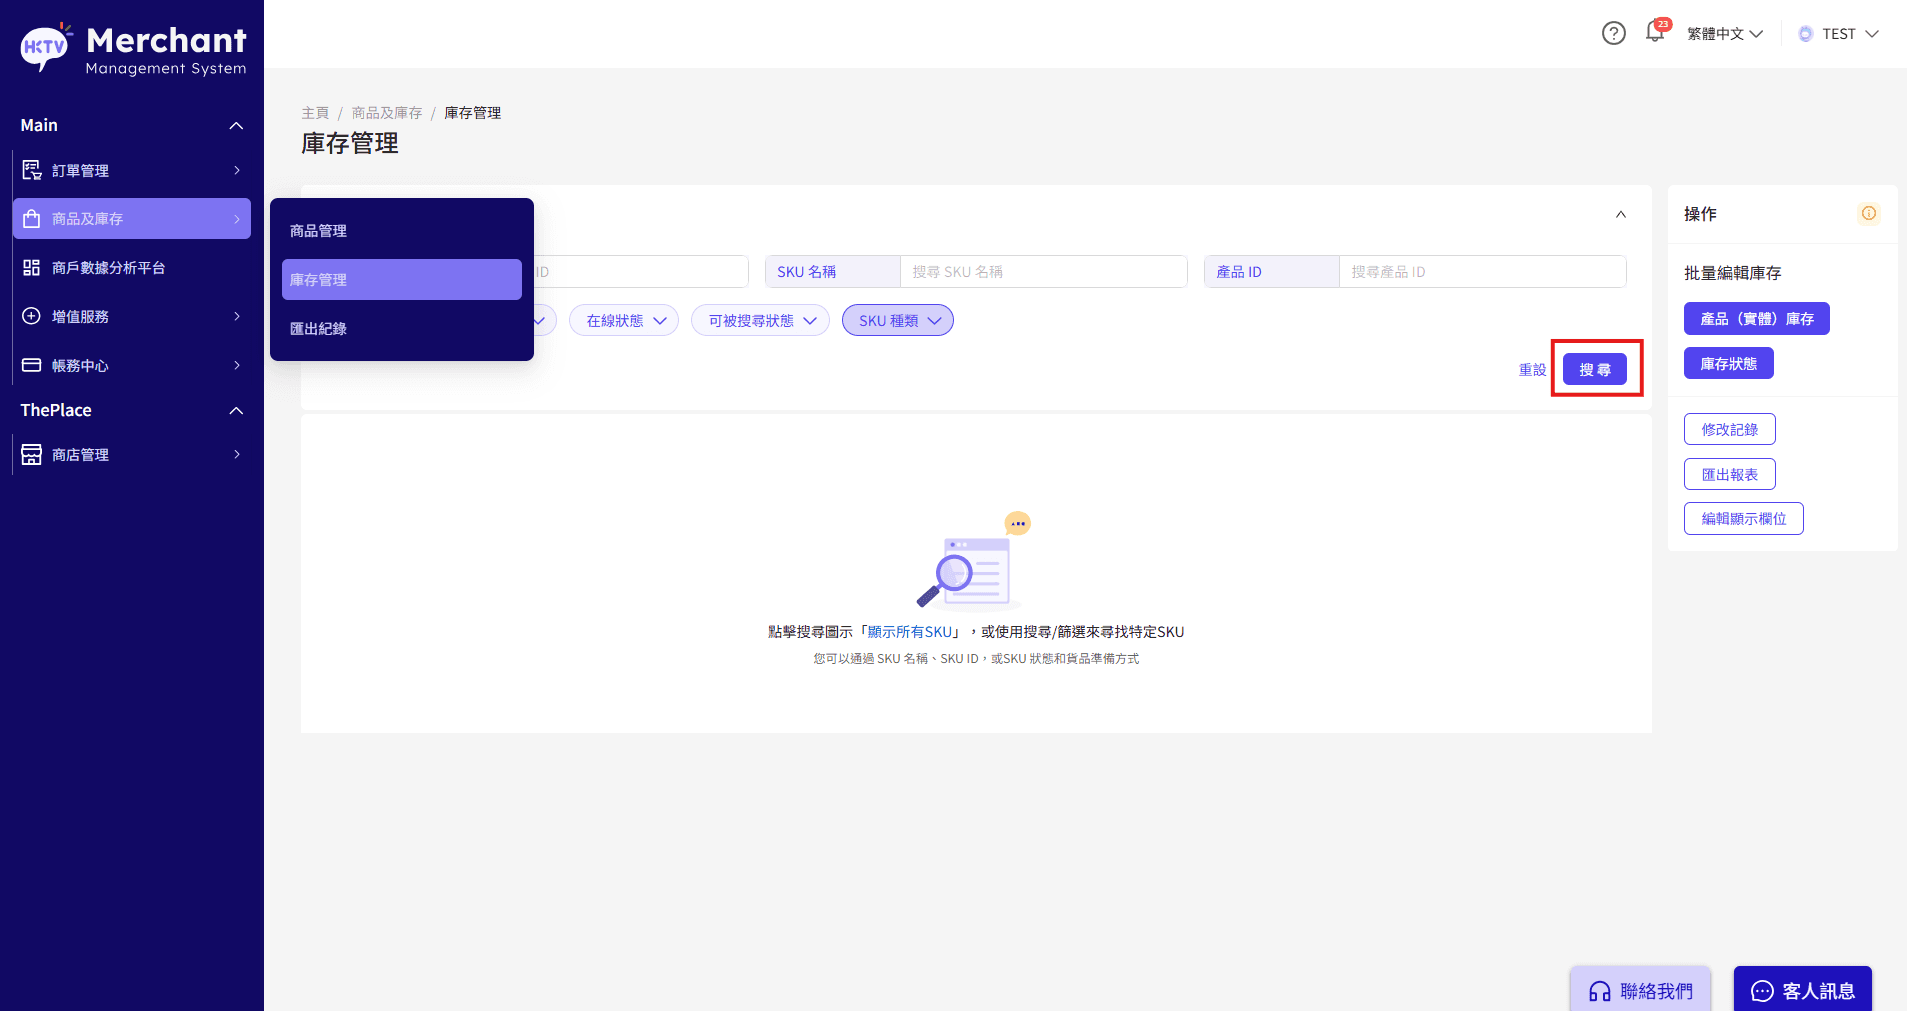
Change inventory quantity Go to "Products and Inventory" > "Inventory Management" Click "Search" to view all products
Select the product that needs to be updated in stock and click the "Edit" column to enter the inventory settings page
Add: Increase available quantity in existing inventory Deduction: Deduct available quantity in existing inventory Settings: After changing the available inventory (sellable) is completed, press "Store"
Merchants can also click on the SKU name to provide inventory details page inventory overview: Add: Increase available quantity in existing inventory Deduction: Deduct available quantity in existing inventory Settings: Change stock available (sellable) inventory settings: In stock = In stock available for sale No = Out of stock
Modify records
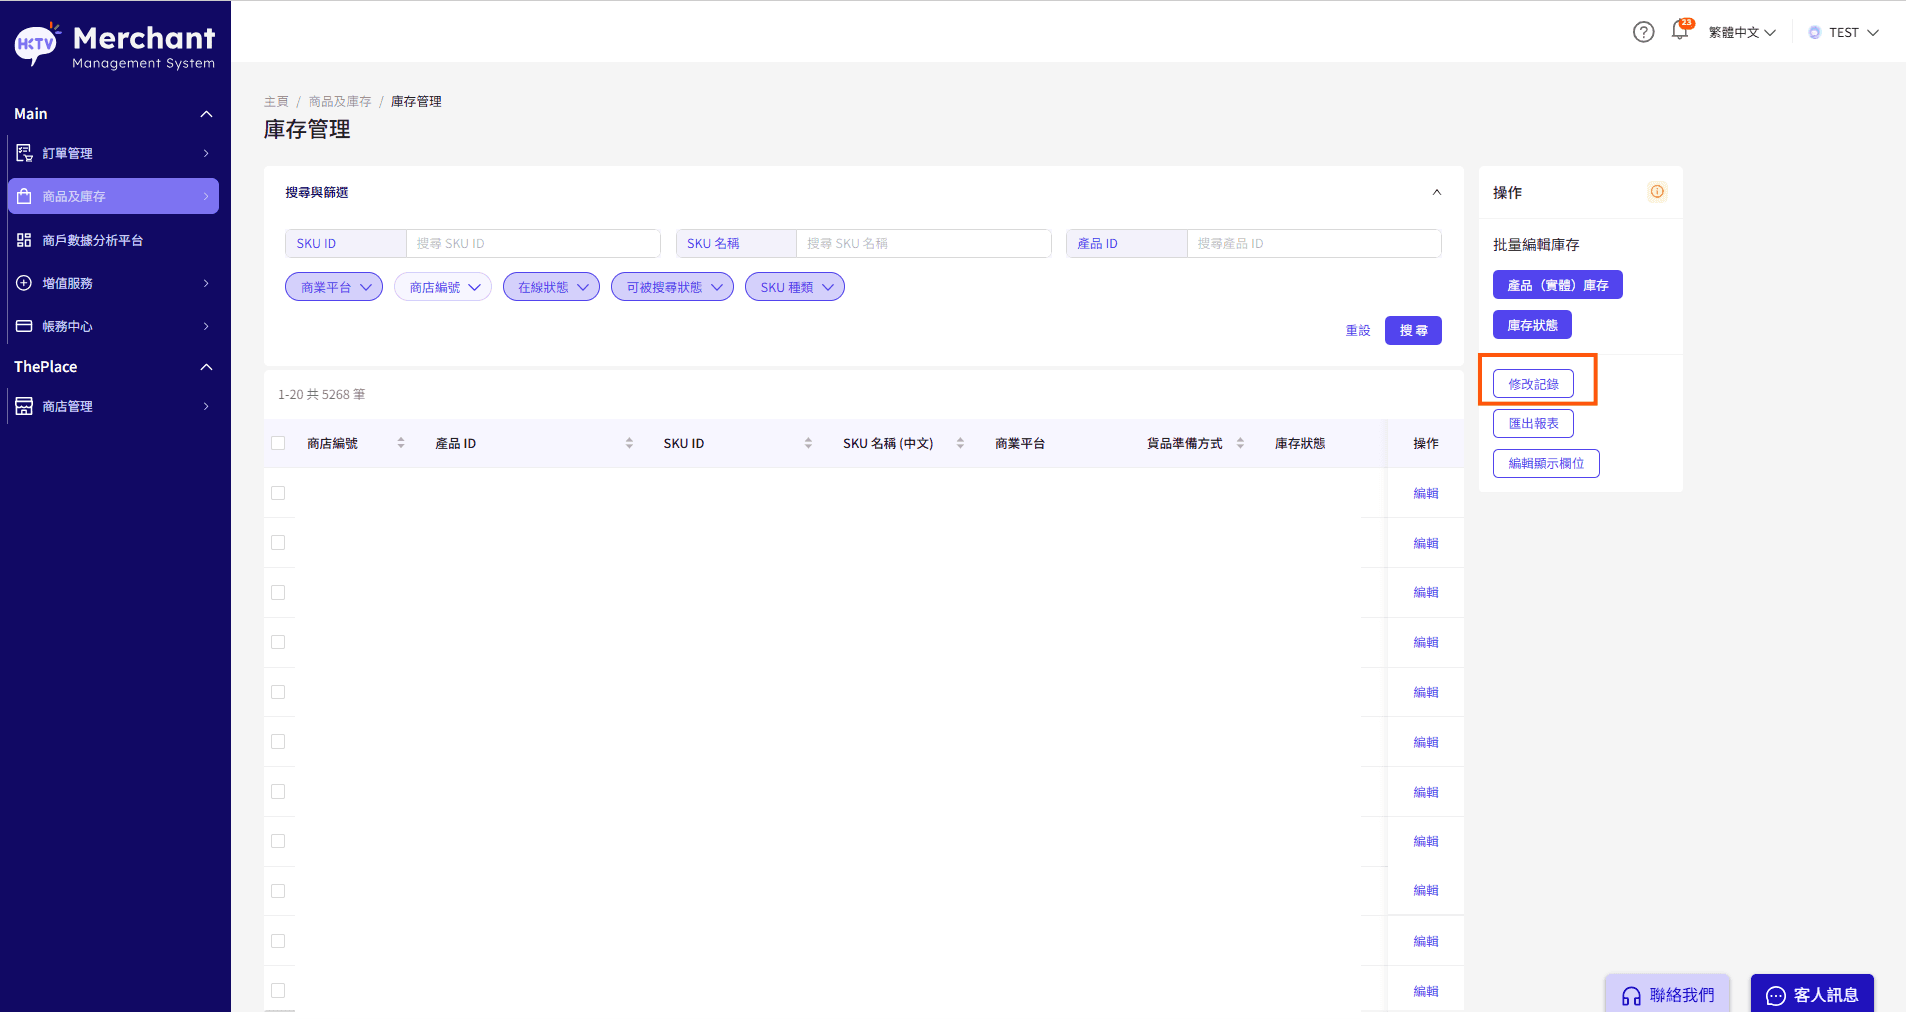
Show Create/Edit Product Record Merchant can check whether the product is created/Edit successfully

Settings on the shelves/deleting shelves
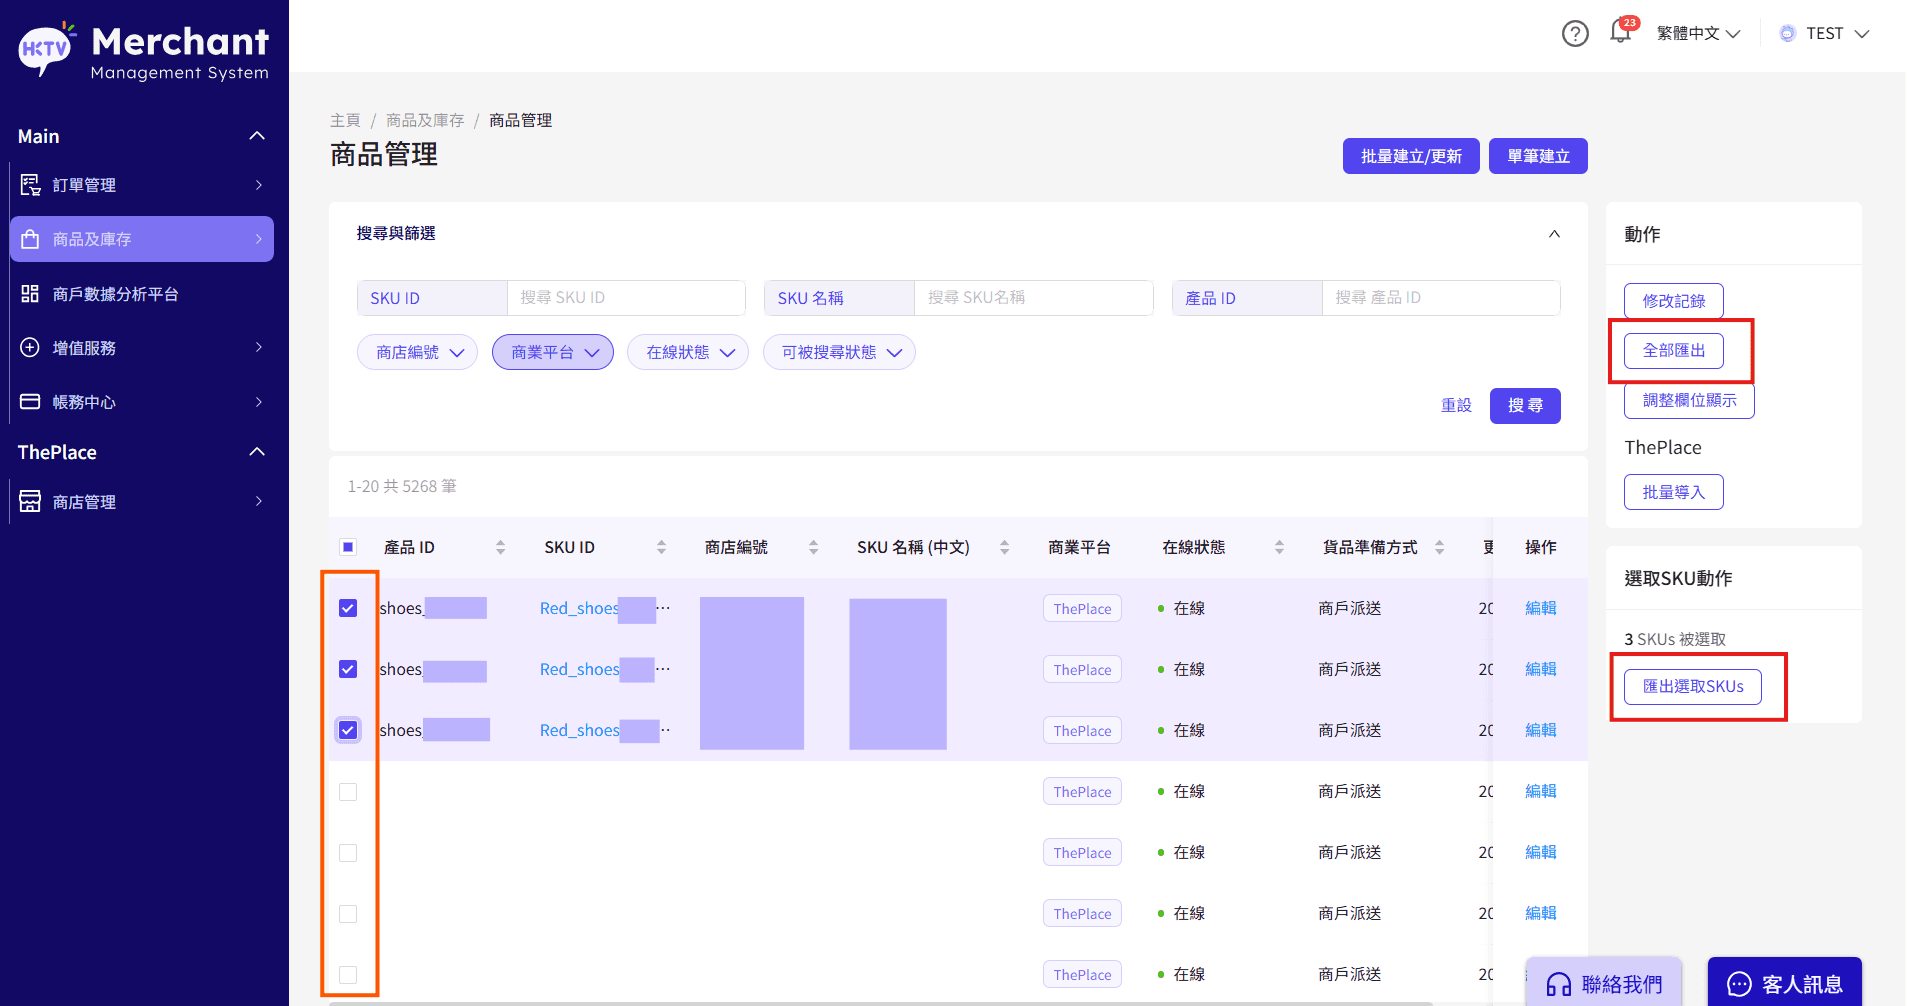
Product and Export Step 1: Enter the product management page and go to [Product and Inventory > Product Management] and press "Export All" / "Export to select SKUs"
Step 2: Modify the downloaded Excel file and enable the downloaded Excel file modification to the updated part that needs to be updated. Prompt: Products that do not need to be modified can be removed before this file.
Step 3: Upload updates in batches and enter the product management page to click "Batch creation/update"
Step 4: Confirm the import in [Select Upload Category > Merchant Name] Select the store number [1000xxxxS] Press "Next" to go to [Batch Update] to upload the updated file and press "Confirm"
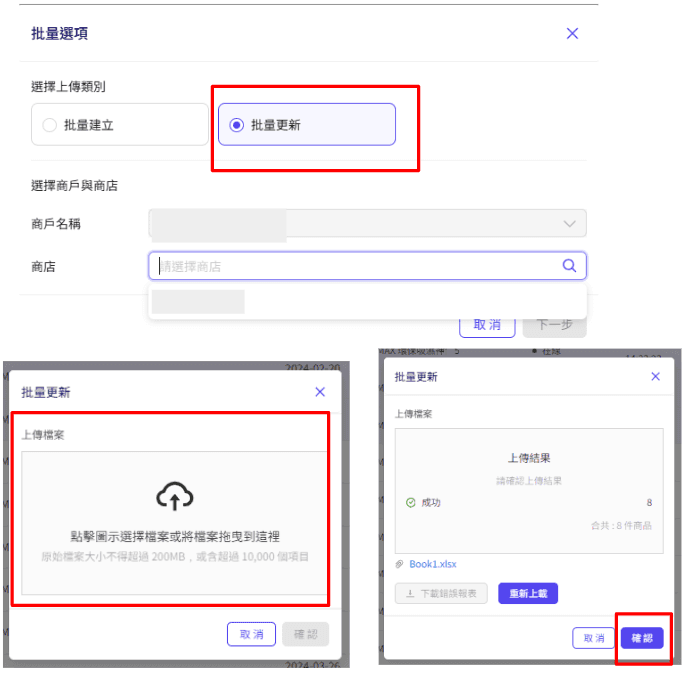
Step 5: After confirming the viewing record, it will jump to the "View Modify Record" page and the status will be transferred from "Updated" to "Success" after completion.
Enter the [Inventory Management] page and go to [Commodity and Inventory > Inventory Management] to select the settings that need to be updated to batch edit product inventory: Product (entity) Inventory batch edit inventory status (In stock/force out of stock): Inventory status
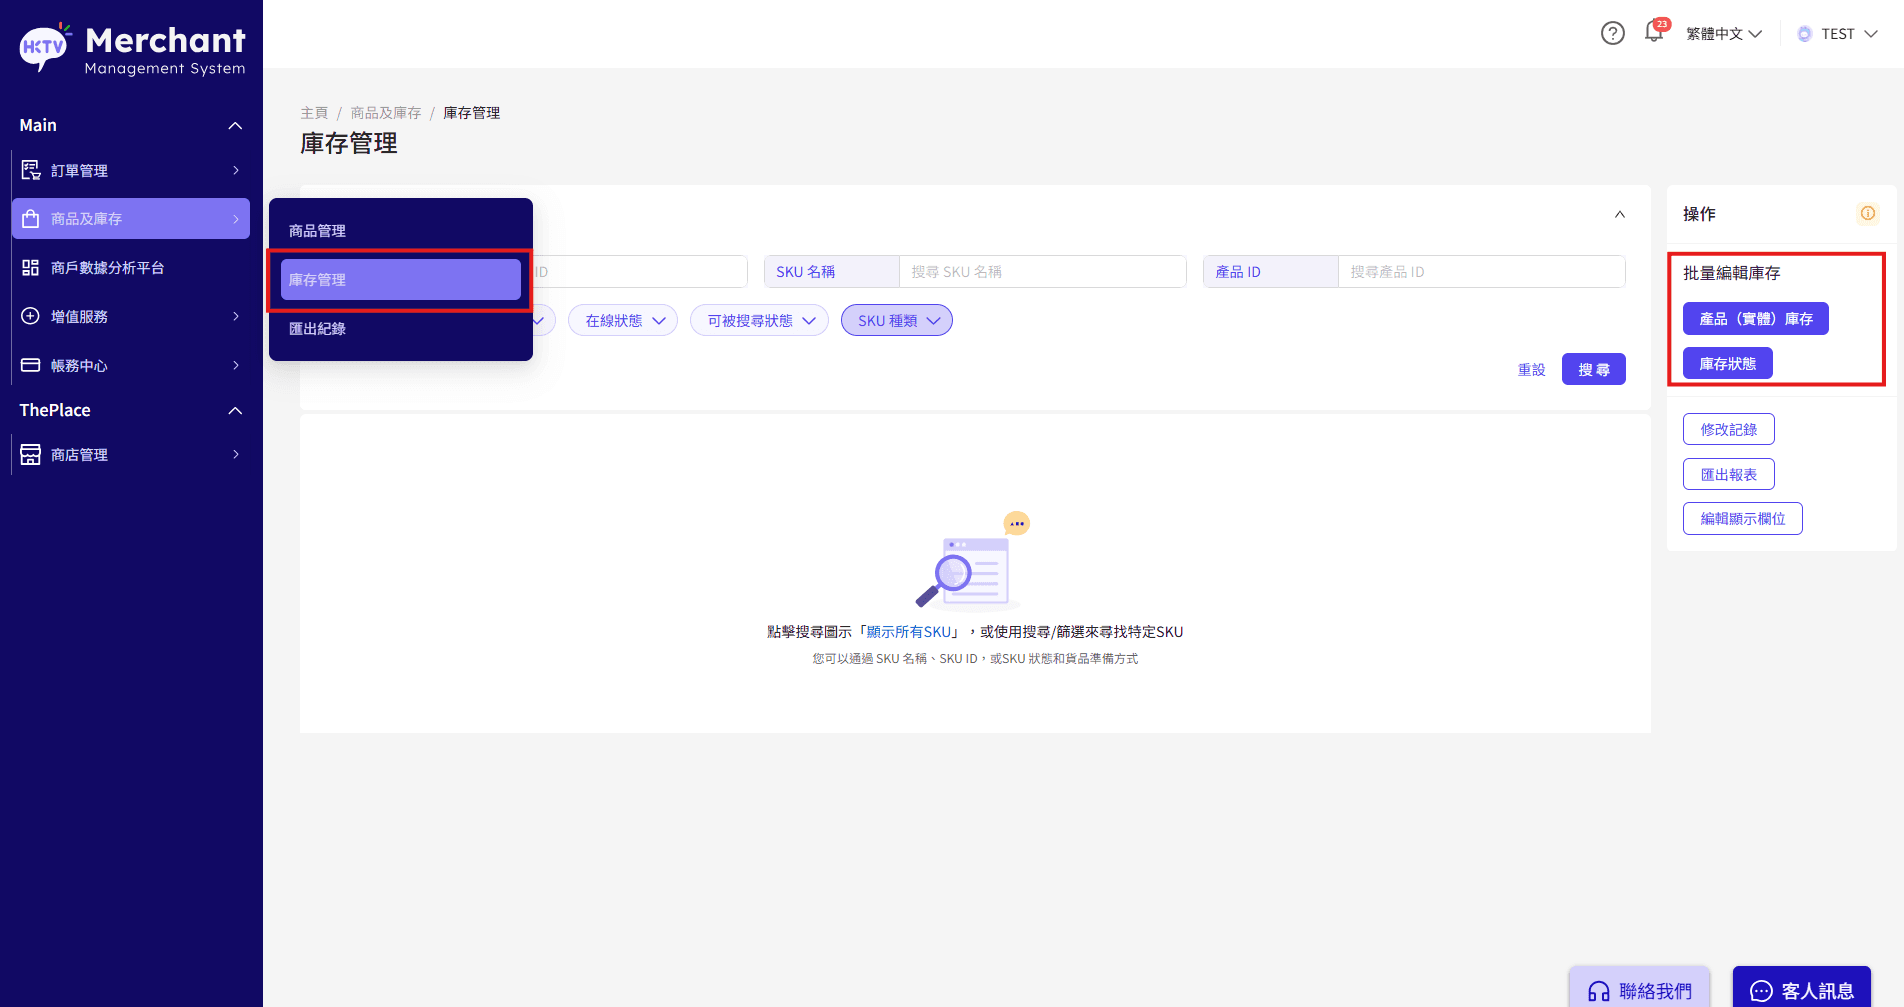
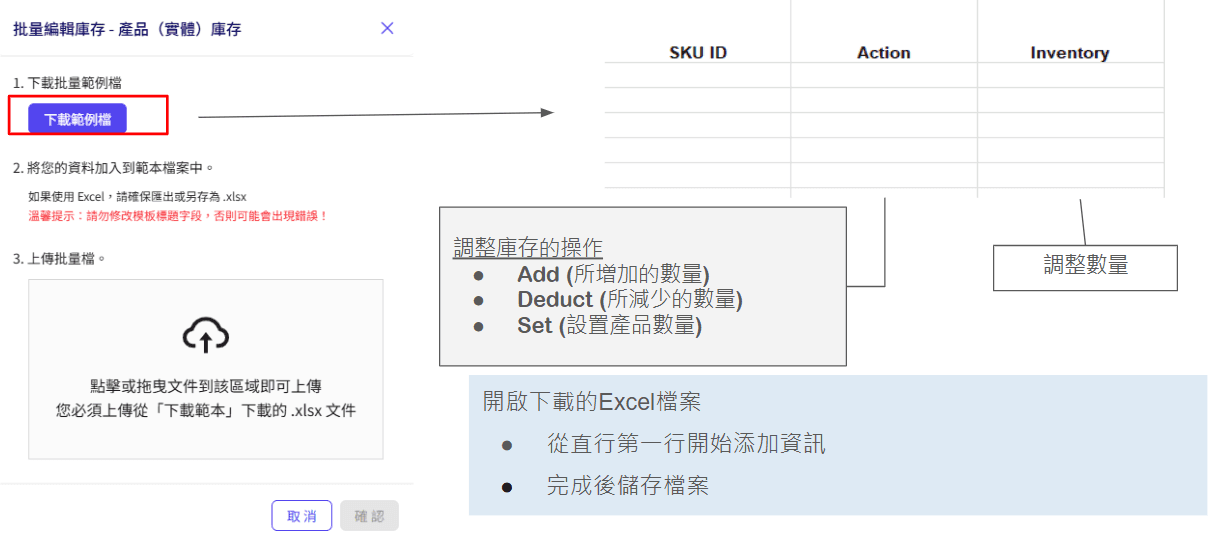
Batch editing of product inventory: Product (entity) inventory
Enter batch edit inventory - Product (entity) Inventory Select Store Number [1000xxxxS] Click [Next] Download the sample file to open the downloaded Excel file. Start from the first line of the direct line to add information. After the file is completed, the file is adjusted. Add (increased quantity) Deduct (increased quantity) Set (set product quantity)
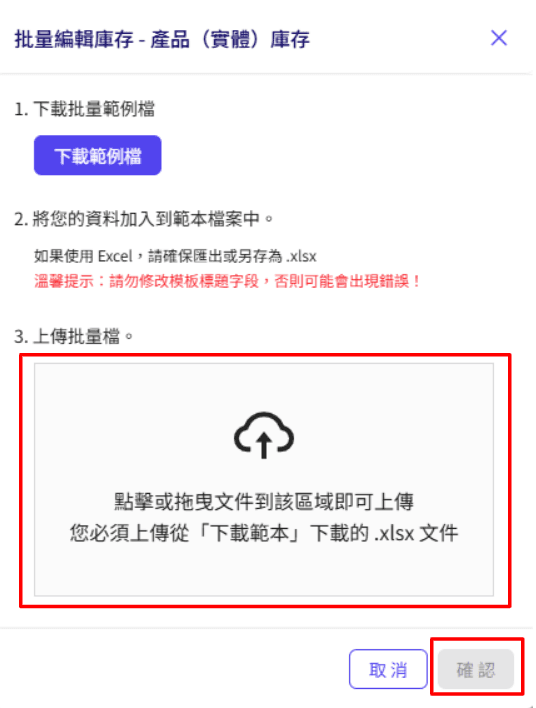
Confirm the import and upload the updated files into the product page. Press "Confirm"
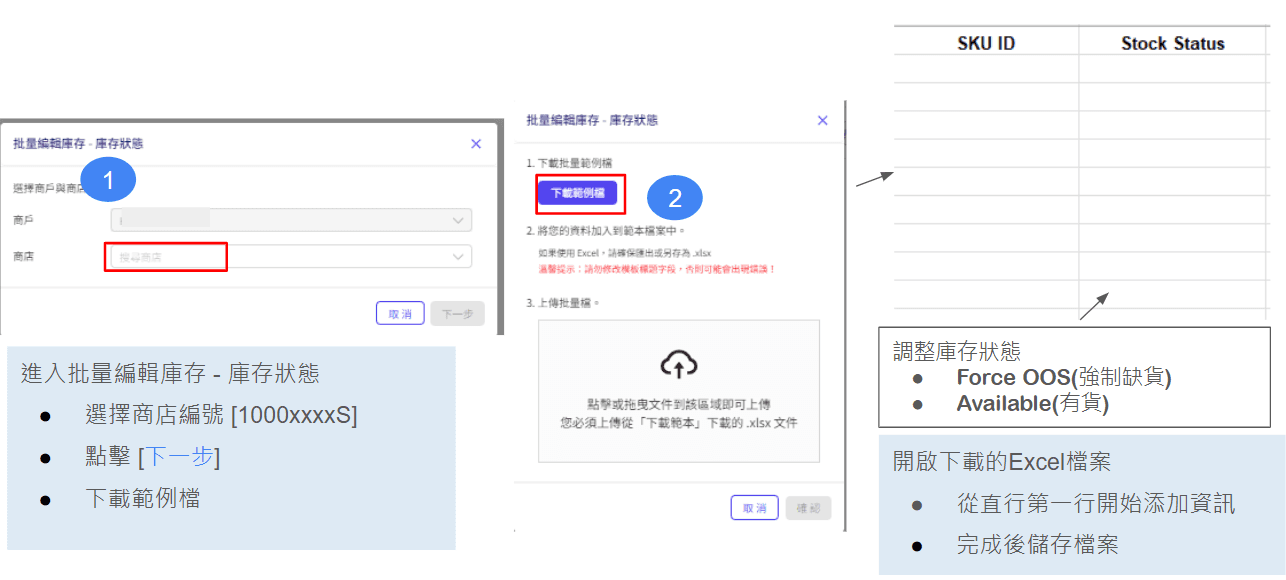
Bulk editing of inventory status (in stock/force out of stock): inventory status
Enter batch edit inventory - Inventory status Select store number [1000xxxxS] Click [Next] Download the sample file to open the downloaded Excel file from the first line of the direct line to add information and store the file to adjust the inventory status Force OOS (Forced out of stock) Available (In stock)
Confirm the import and upload the updated files into the product page. Press "Confirm"
HKTVmall to "ThePlace" Product Copy Guide
*Only applicable to existing HKTVmall merchants (registered by "New Business Application" in the MMS backend ", "ThePlace")
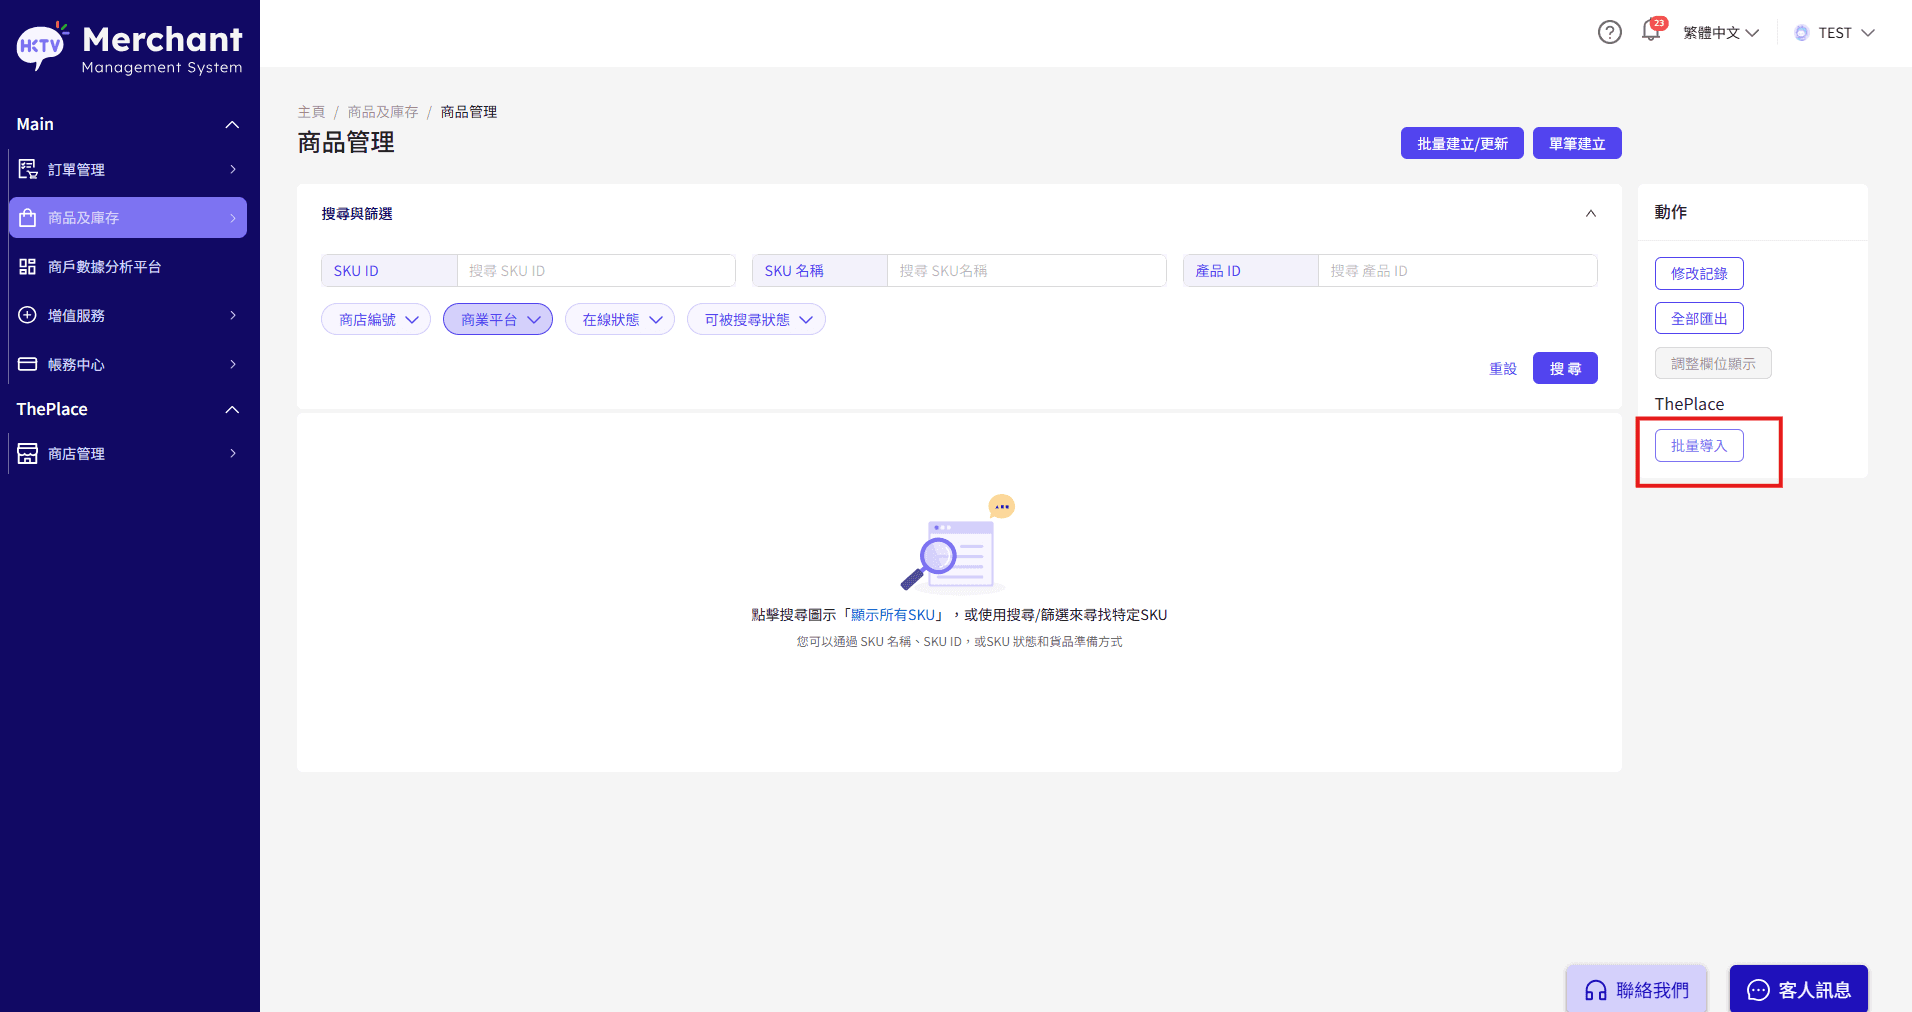
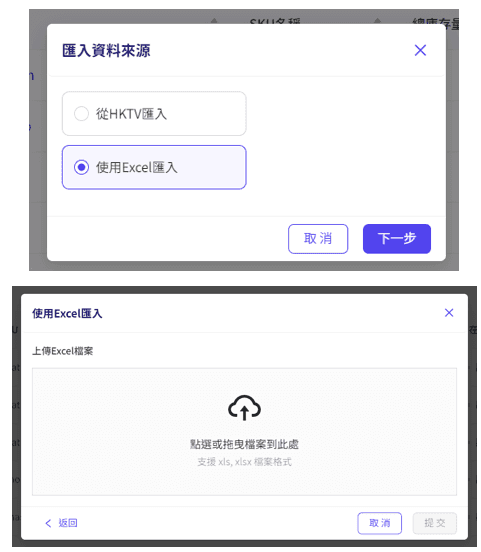
Step 1: Enter [Commodity and Inventory > Product Management] and click "Batch Import"
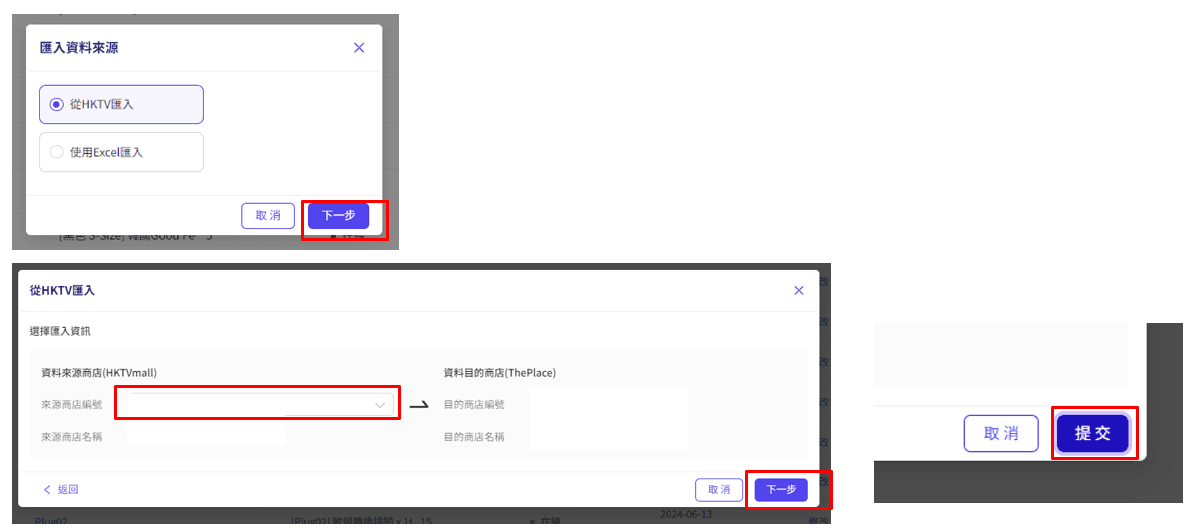
Step 2: Select the import store and click "Received from HKTV" and click "Received from HKTV" and press "Next" to enter the "Received from HKTV" page to select the imported HKTVmall store number. Press "Next" and press "Submit"
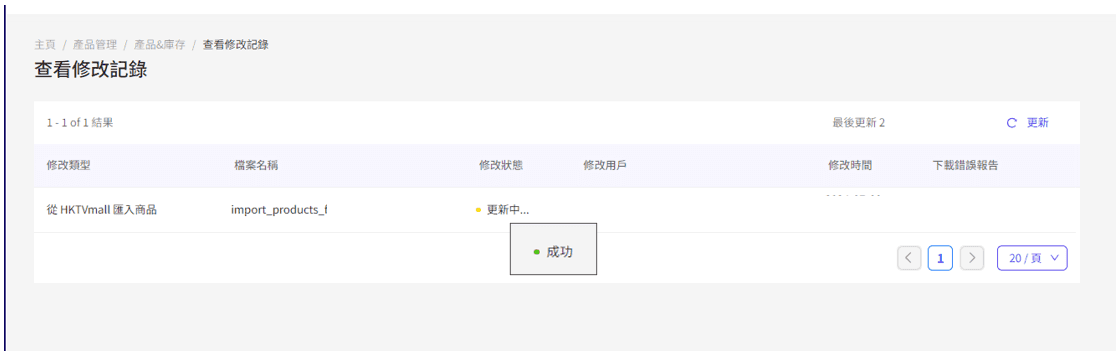
Step 3: After confirming the import and confirmation, it will jump to the "View Modification Record" page. After completion, the status will be transferred from "Updated" to "Successful" to complete the upload. All imported SKUs will be set to "Offline" status and the inventory will be preset to 1. Merchants can update product status and inventory in batches
Step 3: Check the product import status. If the upload fails after the download click [Download Error Report] Understand the reason. The error reason will be displayed in the O column of Excel. Please change the product information based on the error reason* Example: If 2 of 10 products fail to upload, the remaining 8 products will be successfully uploaded.
Import products from "Error Report" Excel (for uploading individual excel files)
Error reports can only change the original price, selling price, can be searched, listed status, product details, inventory status and inventory quantity* If you need to change other information, please copy all information to the new excel to change
Click "Use Excel to import" on the pop-up page of "Received Source" Click "Next" to enter the "Use Excel to import" page to select upload Excel files Press "Submit"
Store settings
Store management and settings
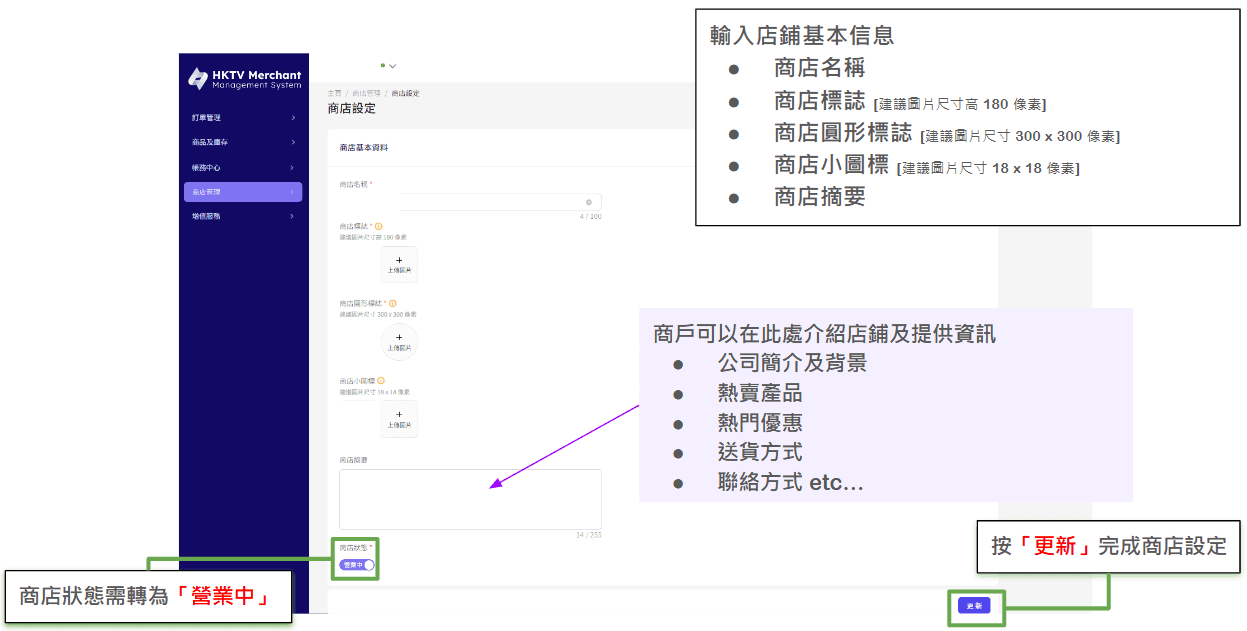
After logging into the system, click "Shop Management" in the menu on the left → "Store Settings"
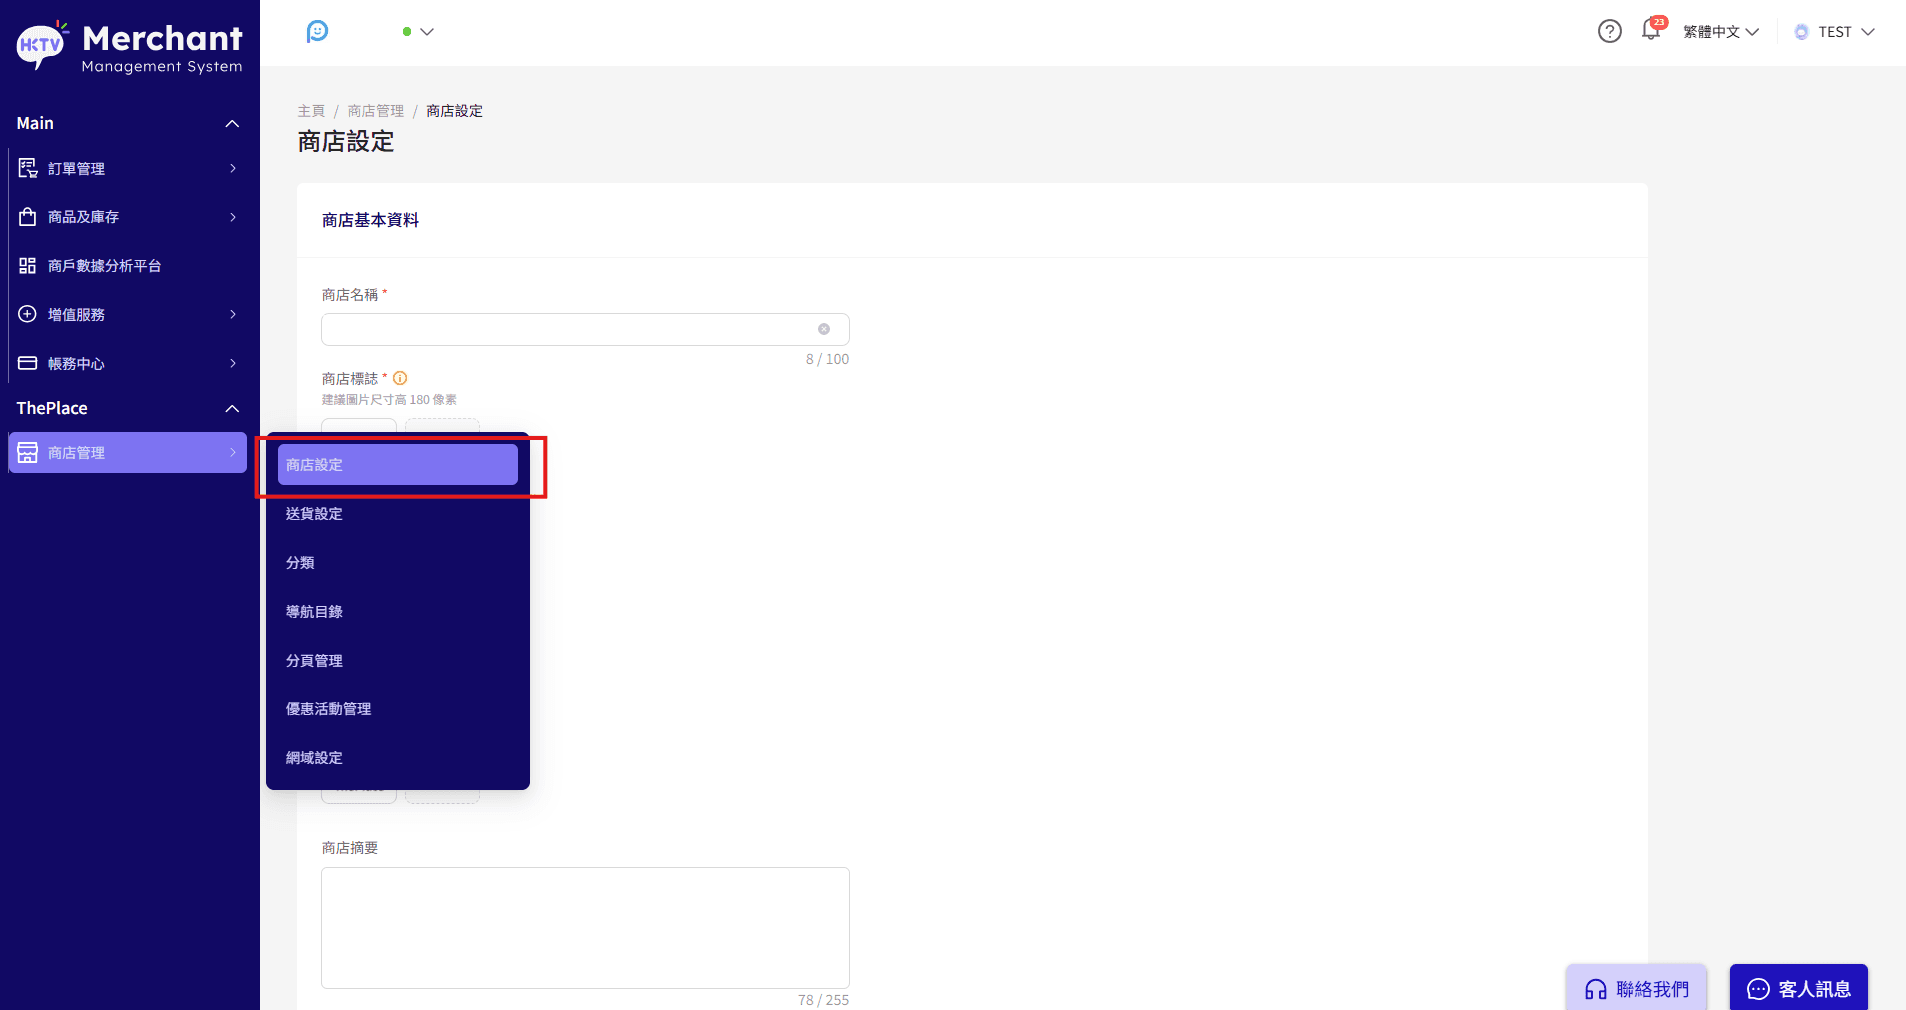
Enter the store basic information Store name Store logo [Suggested image size 180 pixels] Store round logo [Suggested image size 300 x 300 pixels] Store small icon [Suggested image size 18 x 18 pixels] Store summary Merchants can introduce the store here and provide information Company profile and background Hot products Hot discount delivery methods Contact information etc…Store status needs to be changed to "Business" and press "Update" to complete the store settings
Store logo settings (Store logo)

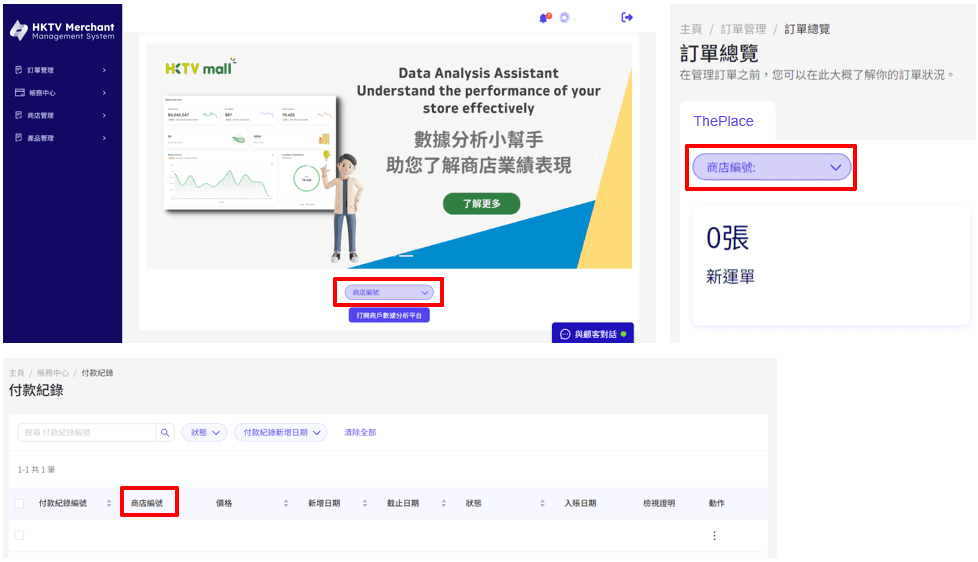
View Store Number You can view Store Number on the following page: Home Order Overview Payment Record
Classification
Create and manage product categories Create categories Click "Create Category", just fill in the name of the category you want to create. Manage Category Hierarchy You can delete any category by clicking "Delete". Related Product Allocation and Management Category Product Delete You can drag and drop each item to arrange the sort of categories. Divide into up to 3 layers.
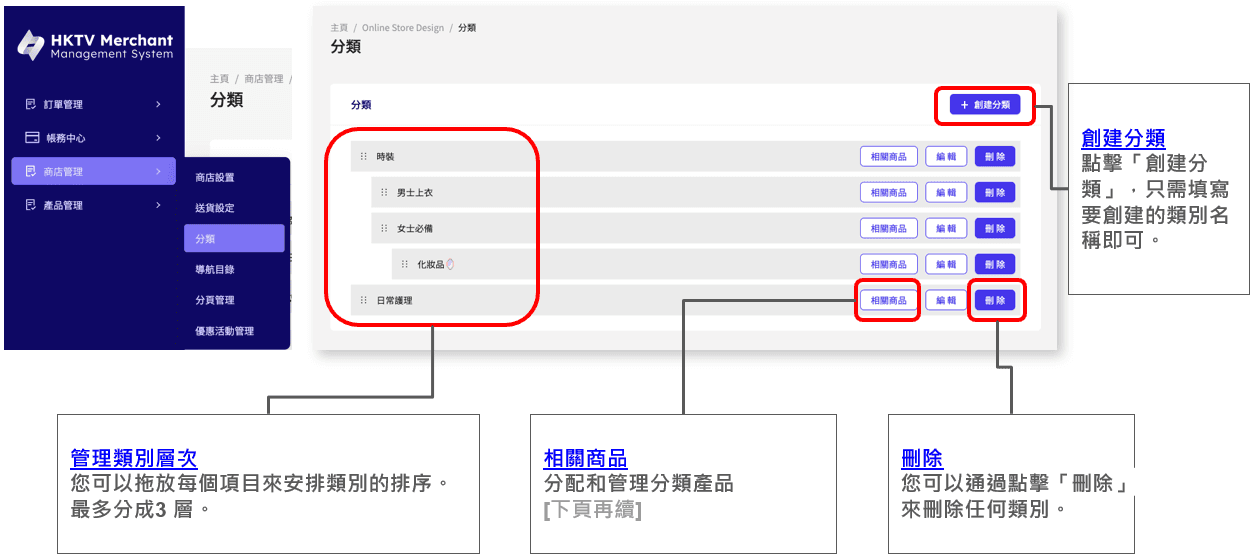
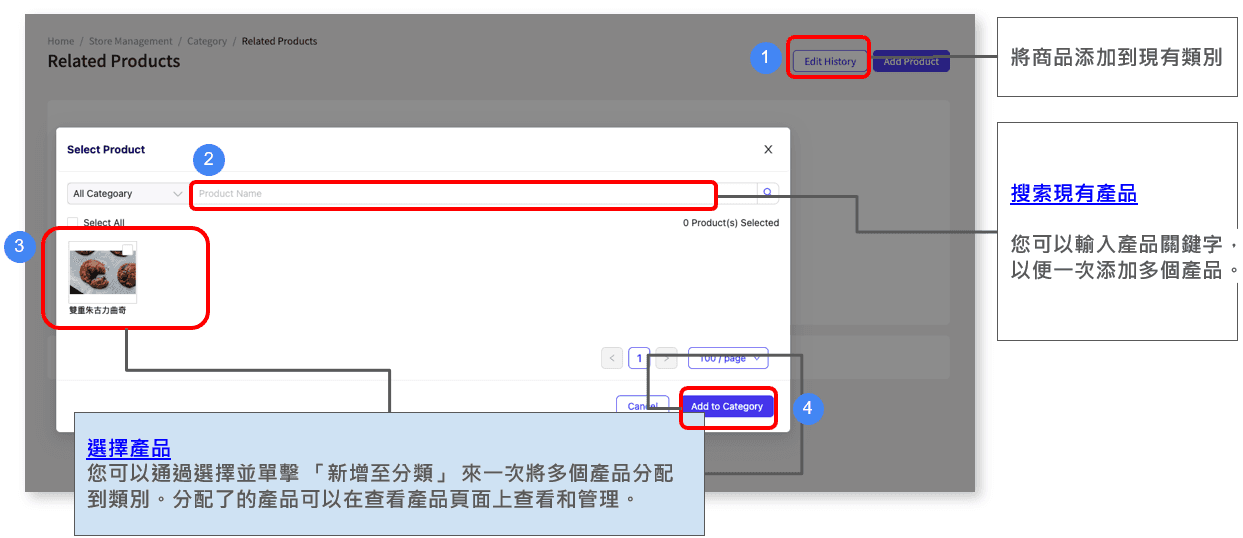
To view products added to a specific category, click the "Add button" and go directly to the "Select Product" page to assign products to a category. *Please note that you will create products before adding them to categories. You can delete any category or multiple categories by selecting them and clicking "Delete". *Before deleting categories, remember to move these products to another category.
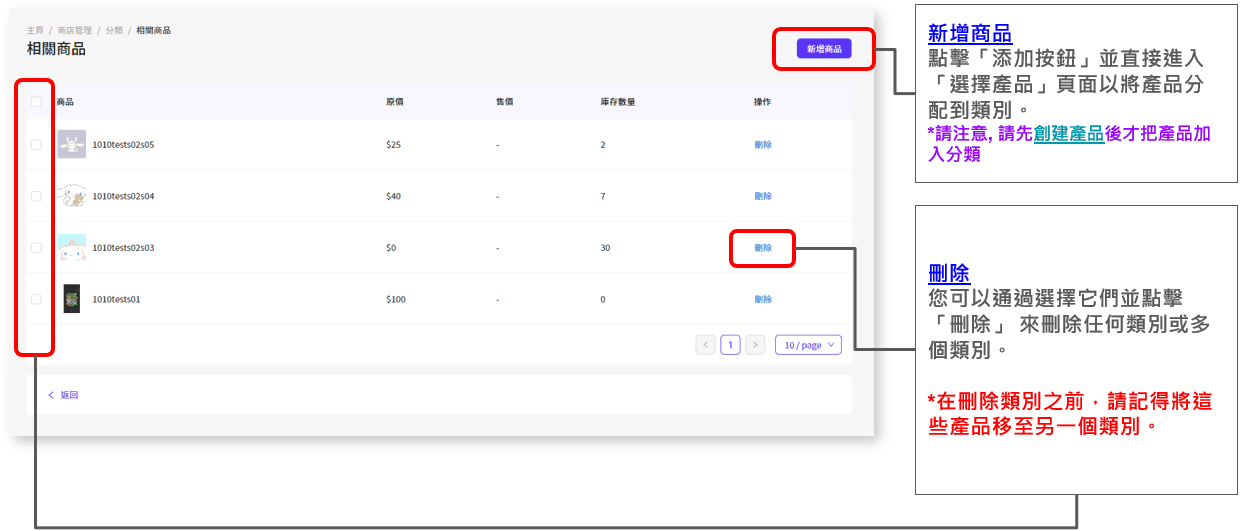
Add Products to Specific Category Add Products to Existing Category Search for Existing Products You can enter product keywords to add multiple products at once. Select a product You can assign multiple products to categories at once by selecting and clicking Add to Category. The assigned products can be viewed and managed on the View Products page.
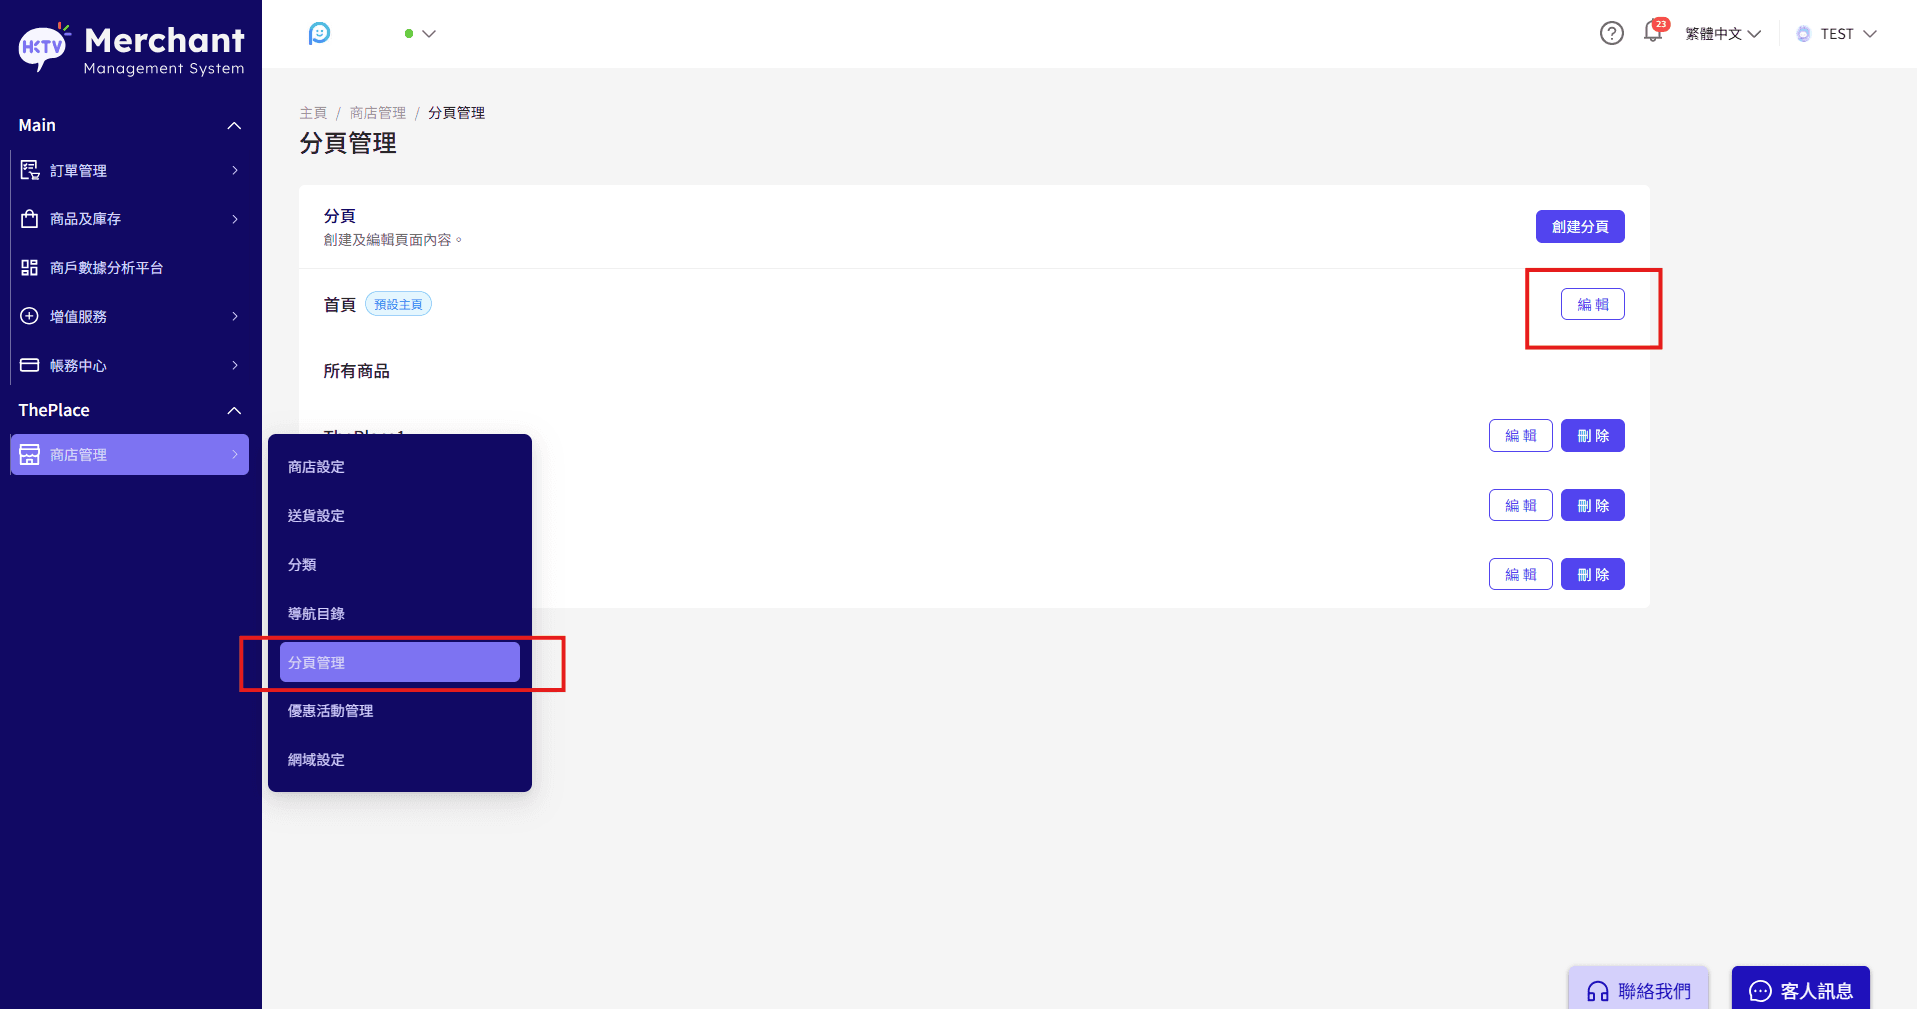
Pagination Management
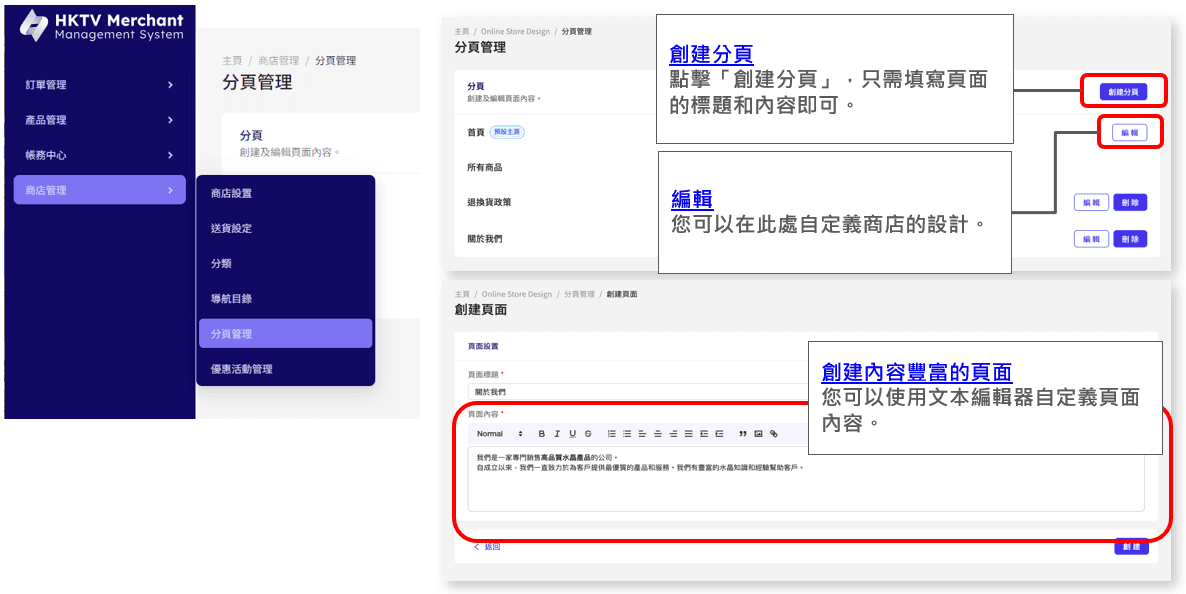
To create a paging, click "Create a paging", just fill in the title and content of the page. Edit You can customize the store's design here. Create a rich page You can customize the page content using a text editor.
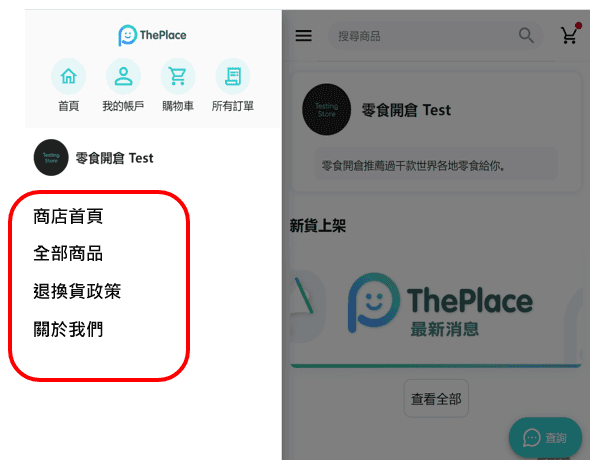
After completing the pagination management, it will be displayed on the left side of the "ThePlace" page
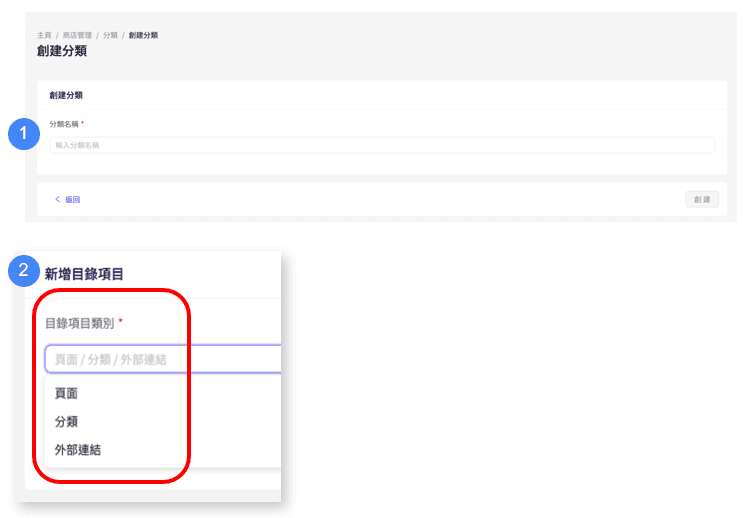
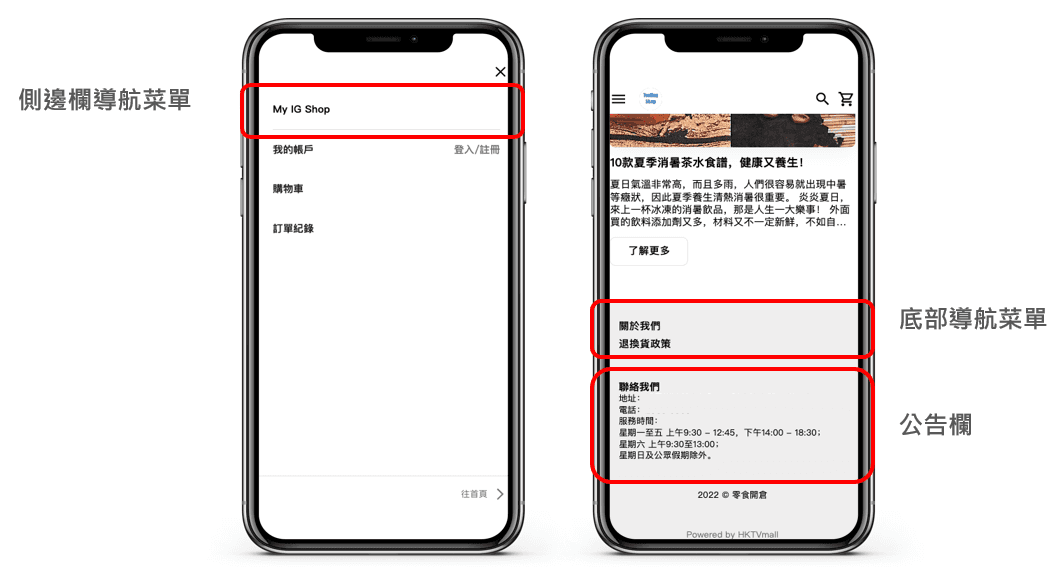
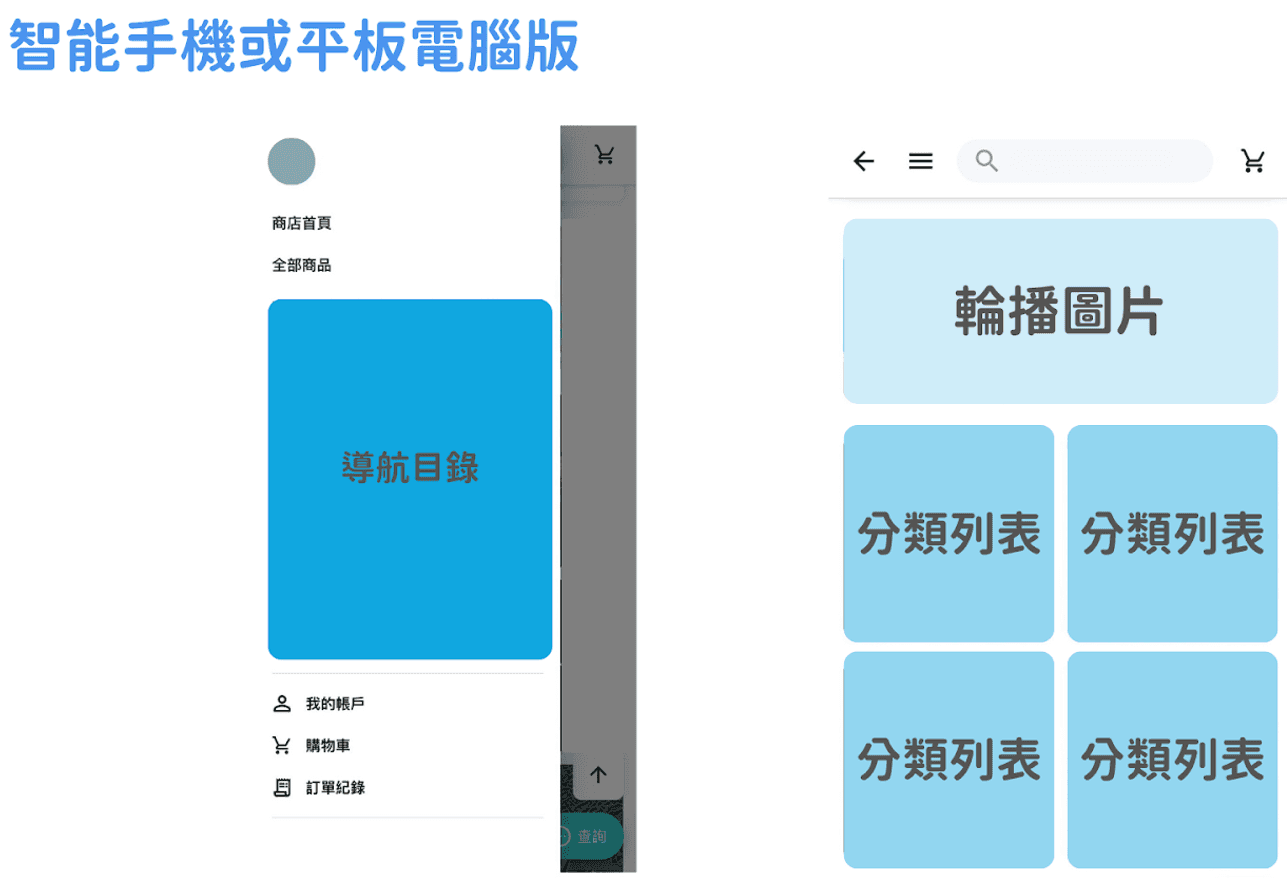
Navigation Directory
Navigation Catalog You can modify the order and content of the sidebar and the menus at the bottom of the page. In the bulletin board, you can publish an announcement, which will be displayed directly at the bottom of the page.
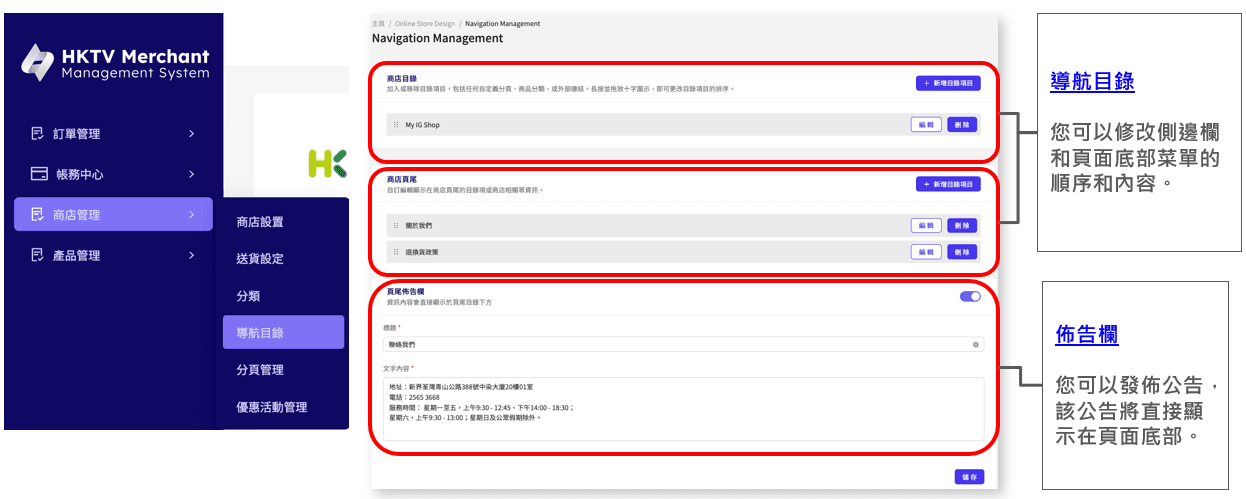
Sidebar Navigation Menu Bottom Navigation Menu Bulletin Bar
Adding a catalog item You can add the following items in the "Navigation Catalog": Page: Link to the page created in the "Page" section Product Category: Displays products in the selected category. You can add and manage product categories in "Shop Management" > "Categories". External links: Link to other websites, such as Instagram. * No links to other e-commerce websites** Copy from http://
Shop homepage
Store homepage management Click "Shop Management" in the menu on the left → "Pagination Management" Click "Edit" to design the homepage
You can add, delete, drag and drop various components through the control panel on the left to design your store homepage. You can instantly preview the layout of the store design on the right, which helps you see the store design directly.

The online store page is displayed as follows:
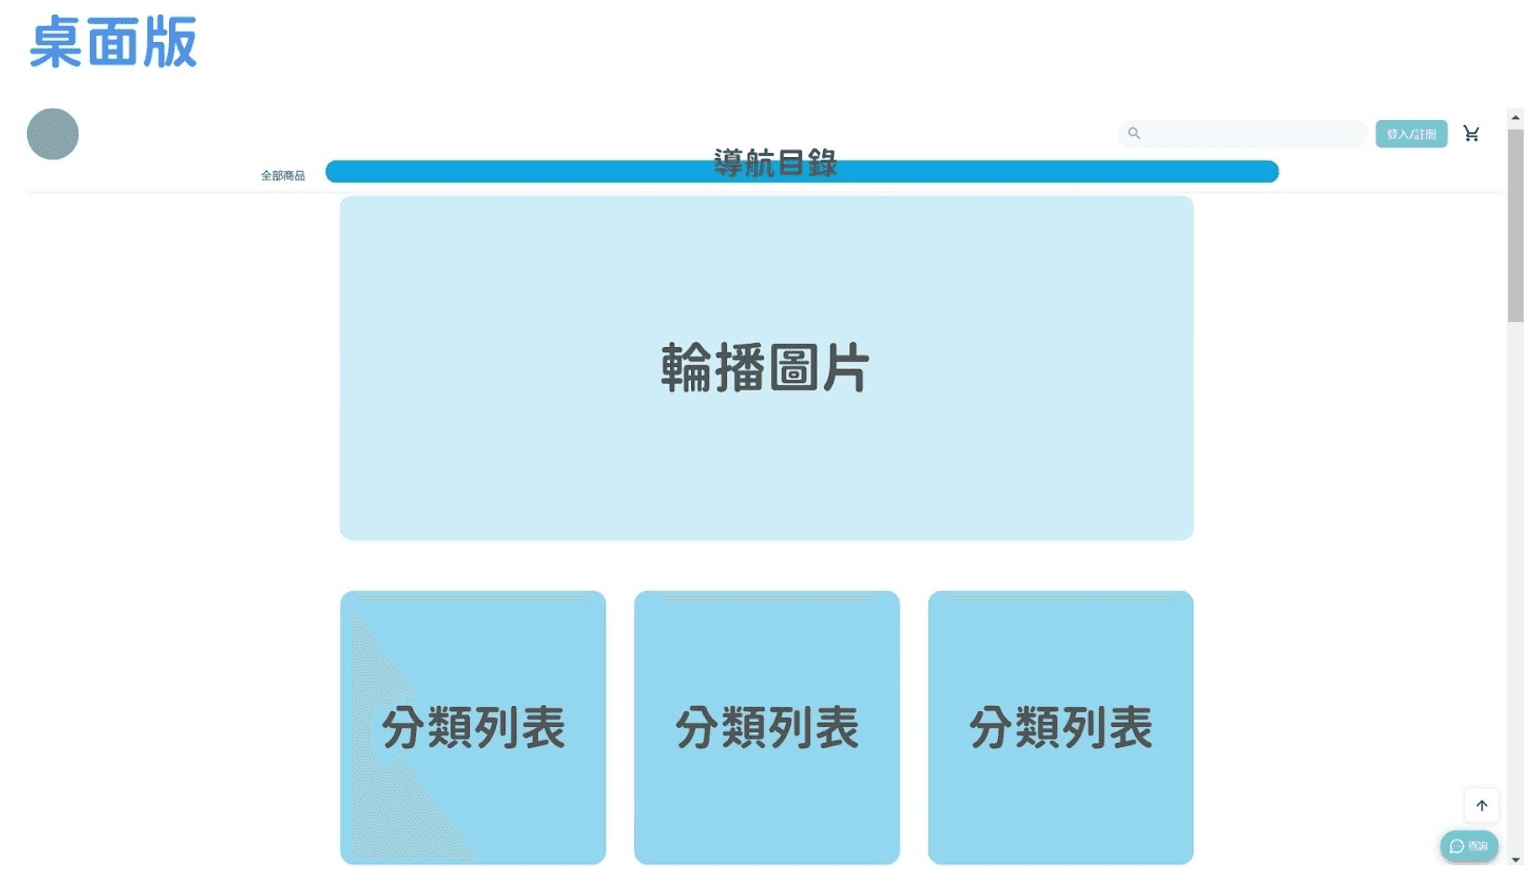
Home page design: Components (1) - Carousel Pictures
Step 1: Click to upload the image. Step 2: Set the image scale of the image. The recommended image size is 1380 x 552 pixels. You can drag the slider to modify the scale of the image being displayed between 1x~3x. After the settings are completed, click "Preview Picture" to see the image effect on the right. Step 3: Select a pre-created category, page, or external link (only links starting with https:// are supported). Optional: Up to 10 images can be added to the component.

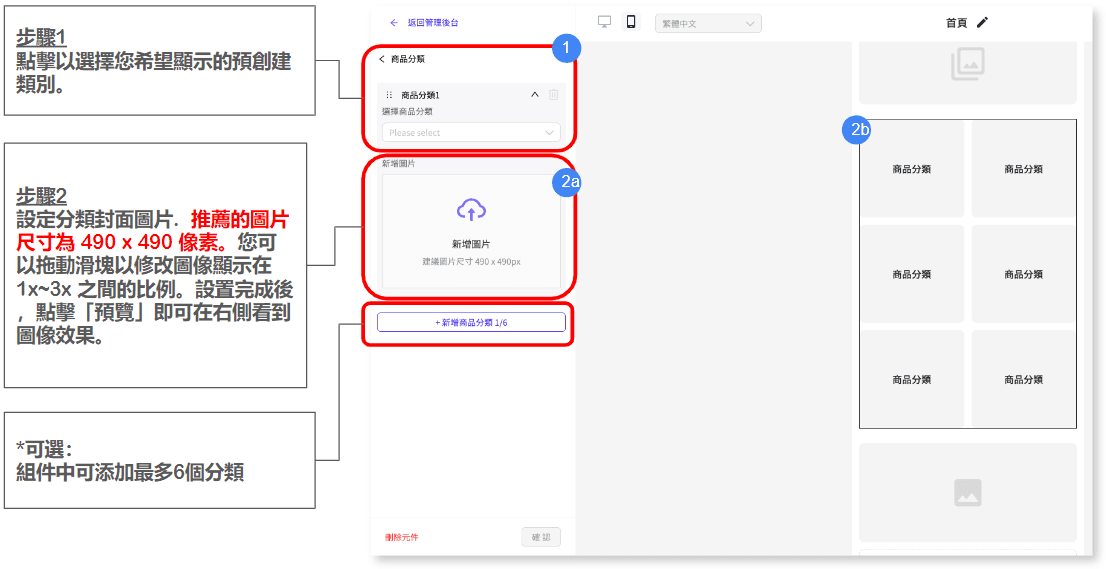
Home page design: Components (2) - Category list
Step 1: Click to select the pre-created category you want to display. Step 2: Set the category cover image. The recommended image size is 490 x 490 pixels. You can drag the slider to modify the scale of the image being displayed between 1x~3x. After the settings are completed, click "Preview" to see the image effect on the right. Optional: Up to 6 categories can be added to the component
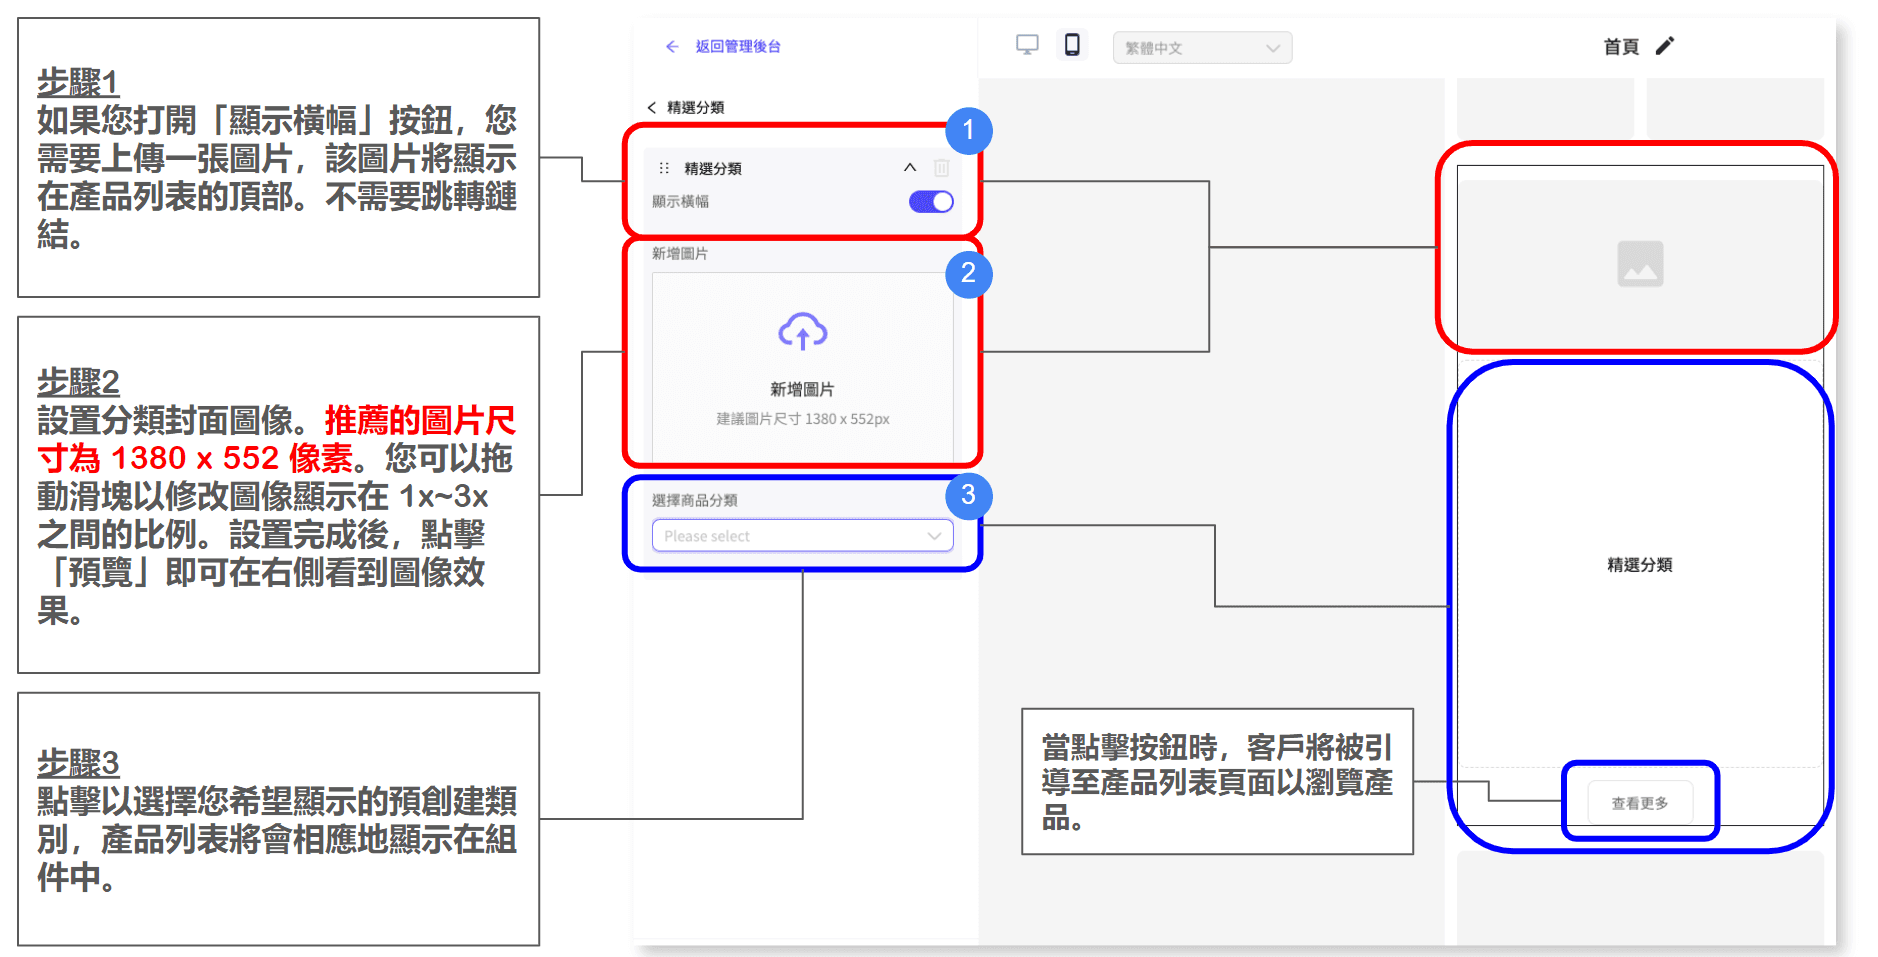
Home page design: Components (3) - Featured categories
Step 1: If you open the "Show Banner" button, you need to upload an image that will be displayed at the top of the product list. No need to jump links. Step 2: Set up the category cover image. The recommended image size is 1380 x 552 pixels. You can drag the slider to modify the scale of the image being displayed between 1x~3x. After the settings are completed, click "Preview" to see the image effect on the right. Step 3: Click to select the pre-created category you want to display and the product list will be displayed in the component accordingly.
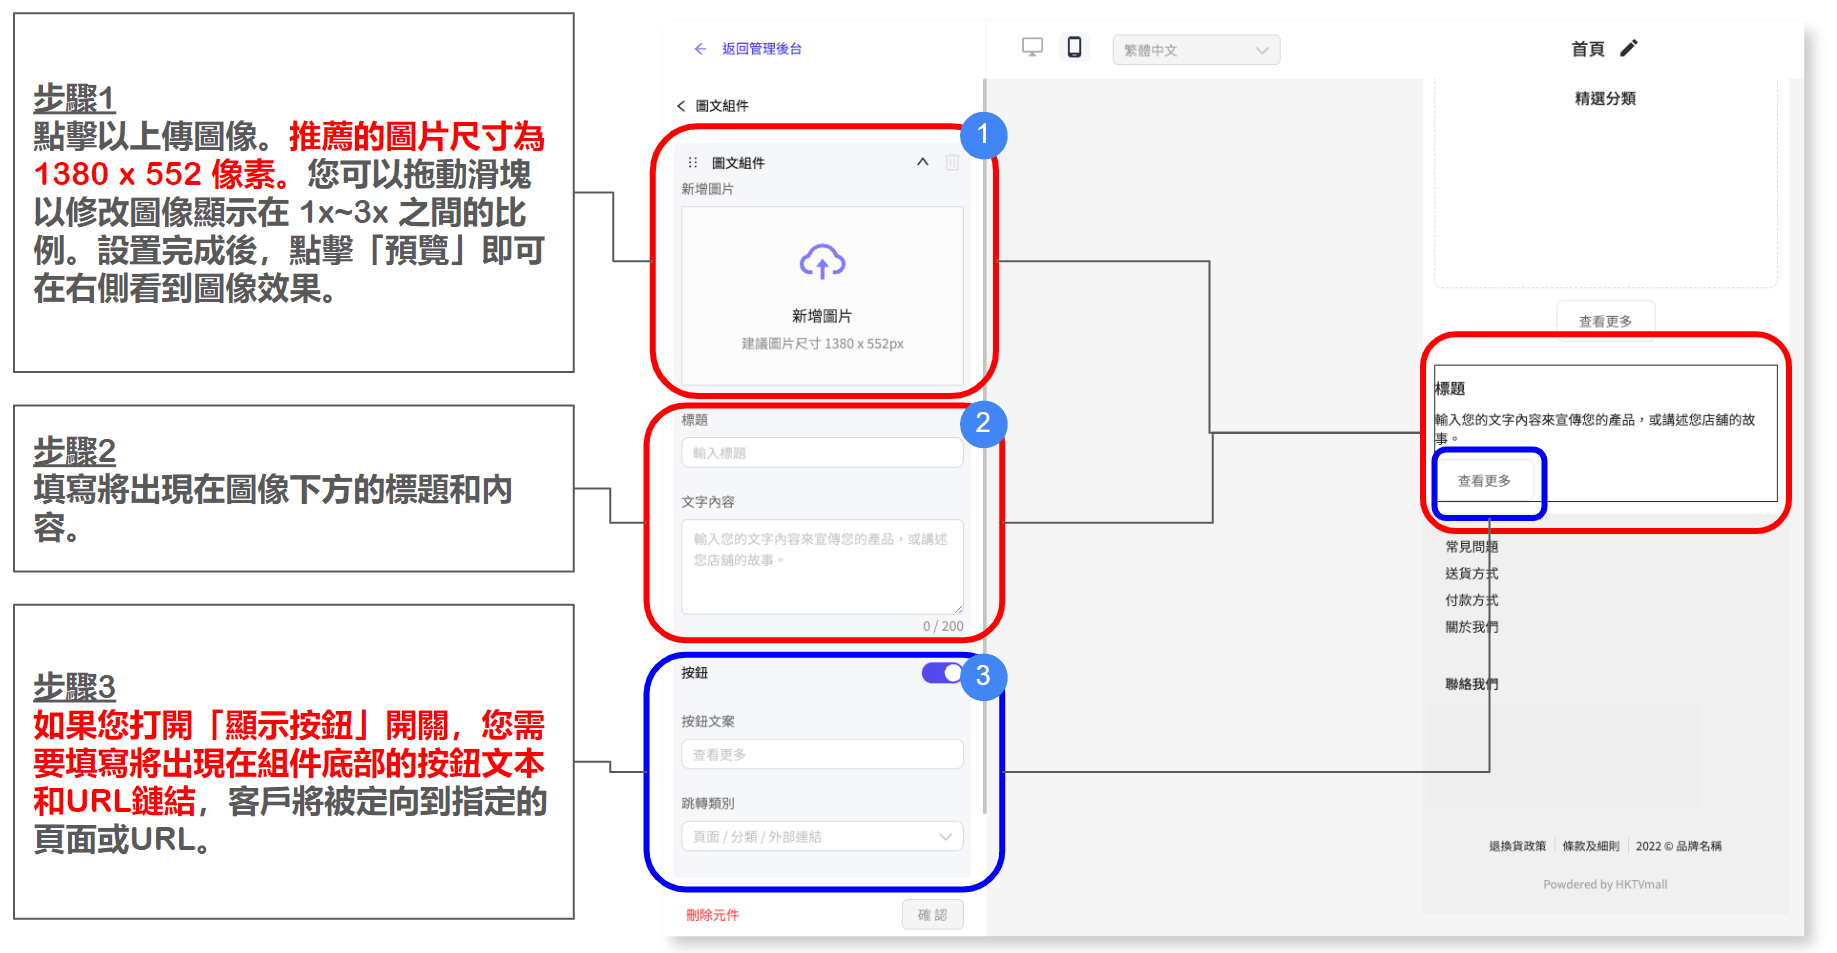
Home page design: Components (4) - Picture and text components
Step 1: Click to upload the image. The recommended image size is 1380 x 552 pixels. You can drag the slider to modify the scale of the image being displayed between 1x~3x. After the settings are completed, click "Preview" to see the image effect on the right. Step 2: Fill in the title and content that will appear below the image. Step 3: If you turn on the "Show Button" switch, you need to fill in the button text and URL link that will appear at the bottom of the component, and the customer will be directed to the specified page or URL.
Delivery settings
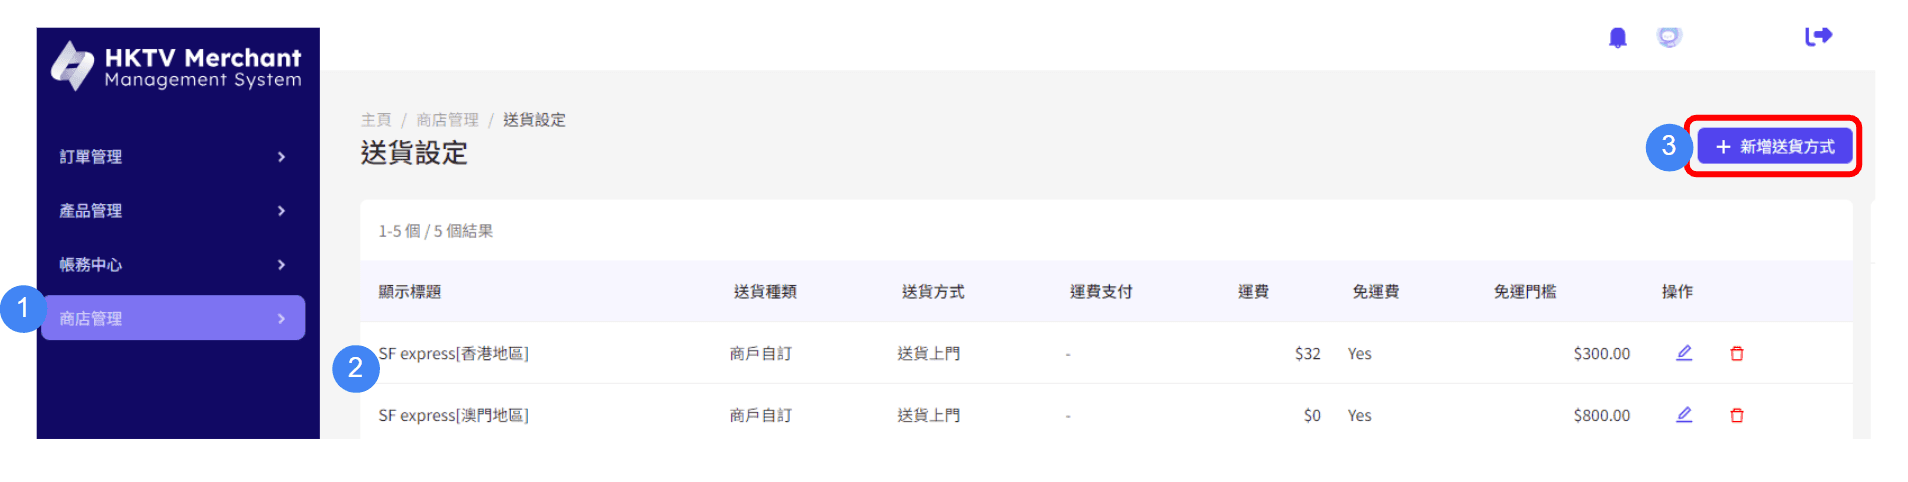
Delivery Management
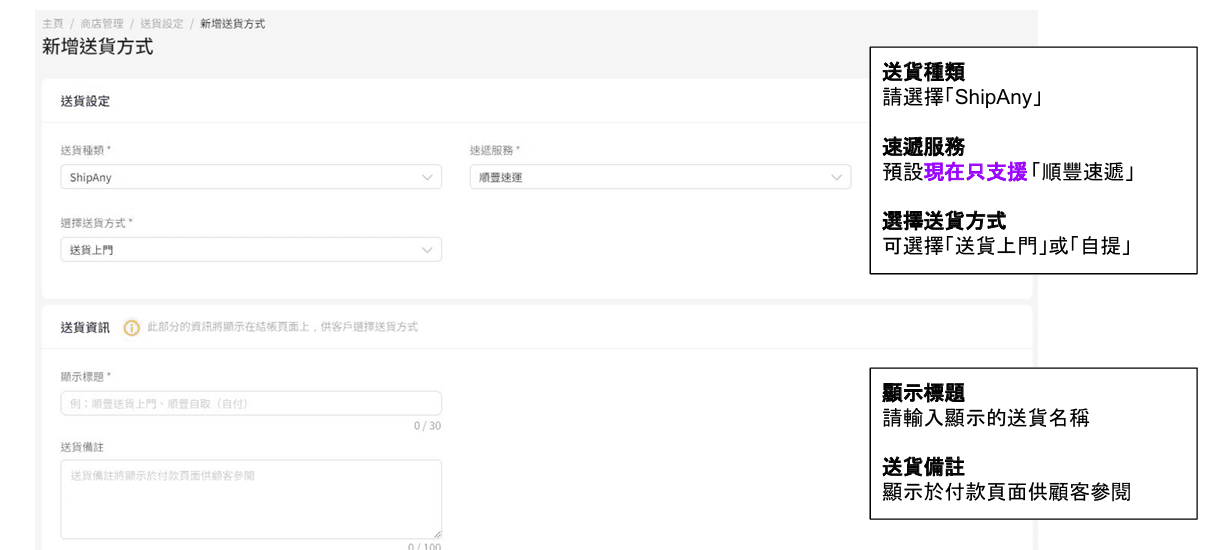
Click "Shop Management > Delivery Settings" in the sidebar to view all the settings created. Click "Add New Delivery Method" on the Delivery Settings Details page.
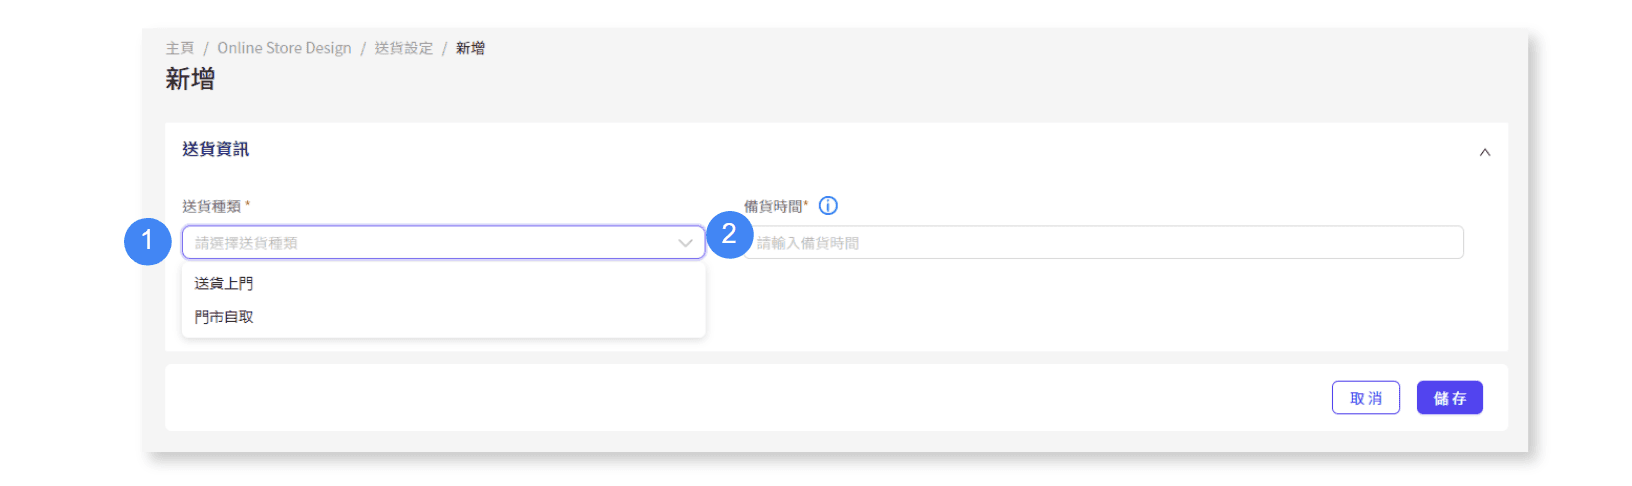
Added a new delivery method to choose delivery method: Home delivery / Store self-pickup input stocking time *Preparation time is used to calculate the estimated delivery date Order confirmation date +Preparation time = Estimated delivery date * When changing the order status to "Shipped" in MMS, the estimated delivery date can be adjusted
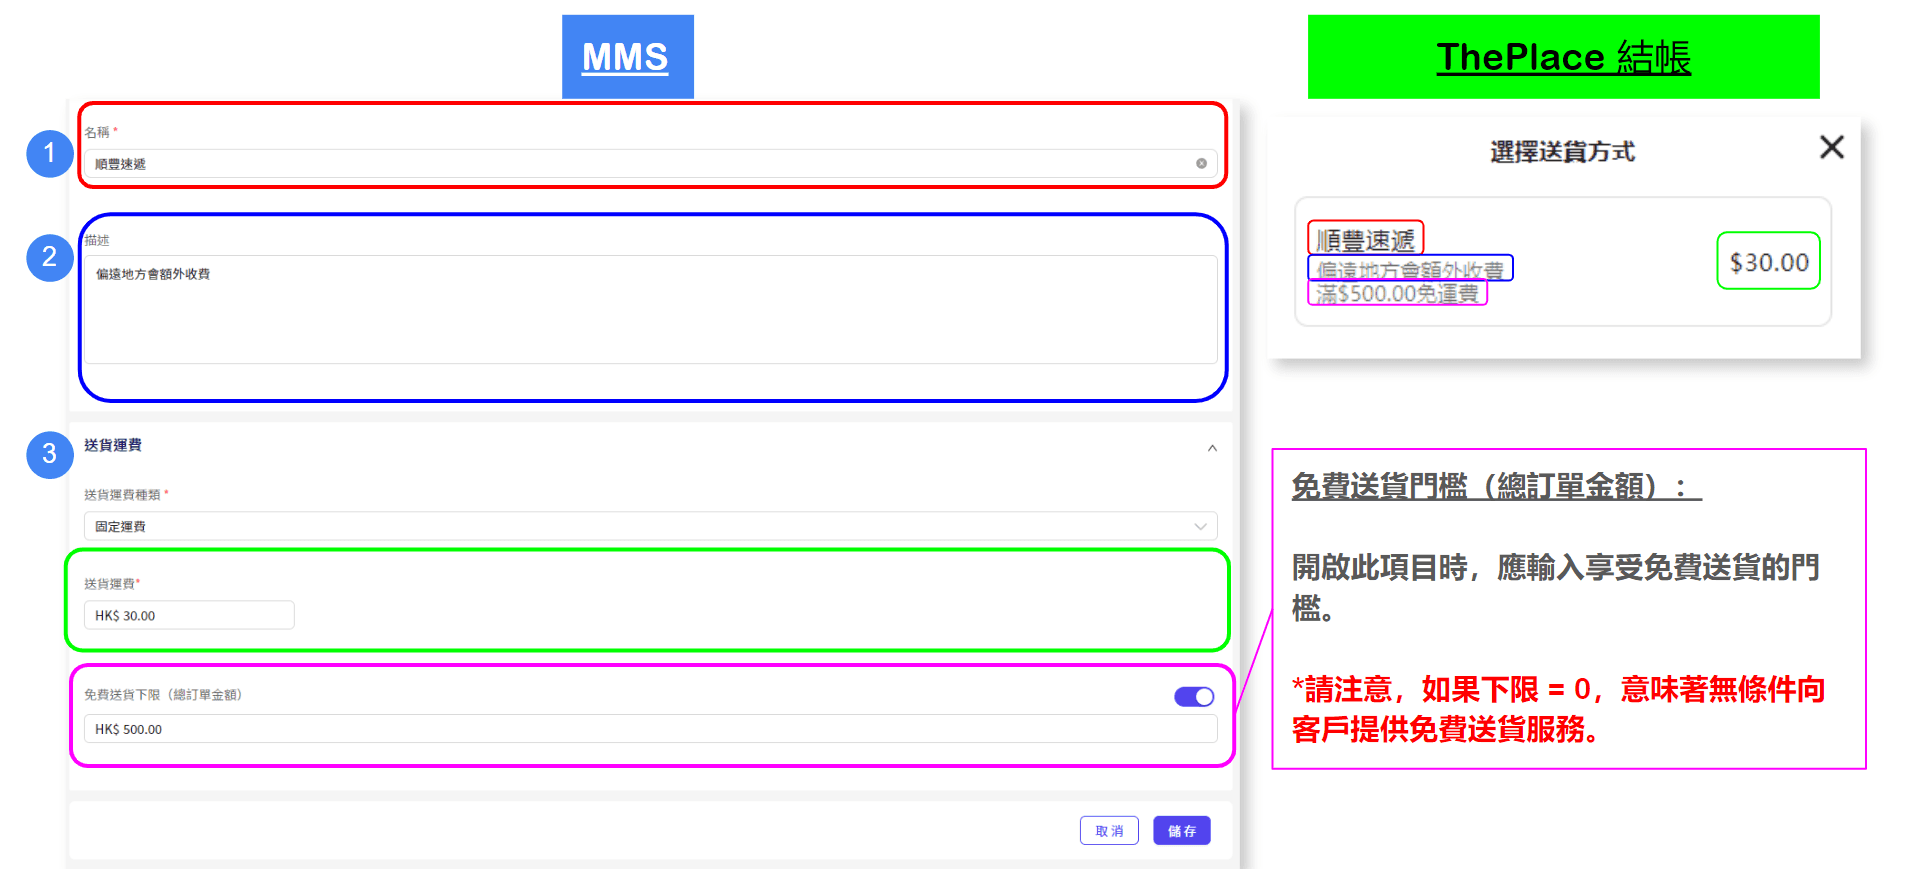
Create a new delivery method - Free delivery threshold for door-to-door delivery (total order amount): When opening this project, you should enter the threshold for enjoying free delivery. *Please note that if the lower limit = 0, it means that free delivery is provided to customers unconditionally.
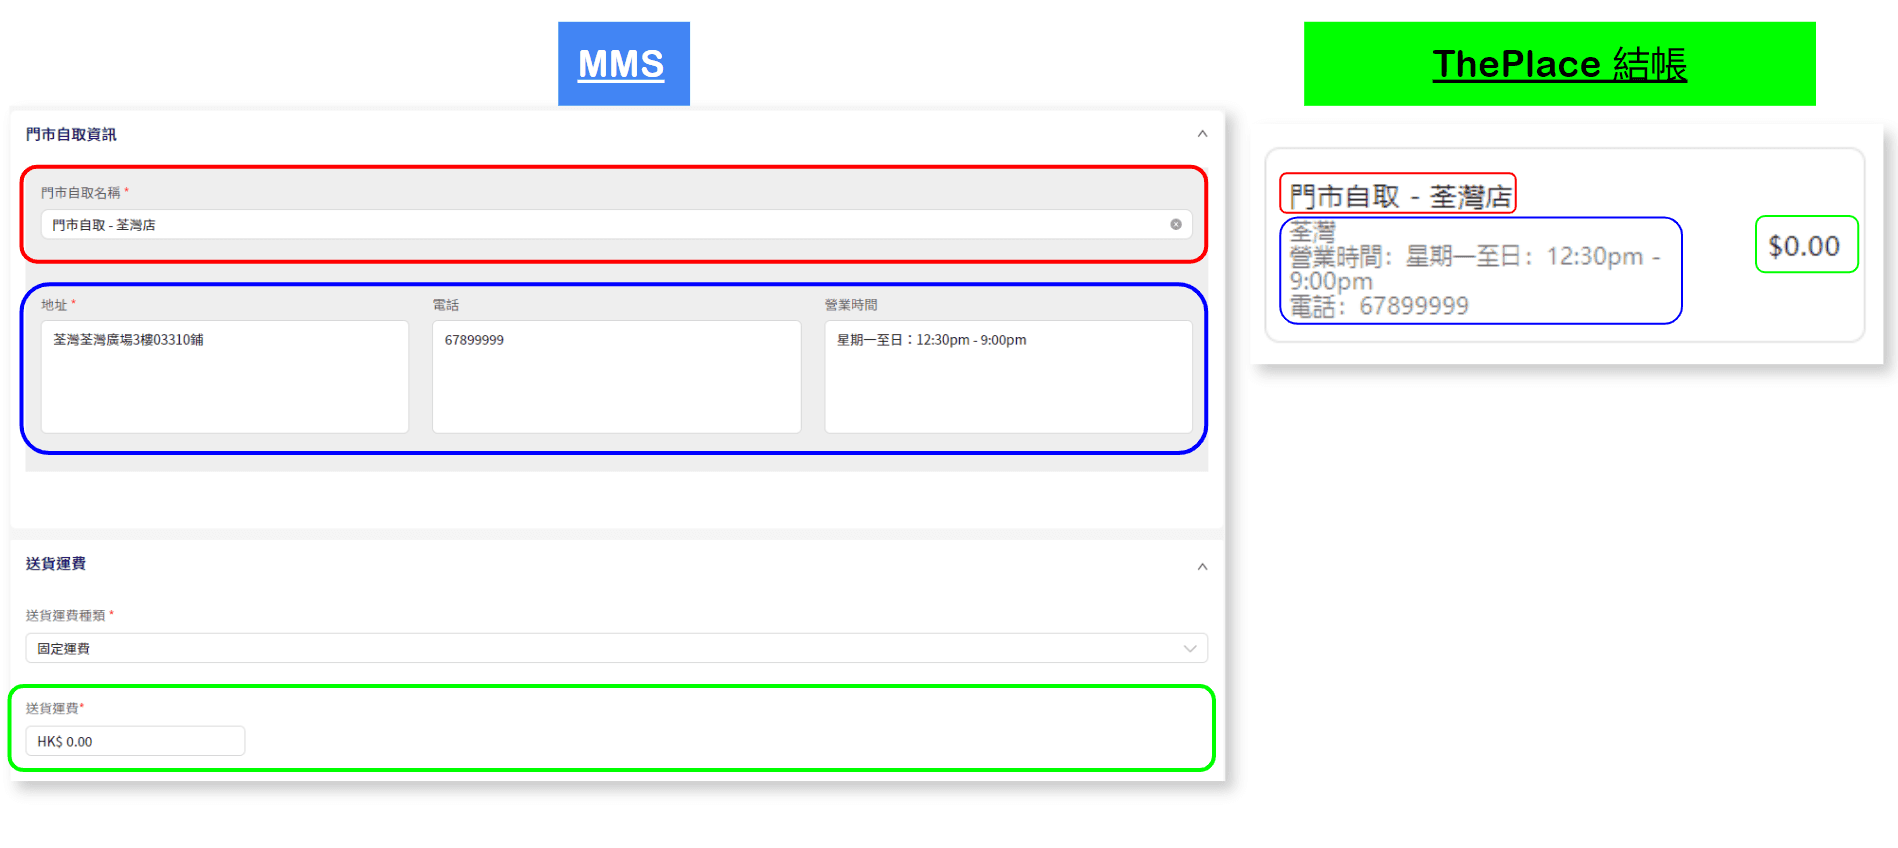
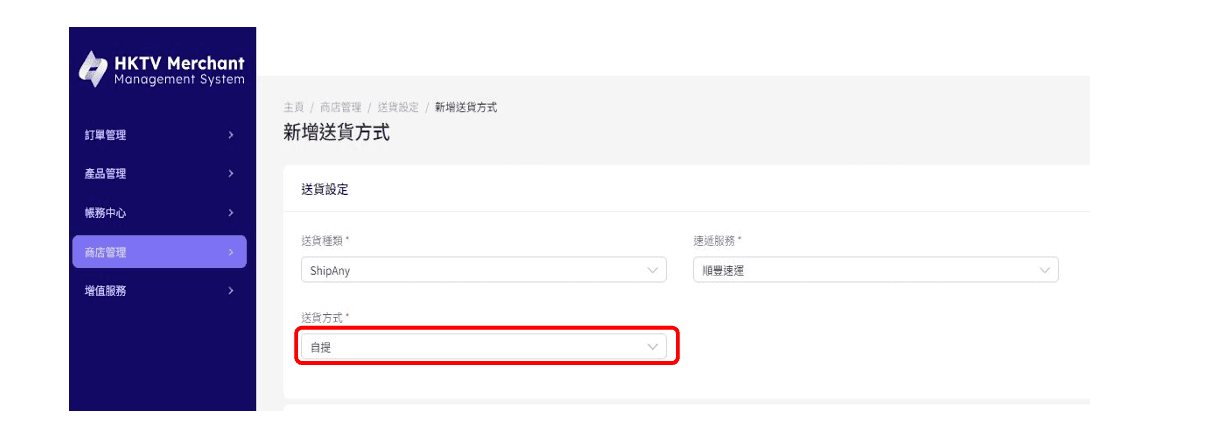
Create a new delivery method - store pickup
Enable ShipAny link
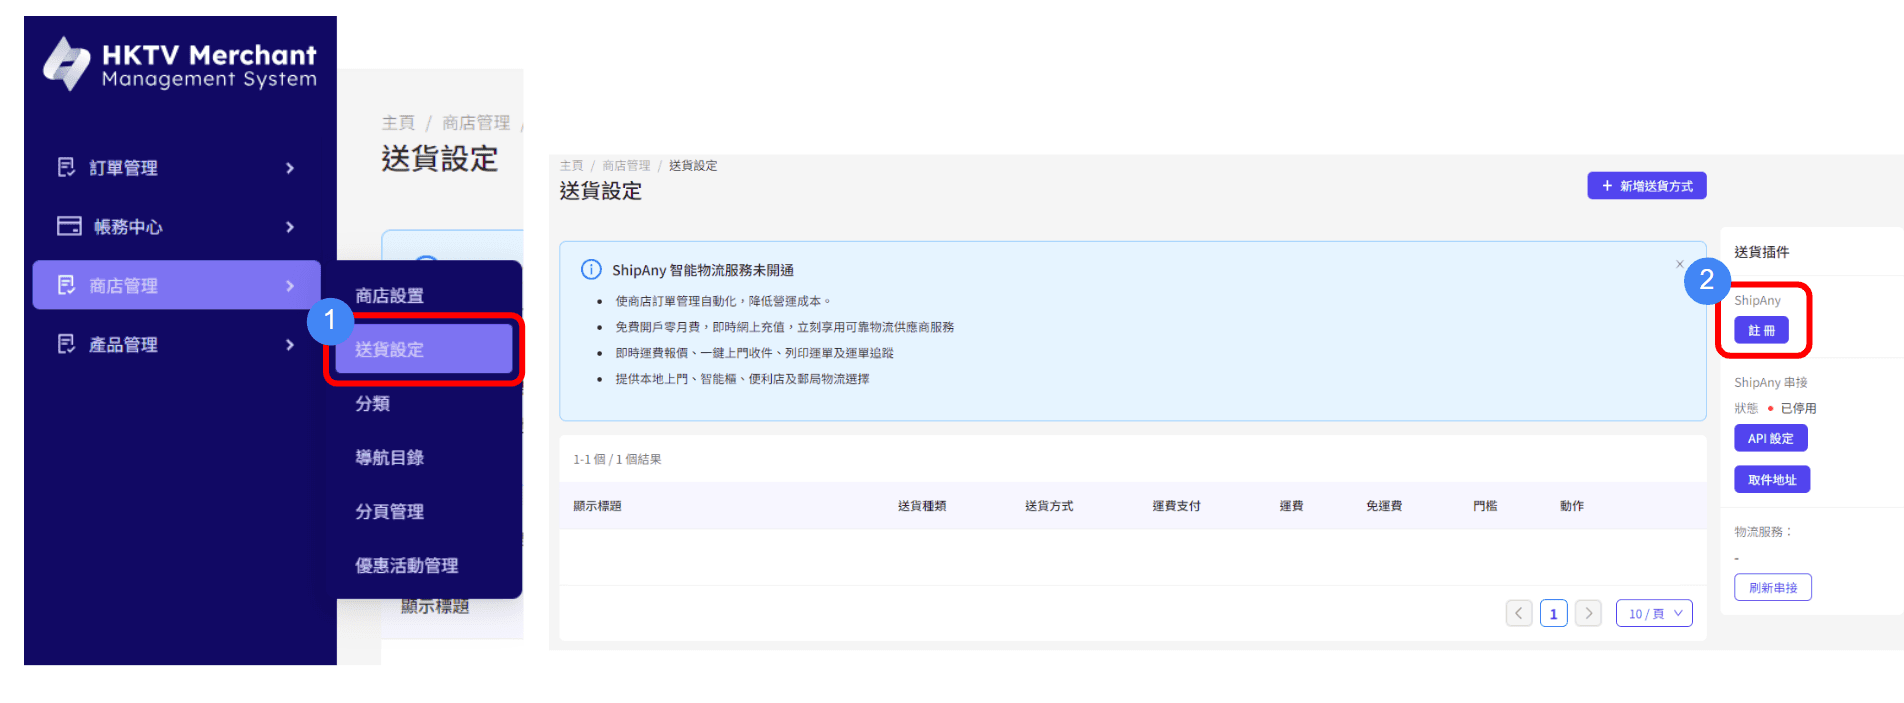
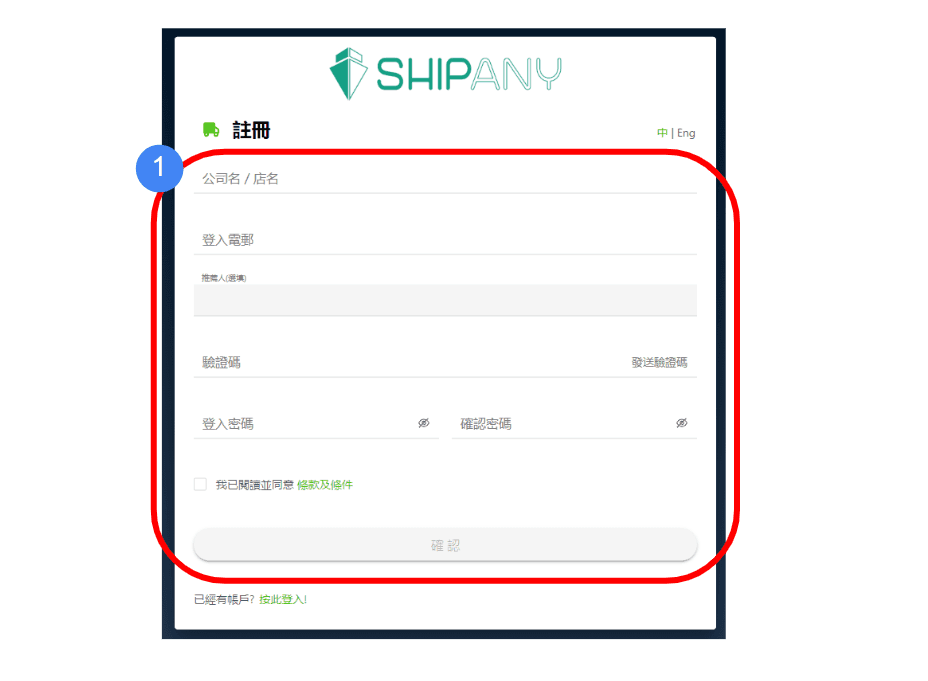
Register a ShipAny account and fill in the information, you will successfully register your ShipAny account.
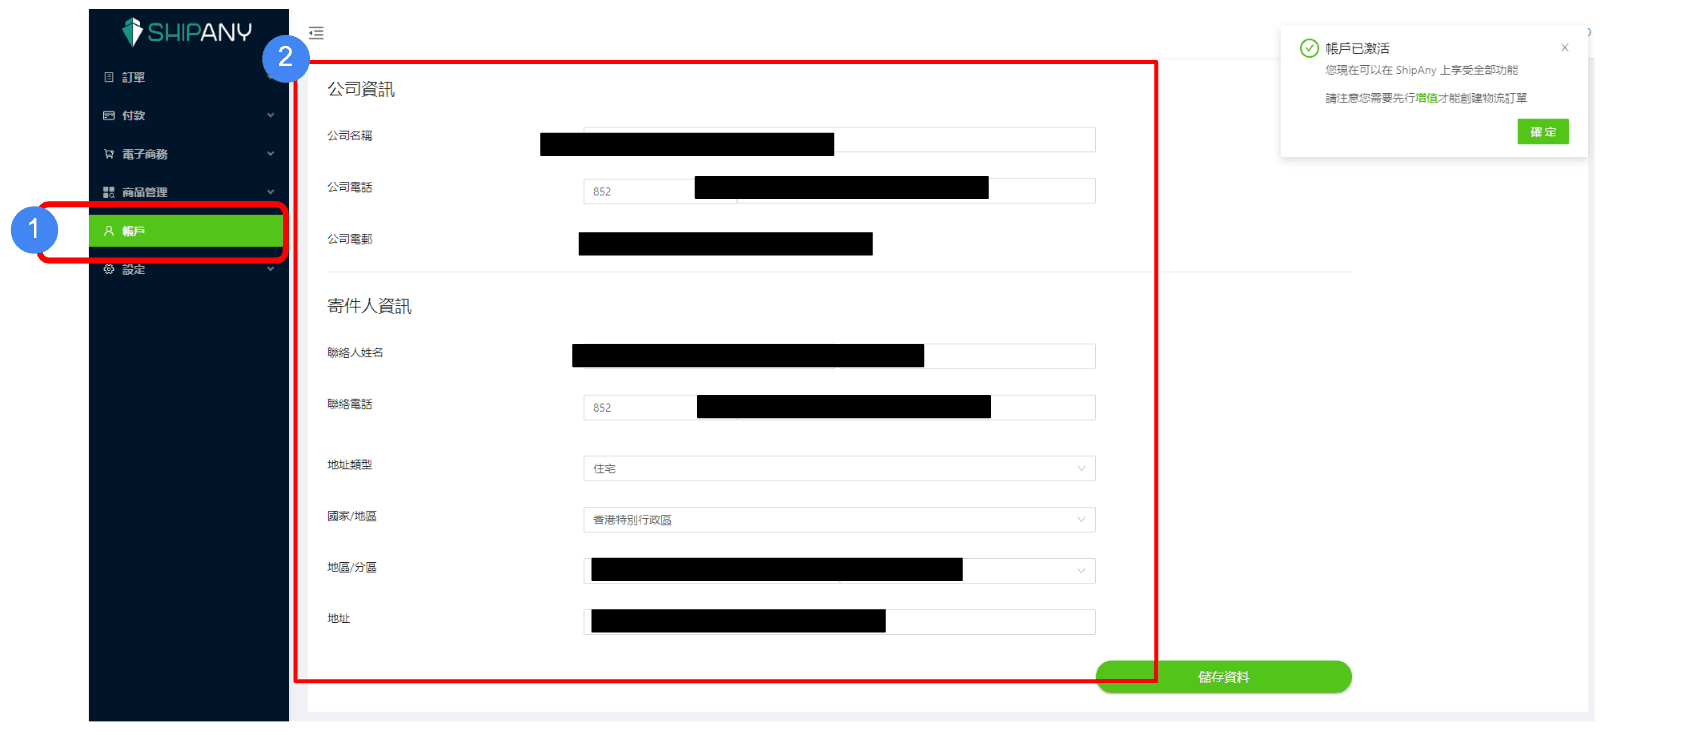
In MMS Bind ShipAny Account Click "Account" in the sidebar of the ShipAny platform to fill in company information & sender information to activate the account
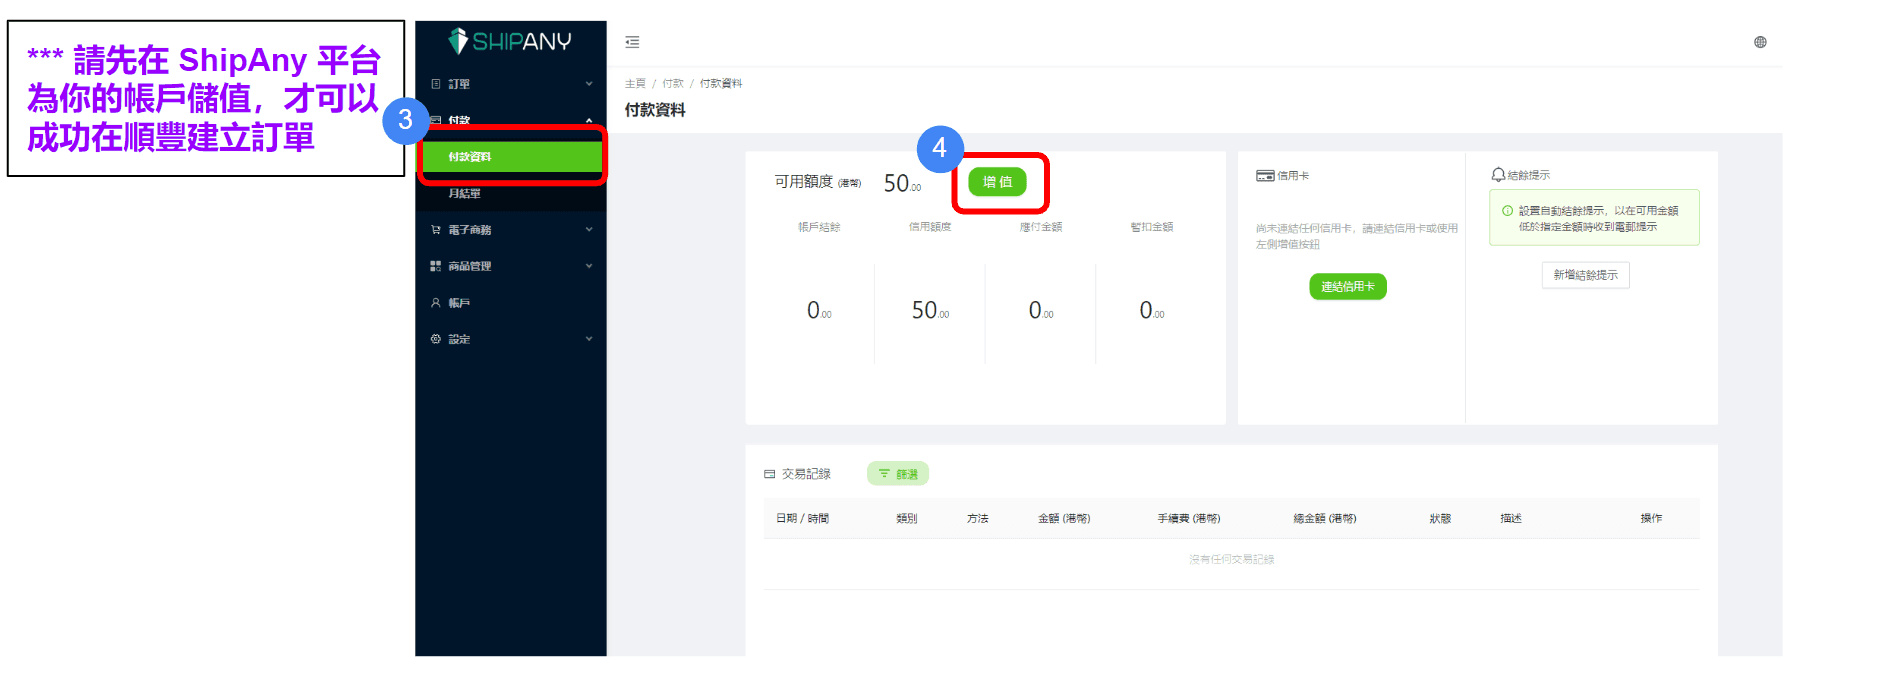
Click "Payment Information" in the sidebar* Please first store value for your account on the ShipAny platform before you can successfully establish an order on SF Express and click "Add Value" to store value for your account
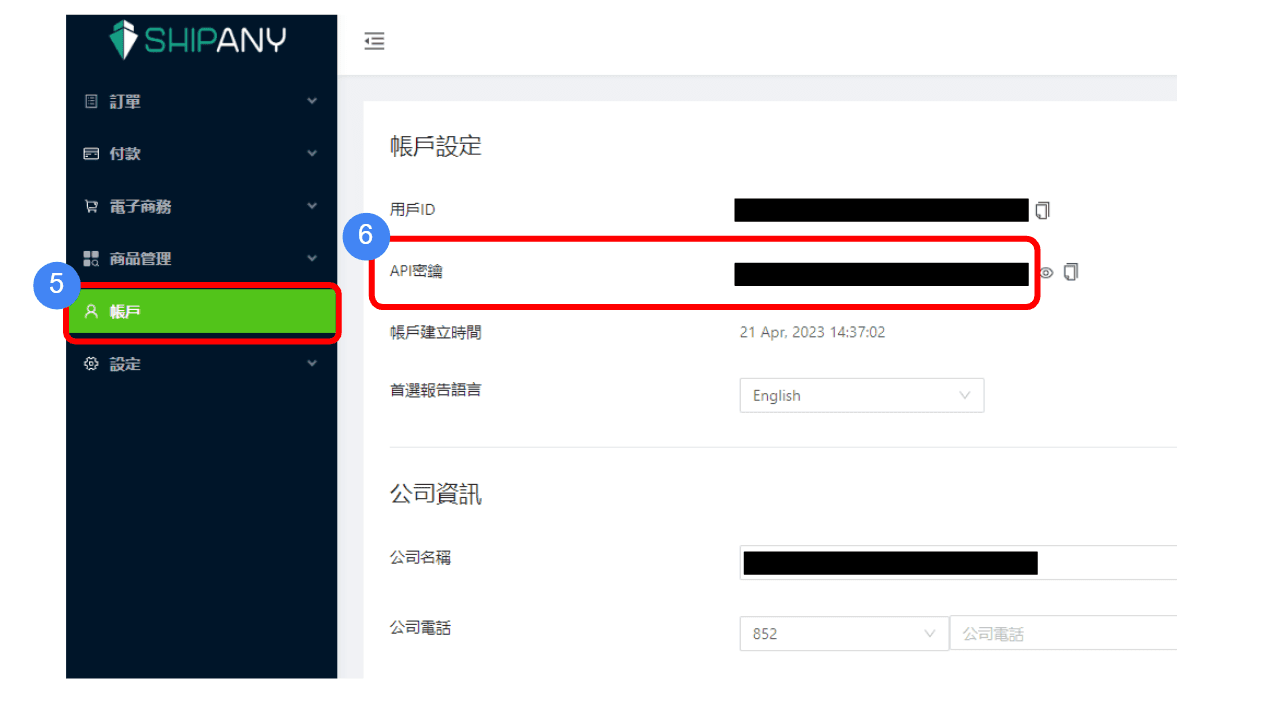
Click "Account" in the sidebar to copy the API key
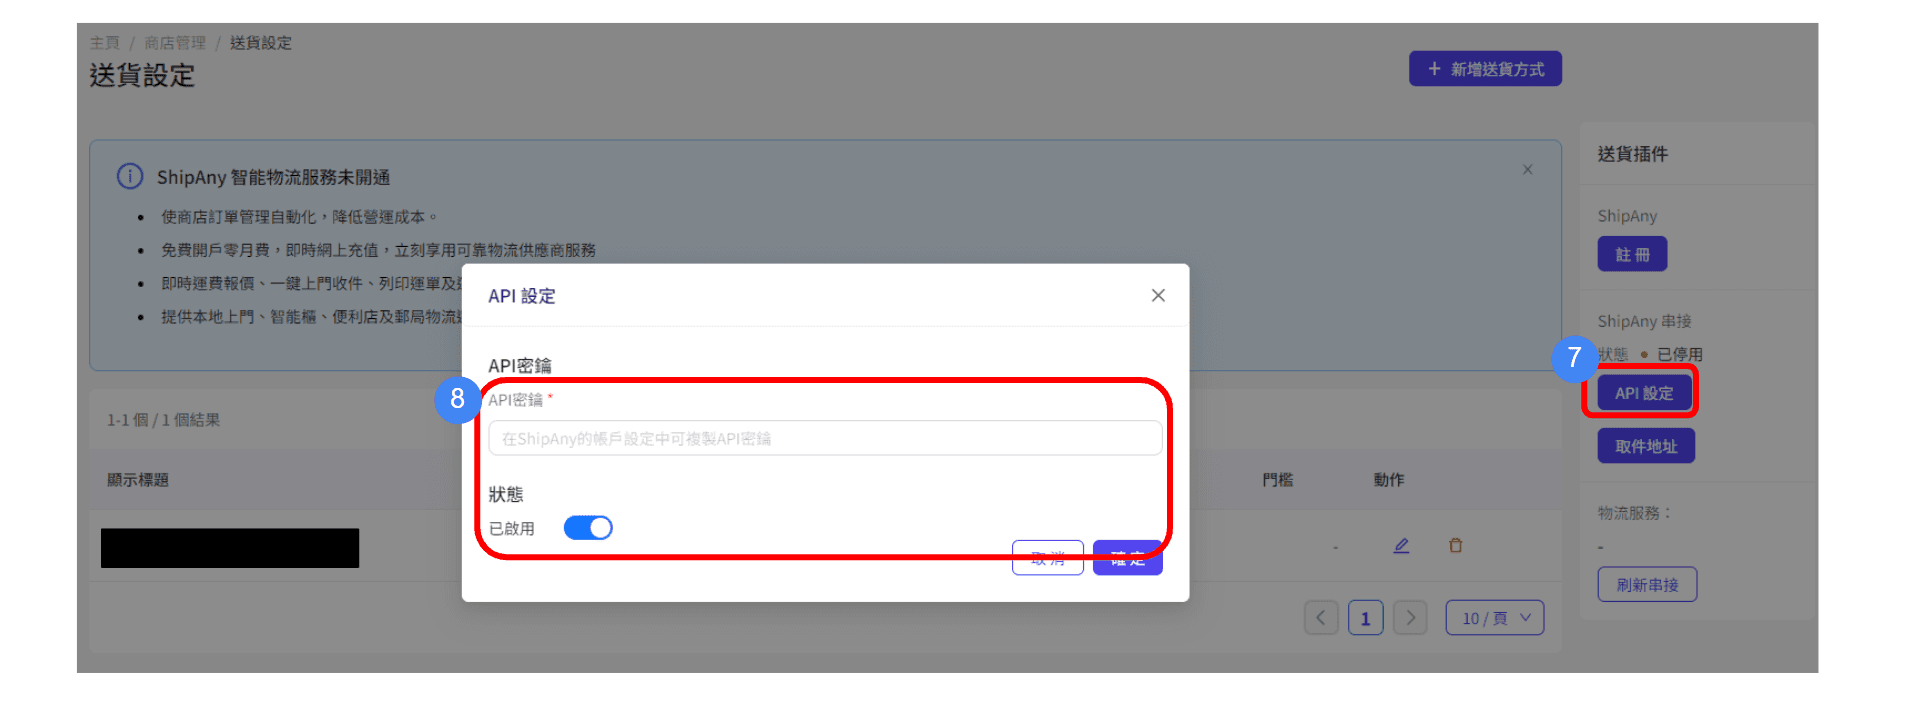
In the delivery plug-in section of MMS, click "API Settings" to enter the API key and set the status to "Enabled"
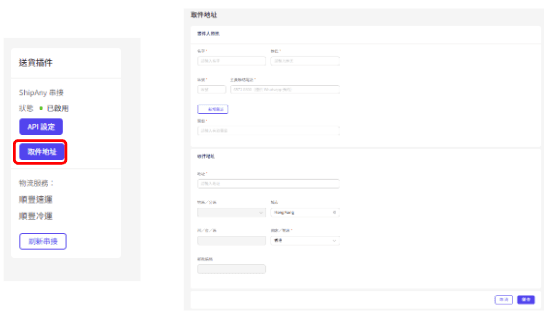
10. In the MMS delivery plug-in section, click "Pickup Address" 11. Enter the sender information and pickup address 12. Press "Save" after completion
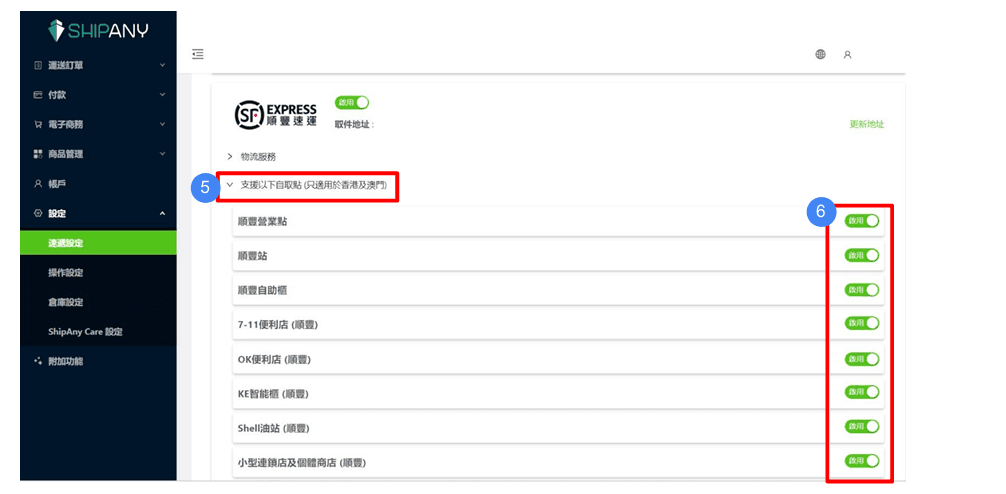
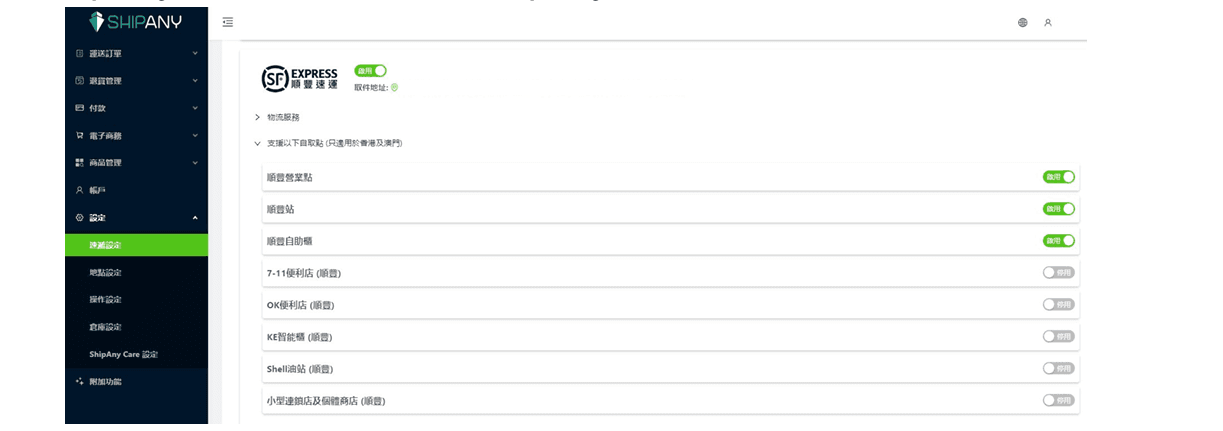
Open ShipAny delivery method *Login ShipAny backend https://portal.shipany.io/user/login
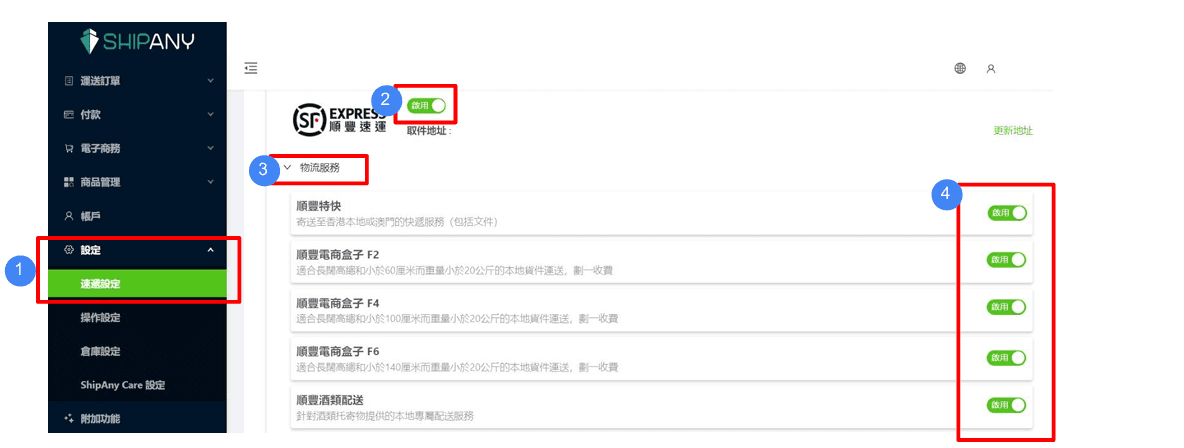
5. Select “Support the following self-pick point (only applicable to Hong Kong and Macao)” 6. Click “Enable” to activate the SF self-pick point option
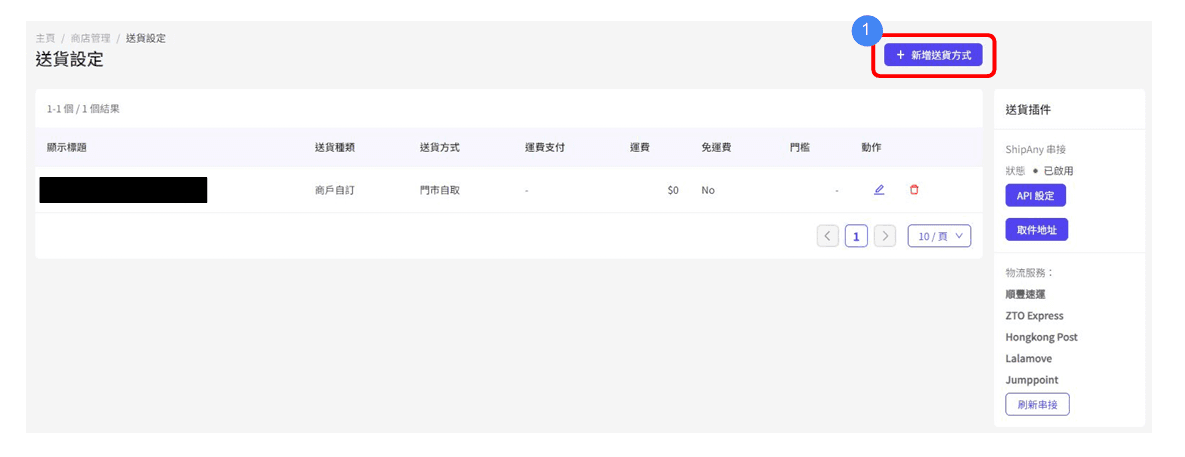
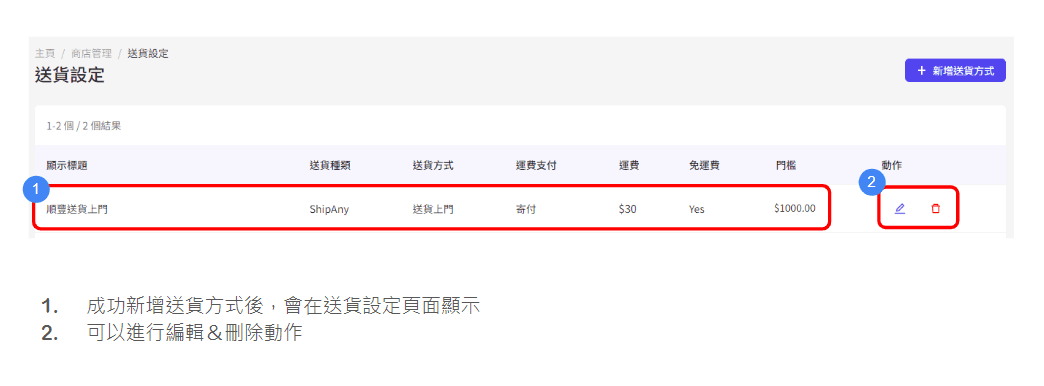
Added ShipAny delivery method *Login to MMS backend https://merchant.shoalter.com/login
Log in to MMS, on the delivery settings page, click "Add new delivery method"

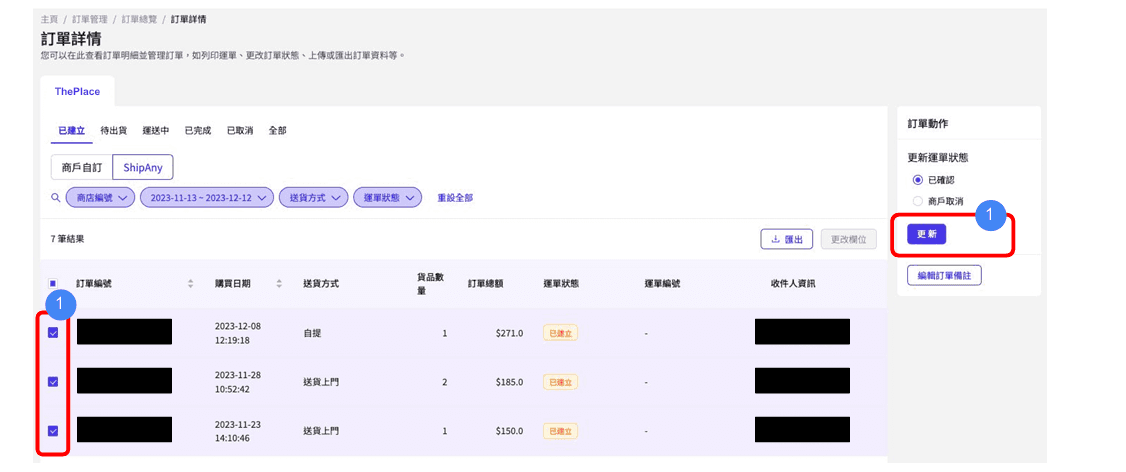
Manage ShipAny orders*Login to MMS backend https://merchant.shoalter.com/login
1. Log in to the MMS background and click on the new order to be processed 2. Confirm the order (the customer will also receive a notification that the order has been confirmed)
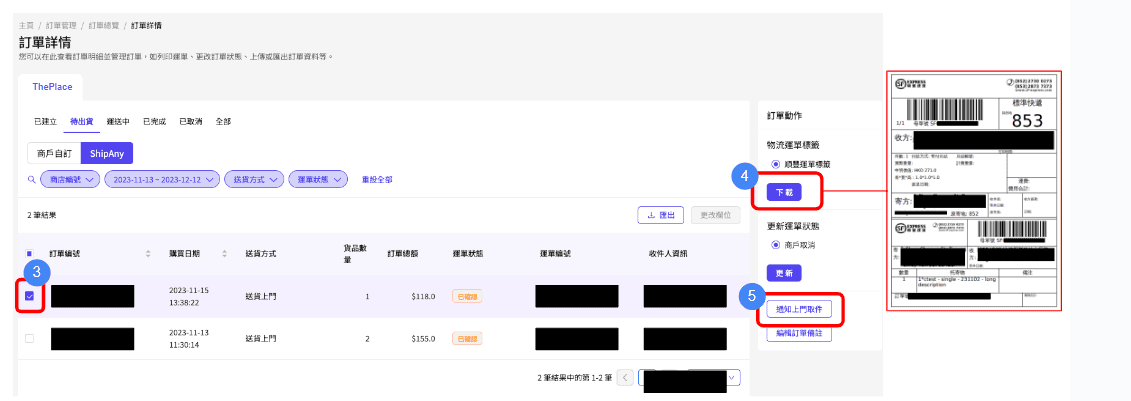
3. Click on the order to be shipped 4. Download the logistics waybill label and attach it to the parcel to facilitate shipping and use by the logistics company 5. Click "Notify the door to pick up the parts" Notify the logistics company to arrange for the courier to receive the goods
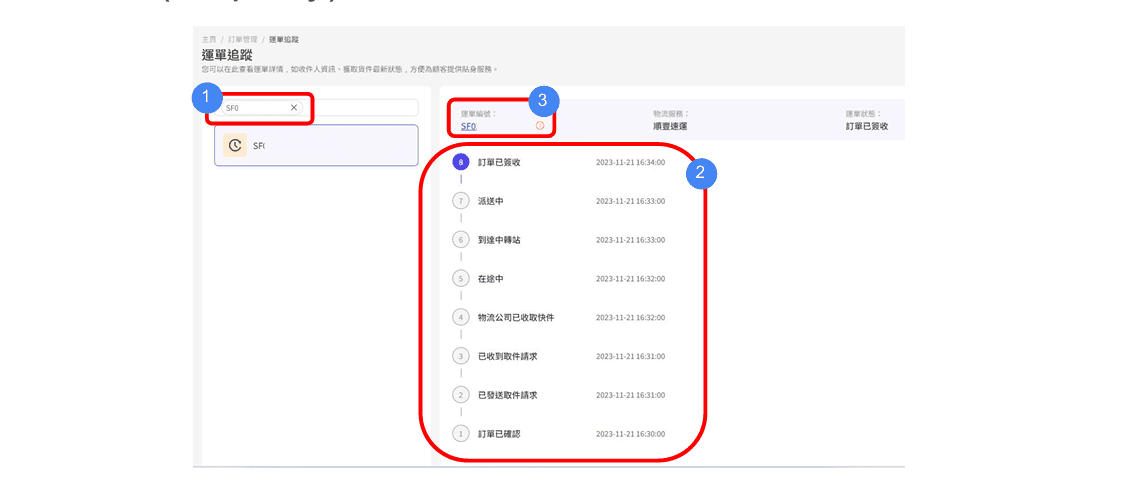
6. Enter the waybill number on the waybill tracking page to track the order shipping status in real time 7. After the logistics company picks up the parts, the system will automatically update the waybill status according to the package shipping status. 8. If you want to query the waybill details, you can click the waybill number to check the logistics official website.
ShipAny SF Express delivered to self-pickup point
1. Log in to the "ThePlace" MMS system 2. Go to "Shop Management" > "Delivery Settings" 3. The new delivery method is "self-pickup"
Order processing
Order Management
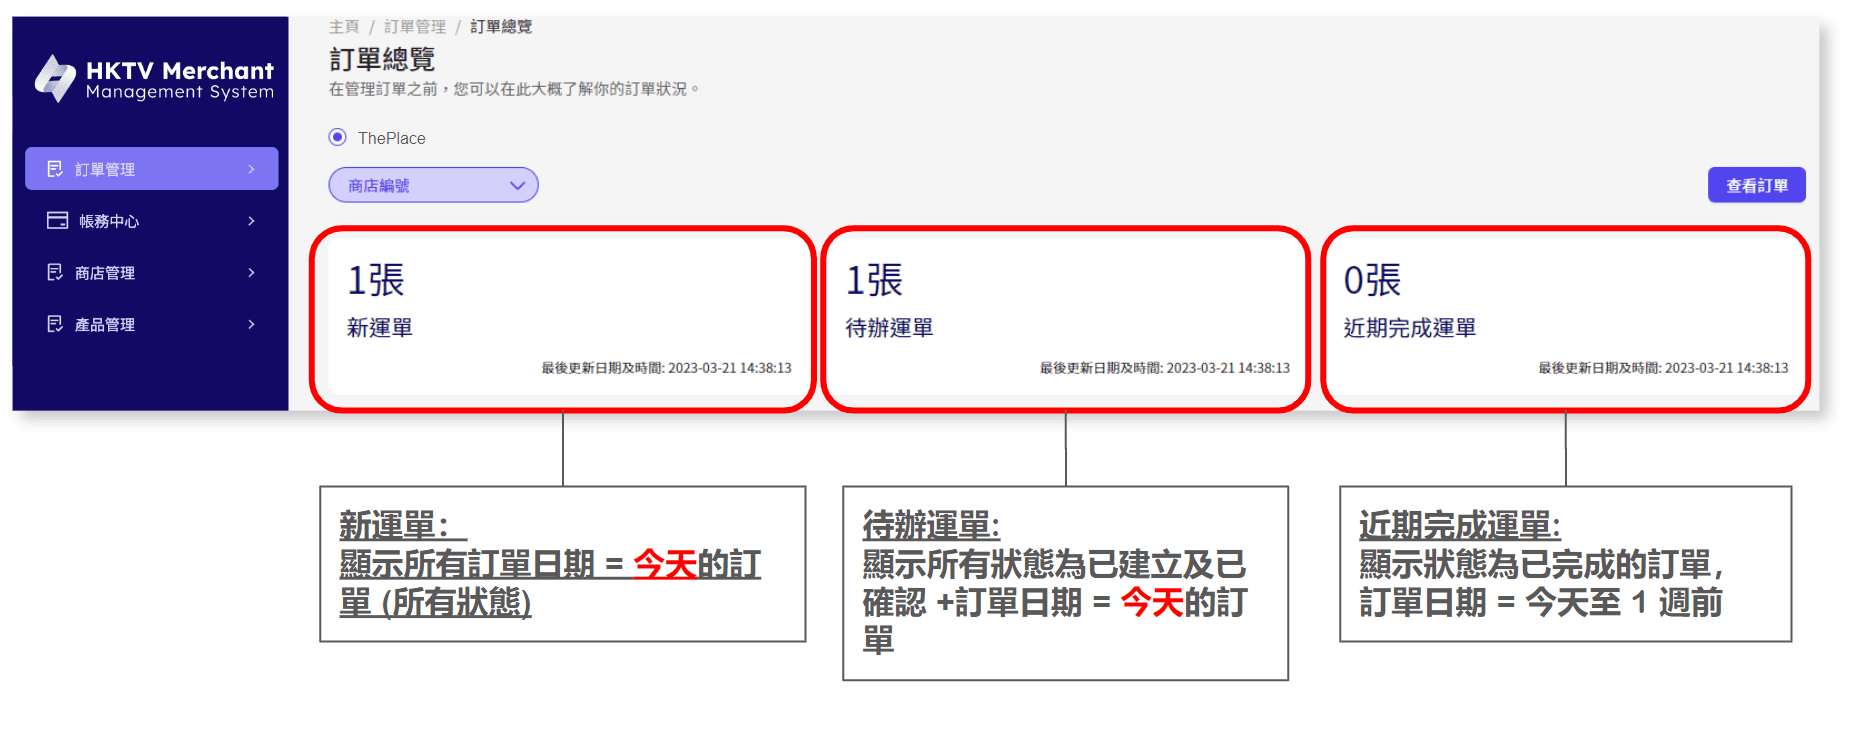
New Waybill: Show all order dates = Today's order (all status) To-do Waybill: Show all statuses established and confirmed + Order date = Today's order recent completion Waybill: Showing orders with statuses completed, order date = Today to 1 week ago
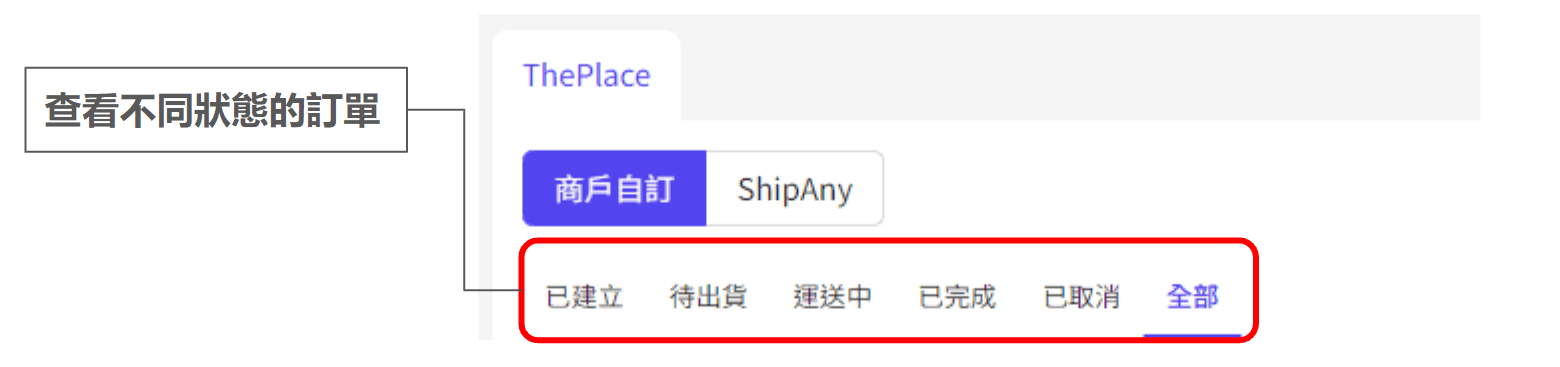
View order details to ship: Show all orders with status of established and confirmed default order date = Shipping today: Show all orders with status of shipped and recyclable default order date = Completed today to 1 week ago: Show all orders with status of completed default order date = Canceled today to 1 week ago: Show all orders with status of cancelled default order date = Today to 1 week ago All: Show all orders with status of cancelled default order date = Today to 1 week ago
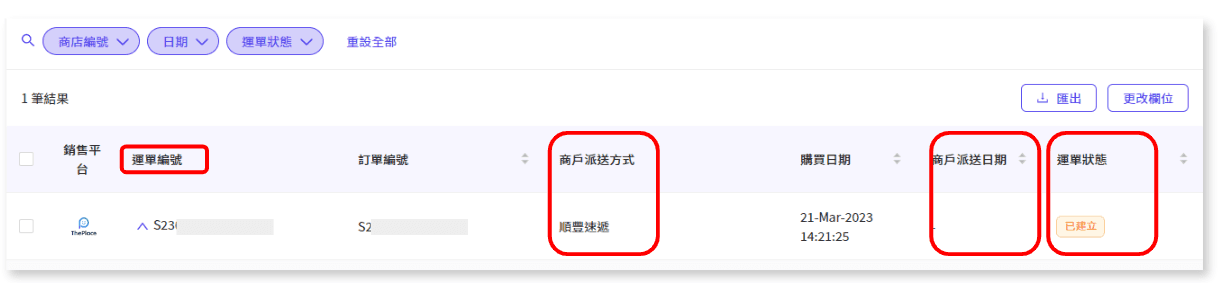
Waybill number: Click the arrow in the "Waybill number" column, and the SKU merchant delivery method purchased in the order will be displayed: Delivery method selected by the customer for the order Merchant delivery date: Display when status = SHIPPED (ShiPPED) / READY TO PICKUP (Checkable) / COMPLETED (Completed) "ThePlace" has 7 order statuses in total: #1 Confirmed (Created) #2 Acknowledged (Confirmed) #3 Shipped (Shipped) #4 Ready To Pickup (Checkable) #5 Received (Shipped) #6 Completed) #7 Cancelled (Celled)
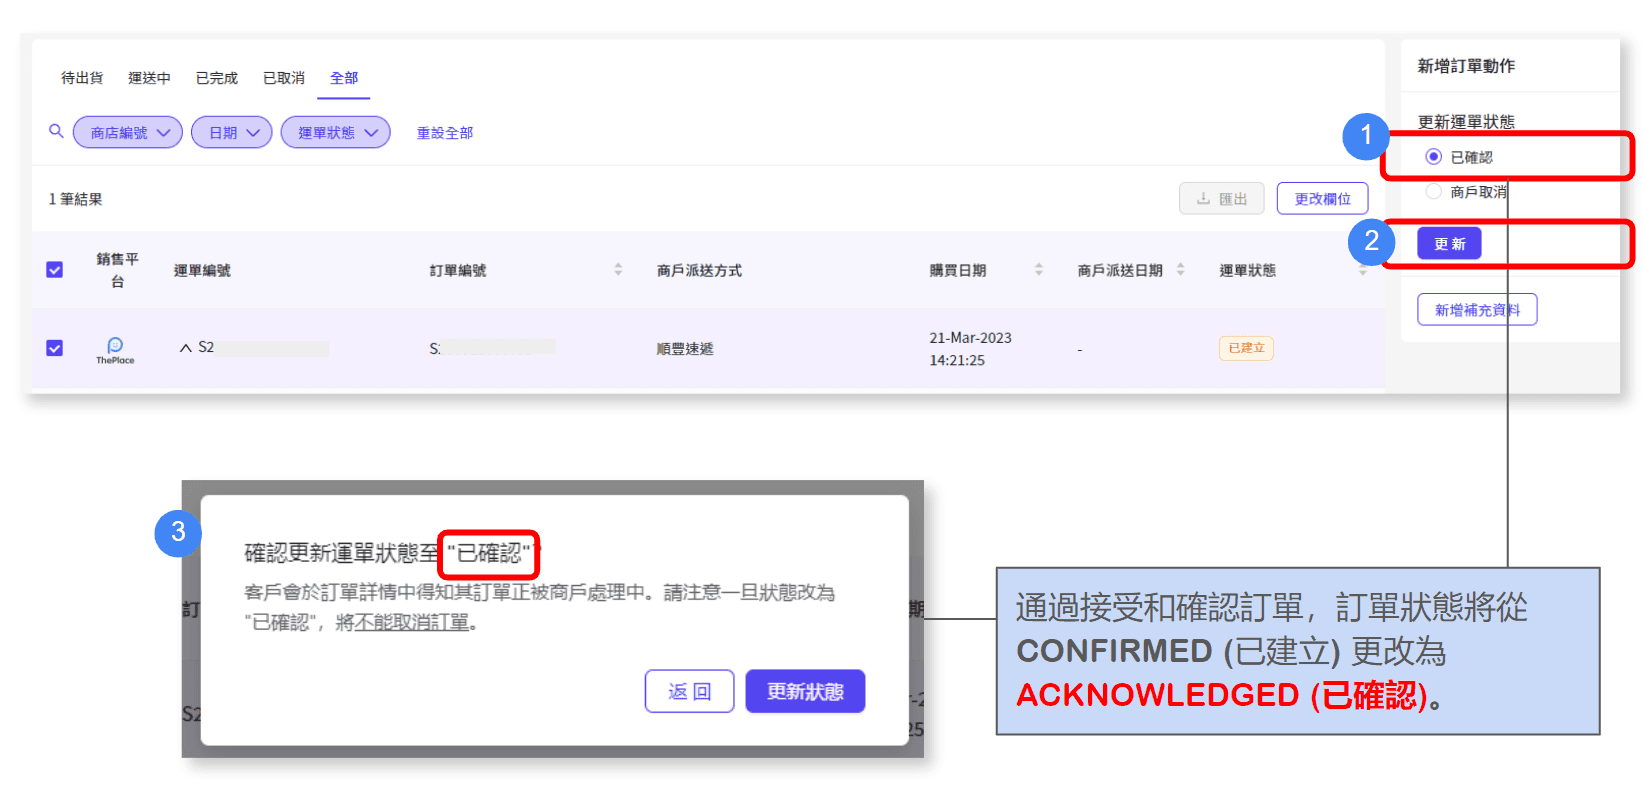
Update Status (Created > Confirmed) By accepting and confirming an order, the order status will be changed from CONFIRMED to ACKNOWLEDGED (Confirmed).
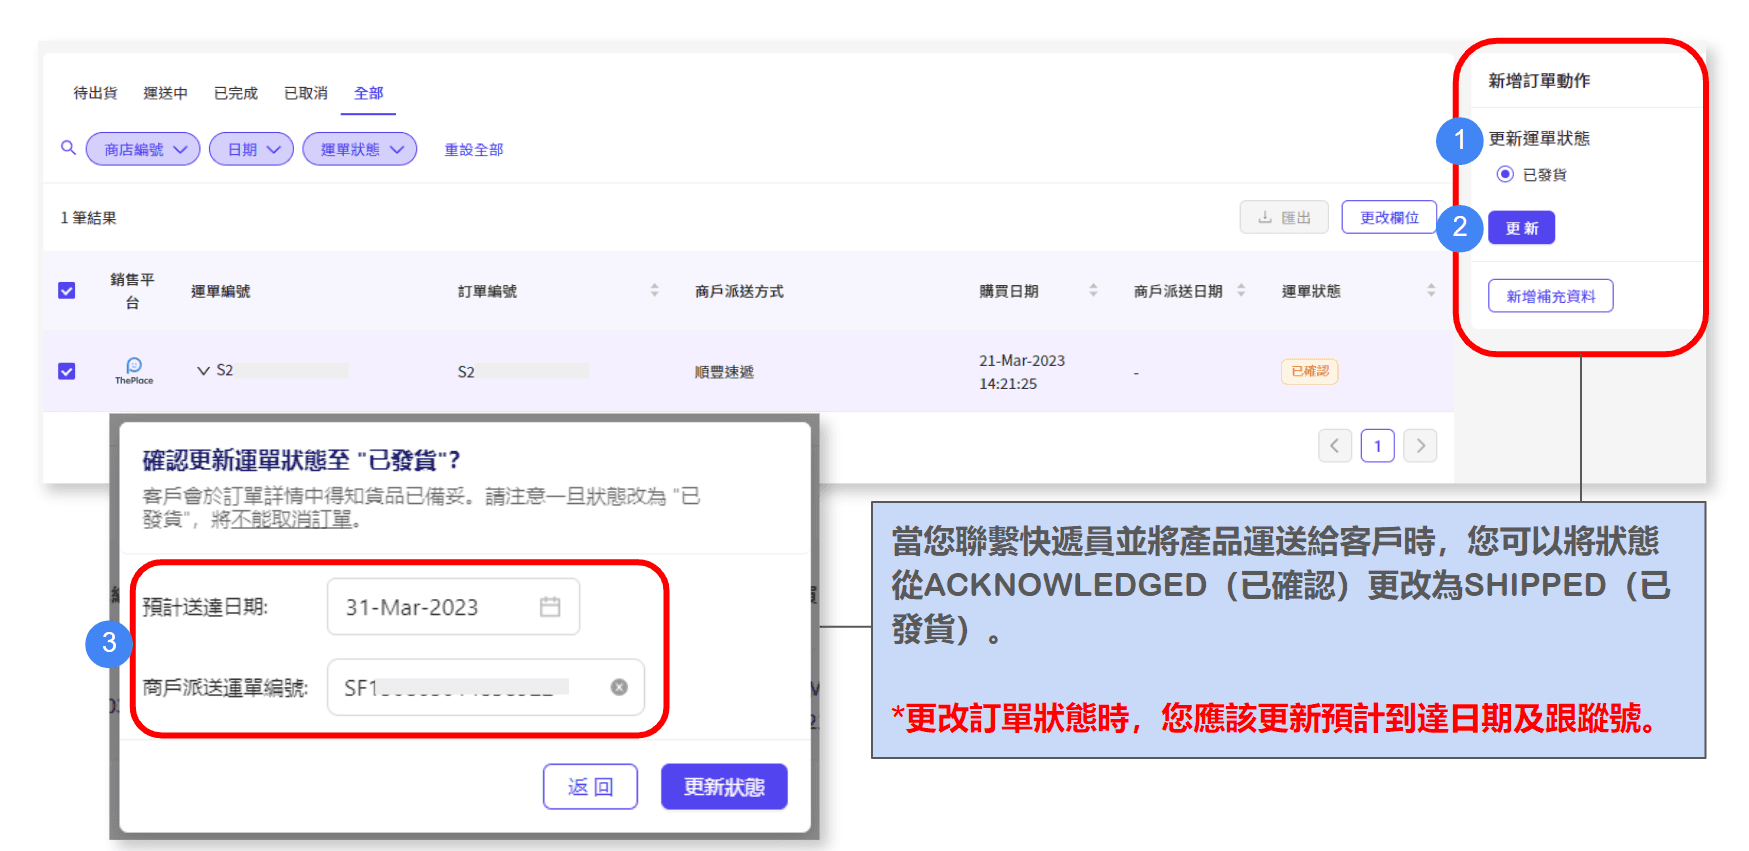
Update Status (Confirmed > Shipped) When you contact the courier and ship the product to the customer, you can change the status from ACKNOWLEDGED to SHIPPED (Shipped). When changing the order status, you should update the expected arrival date and tracking number.
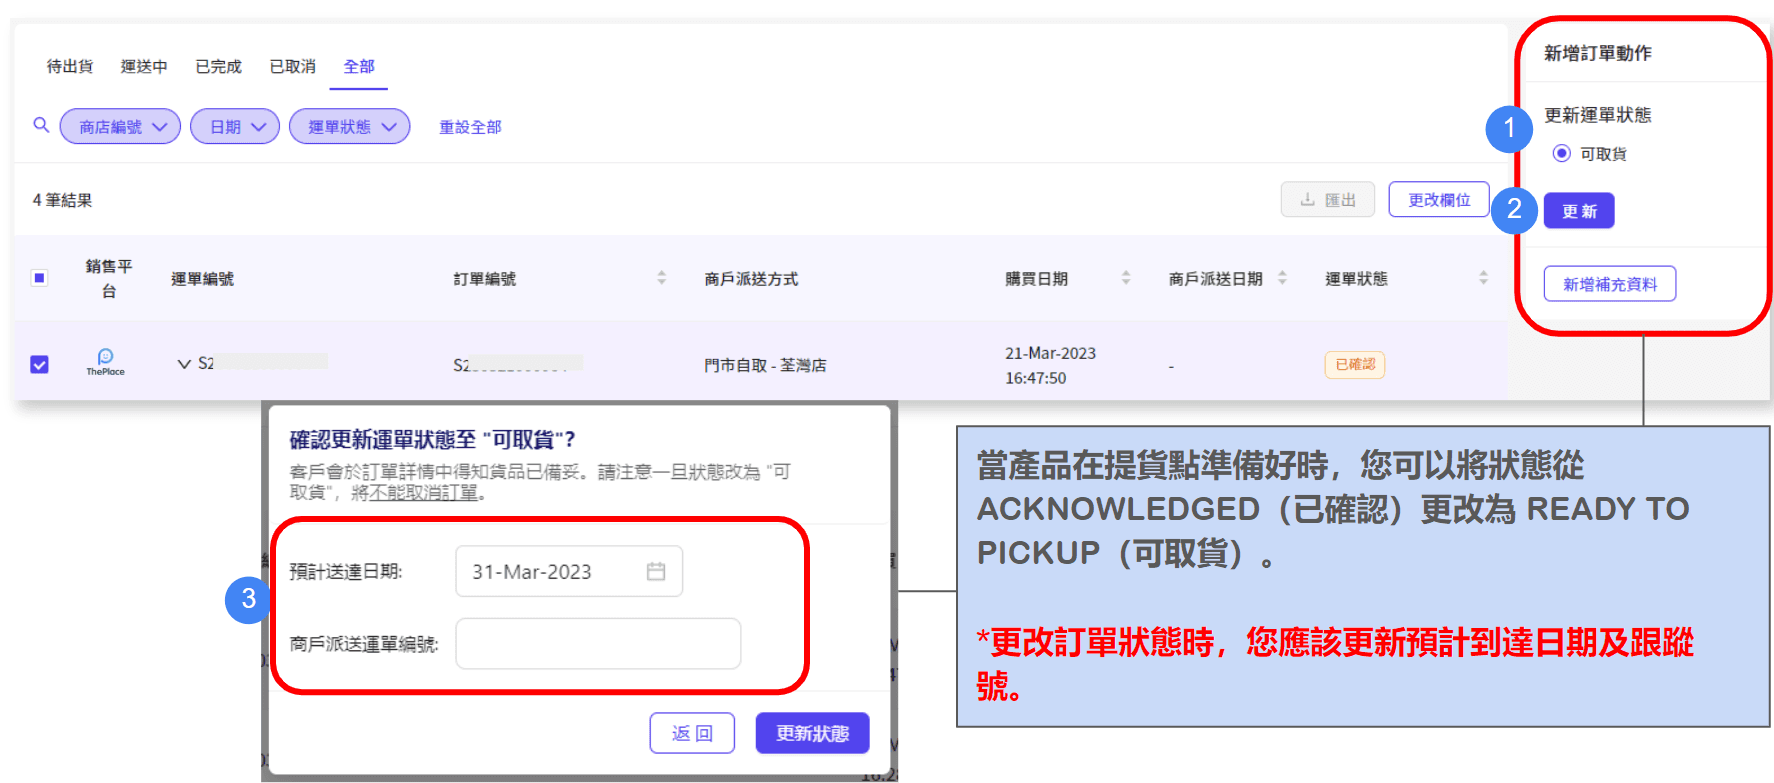
Update Status (Confirmed > Received) When the product is ready at the pickup point, you can change the status from ACKNOWLEDGED to READY TO PICKUP (Received). When changing the order status, you should update the expected arrival date and tracking number.
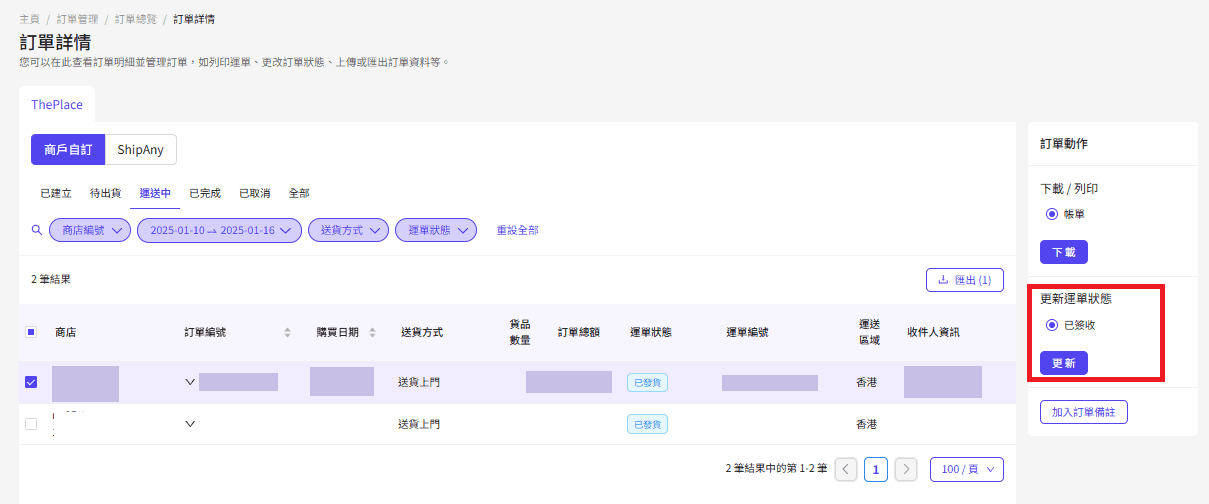
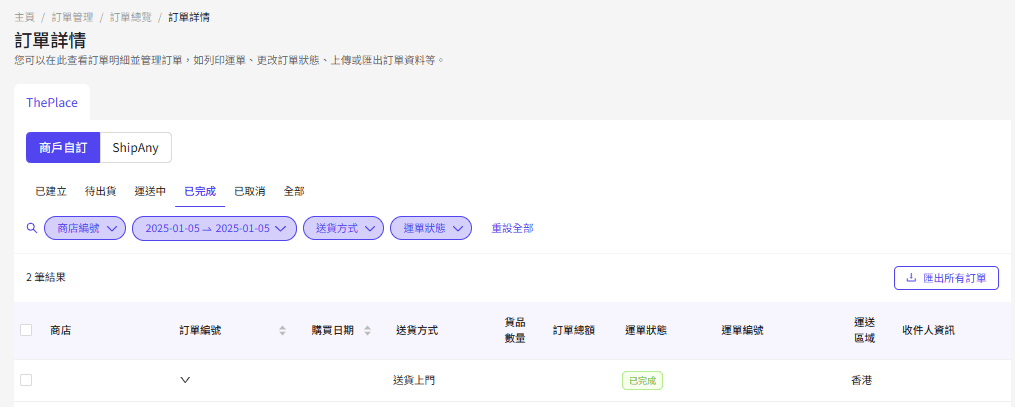
Update status (Shipped > Signed) If the merchant confirms that the customer has successfully received the goods, he can log in to the background to update the waybill status* to "Shipped". The system will notify the customer and the order will automatically be converted to "Completed" after 7 days, and the payment will also be calculated and subsequently issued on the next settlement date.
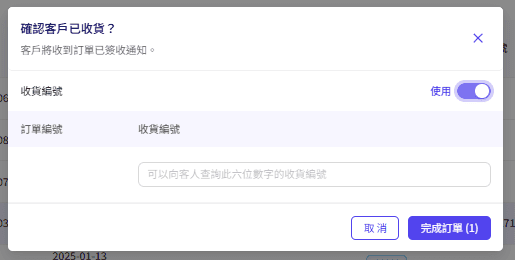
Update status (Shipped > Completed) Merchants can also ask customers to click "Confirm Received" on the "Order Details" page or provide the receipt number to the merchant. The order will also be updated immediately to "Completed"
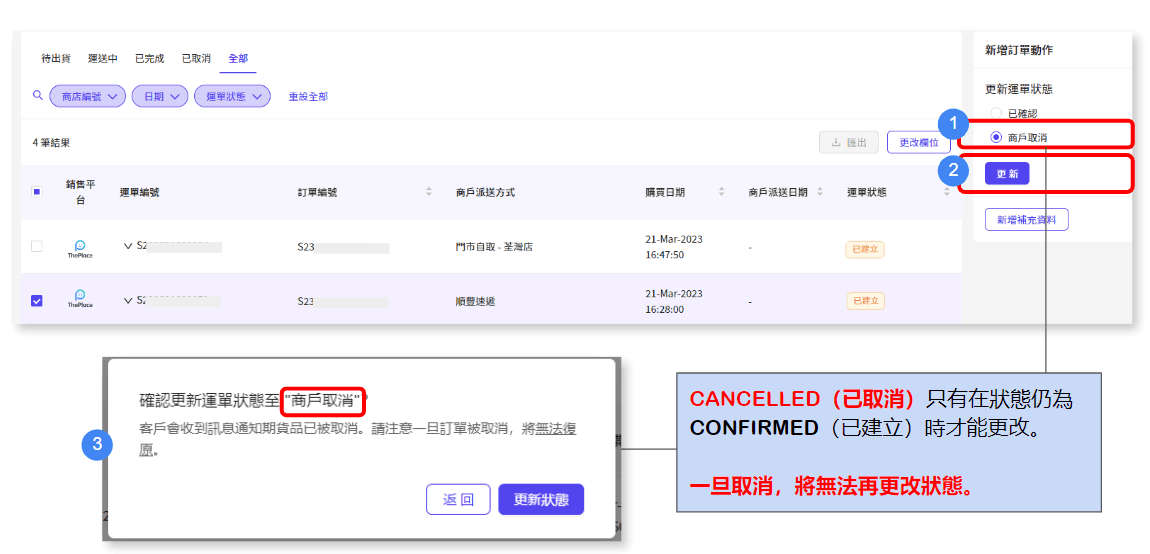
Update Status (Created > Cancel)CANCELLED can only be changed if the status is still CONFIRMED. Once canceled, the status can no longer be changed.
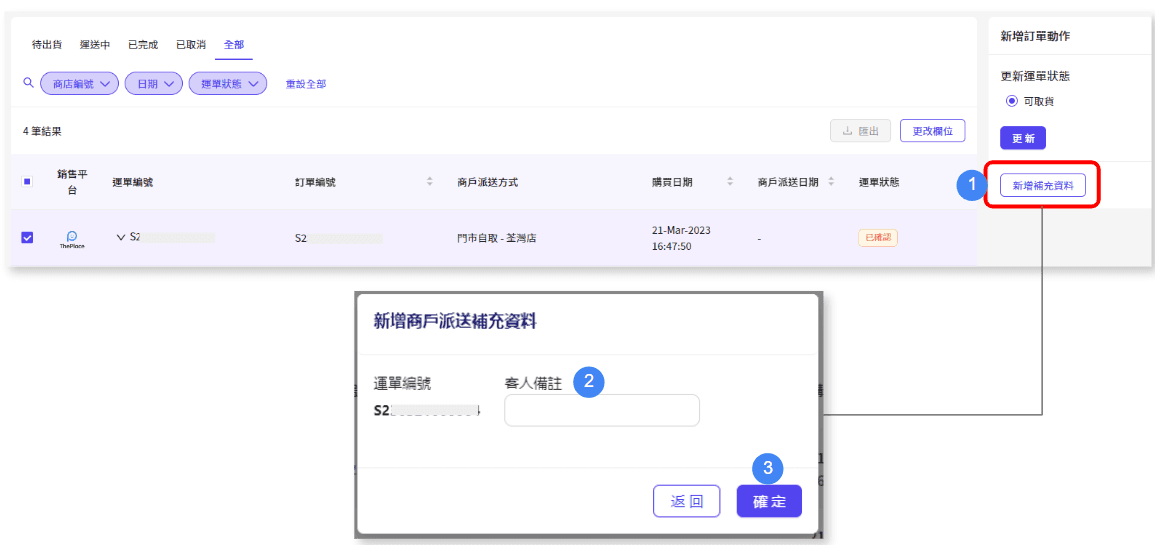
Add additional information to orders
Click "Export" to get the order delivery information and contact information for the order.
Export Order Report You can export orders excel based on filter conditions. Order details in the report: Delivery information (including recipient name, contact information and address, etc.) Contact information (including user name, phone number and email address).

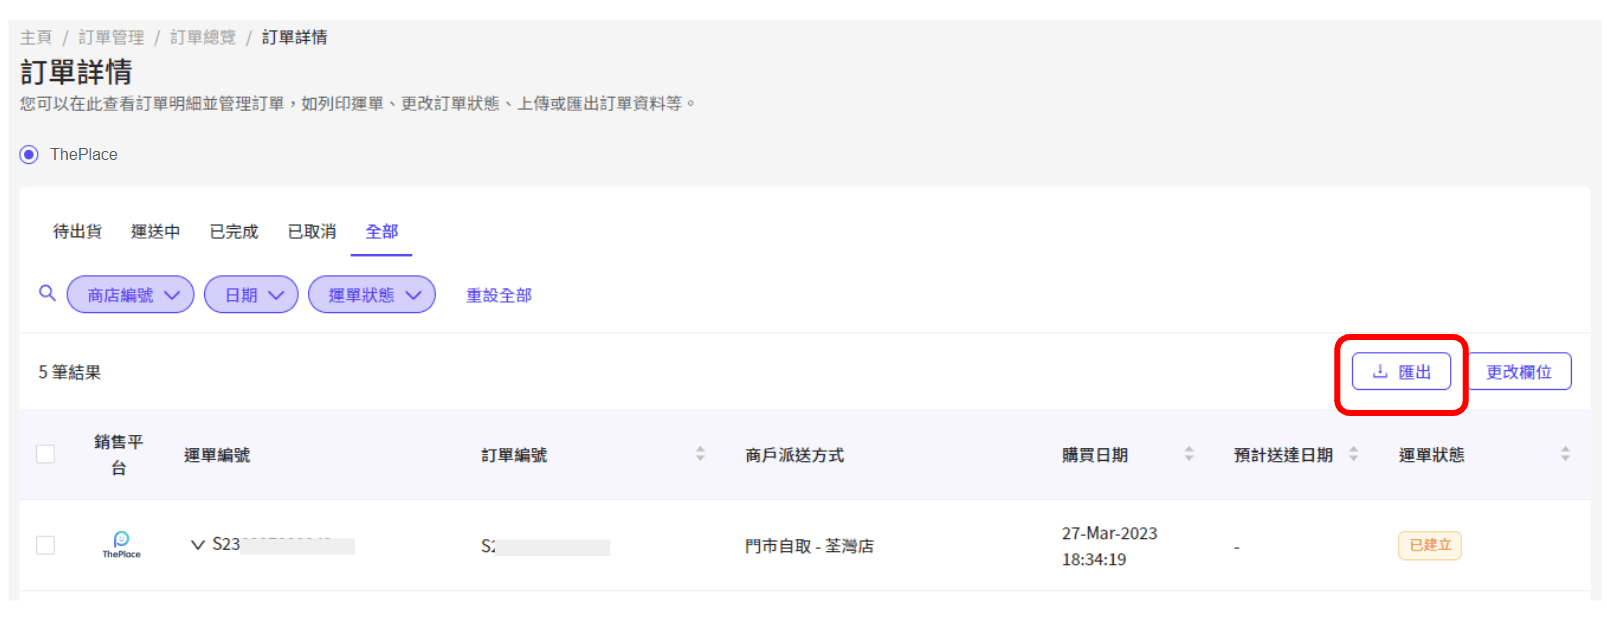
Pickup order
列印撿貨單 (Pick List) 步驟
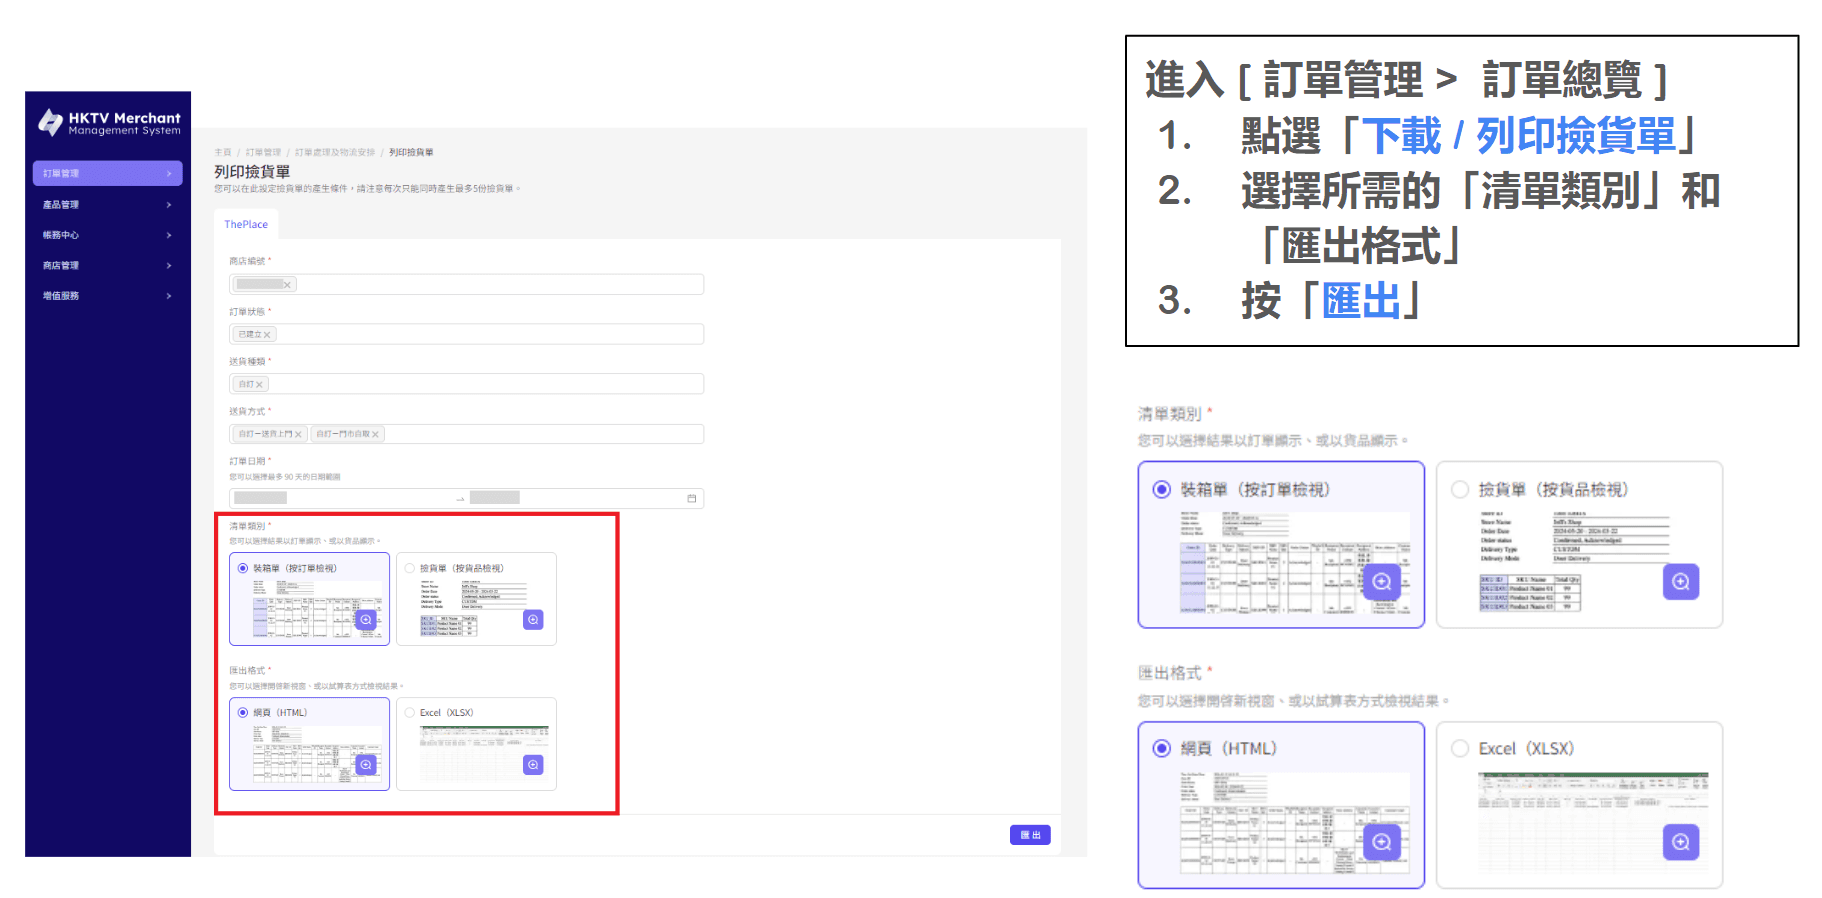
進入 [ 訂單管理 > 訂單總覽 ]
點選「下載 / 列印撿貨單」
選擇所需的「清單類別」和「匯出格式」
按「匯出」
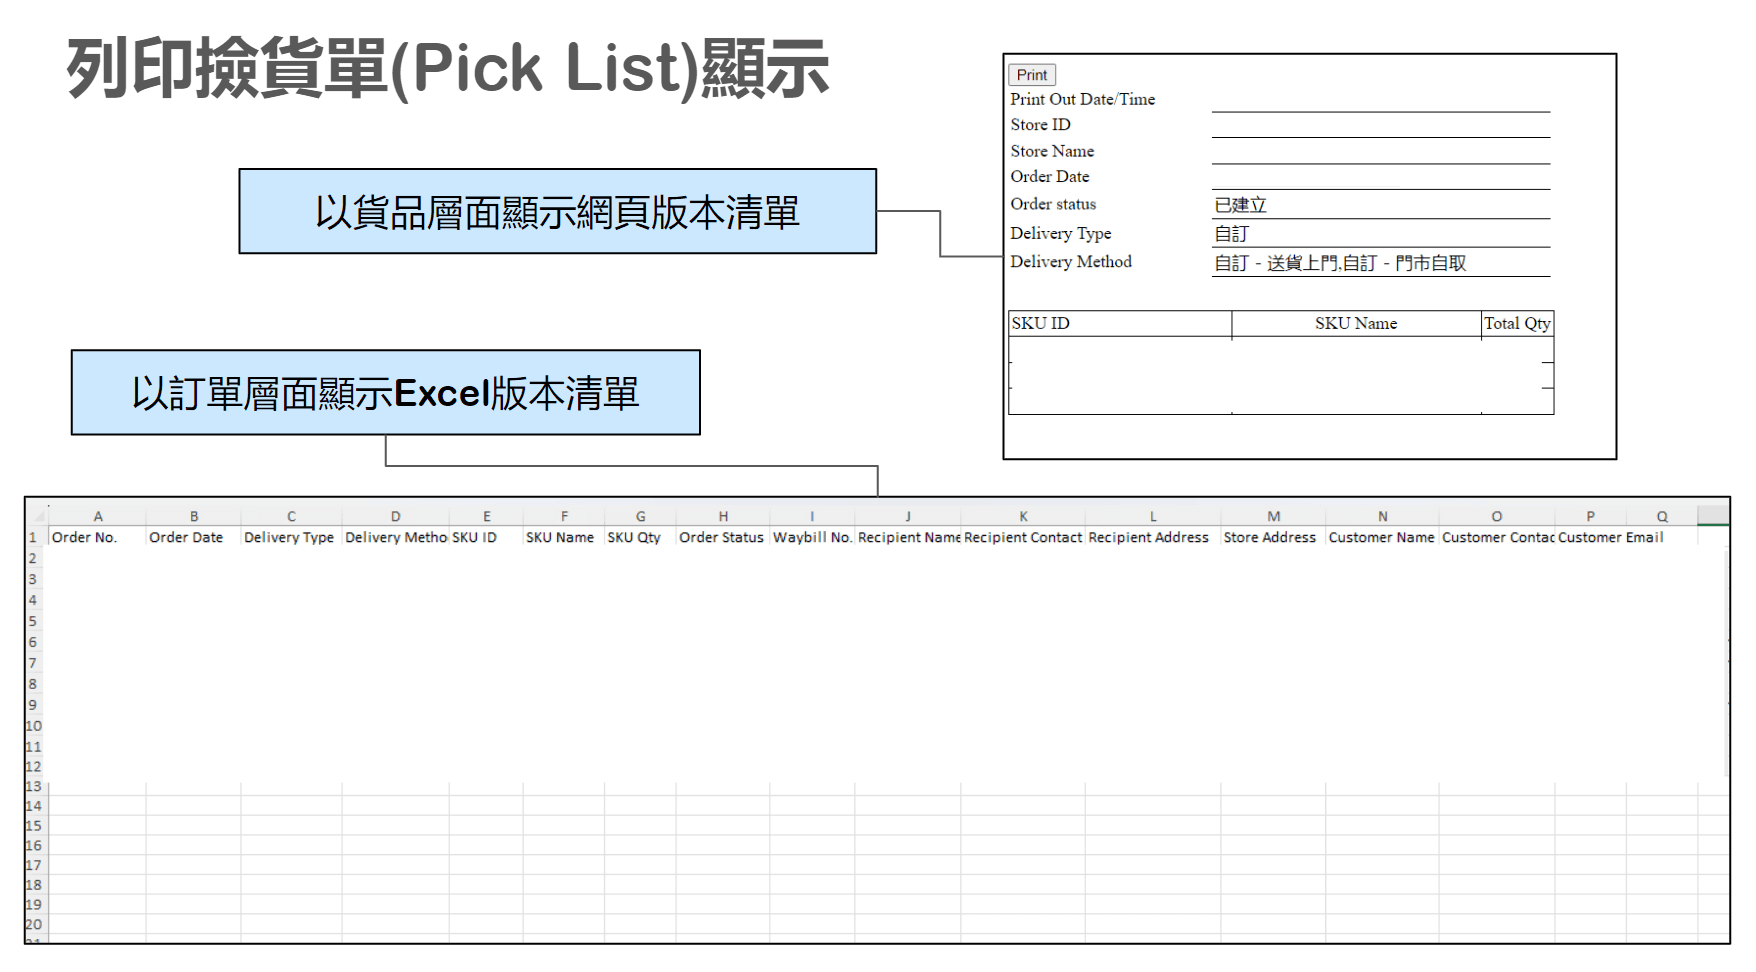
- 以貨品層面顯示網頁版本清單
- 以訂單層面顯示Excel版本清單
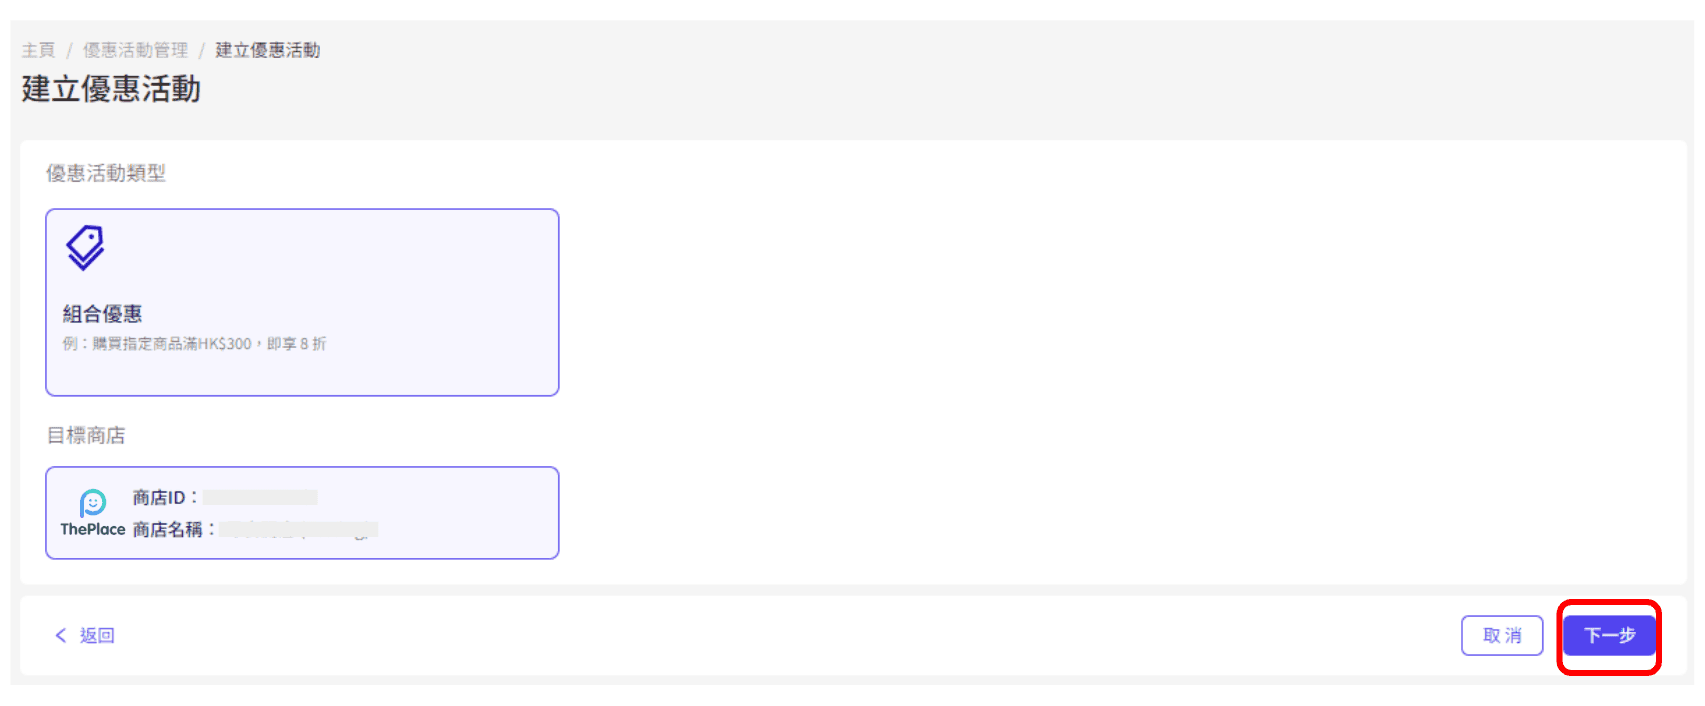
建立優惠活動
優惠活動管理
建立優惠活動 - 第1步
點擊「下一步」以設定優惠活動詳細信息
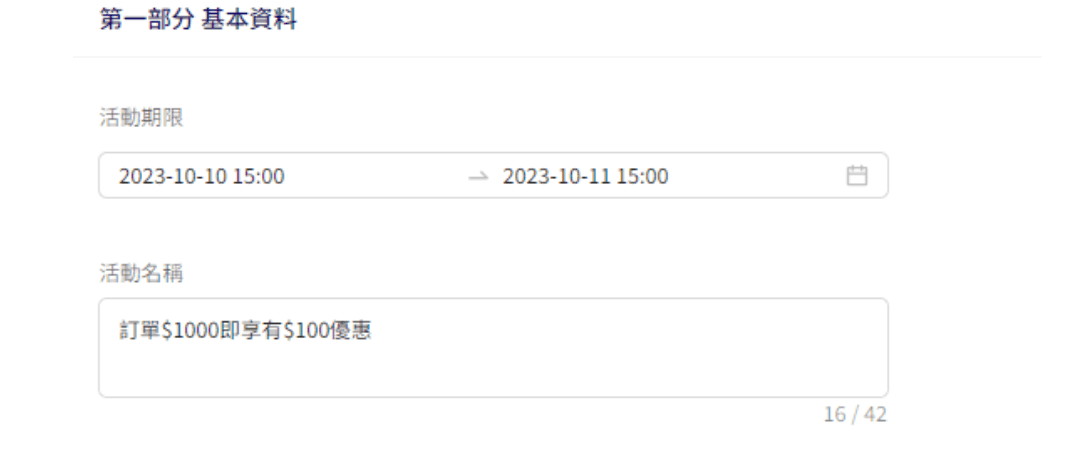
建立優惠活動 - 第2步
活動期限:優惠活動生效的時間。
活動名稱:僅供內部使用,以便您更加方便管理優惠活動。
* 備註:優惠活動開始時間不能設定在當前時間之前。
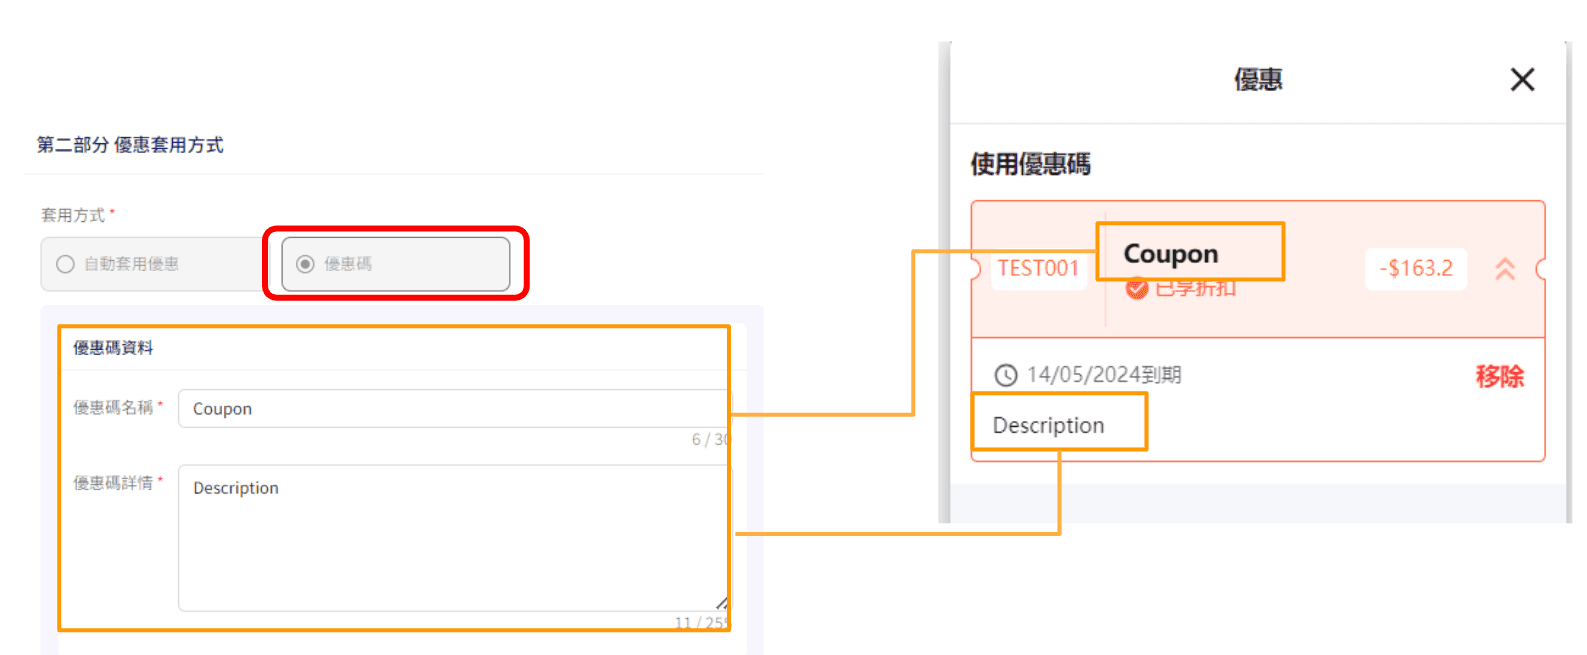
建立優惠活動 - 第3步
於套用方式點選 「優惠碼」
輸入優惠碼資料
優惠碼名稱
優惠碼詳情
建立優惠活動 - 第4步
輸入通用優惠碼設定
通用優惠碼 ( 最多10字元,包含大小寫英文字母和數字 )
每個優惠碼的使用上限 ( 可設置無限 )
每位顧客可使用該優惠碼的上限
* 注意 : 請留意優惠碼的英文大小寫差異
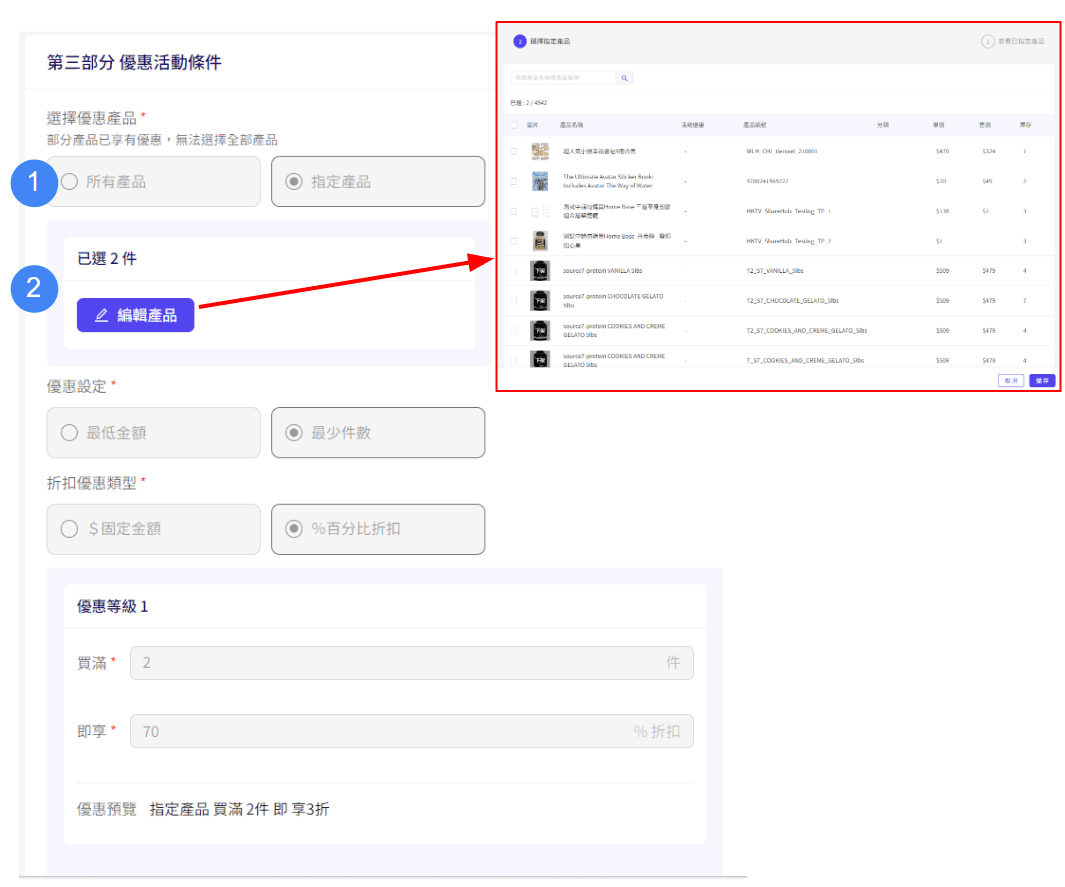
建立優惠活動 - 第5步
加入產品:當客人所選產品達到優惠活動的購買門檻時(例如最低訂單金額或數量),該優惠碼將適用。
* 備註:一個交易同時只能使用一個優惠碼,但優惠活動(如滿額即減/享有折扣)可與優惠碼同時使用。購買門檻可以在特定產品上設定為「最低金額」或「最低數量」。一旦設定了條件,您可以設定該優惠活動的具體折扣百分比、金額或產品數量。每個優惠活動最多可設定三個不同層級的折扣,以幫助提升銷售。
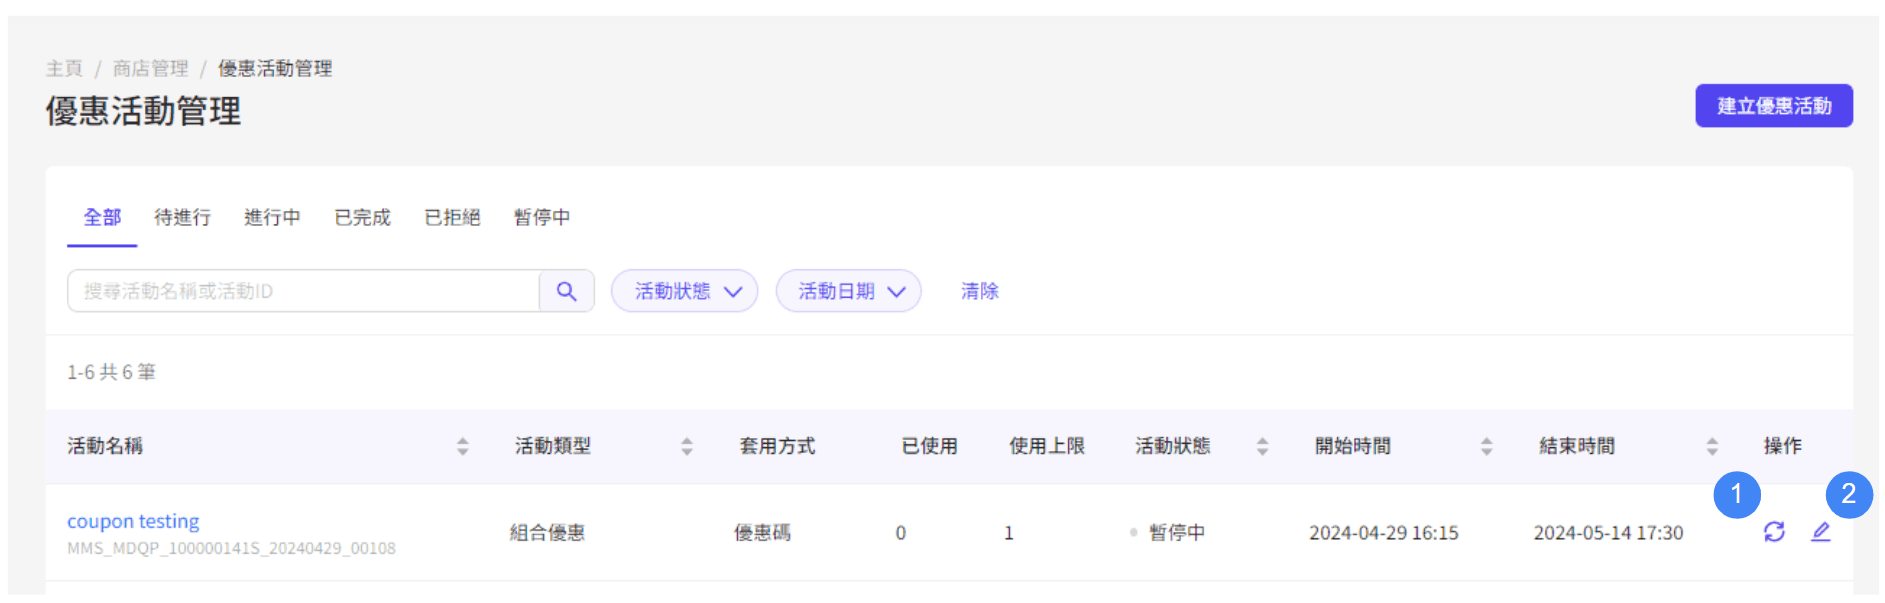
建立優惠活動 - 第6步
暫停或繼續優惠活動
編輯優惠活動詳情
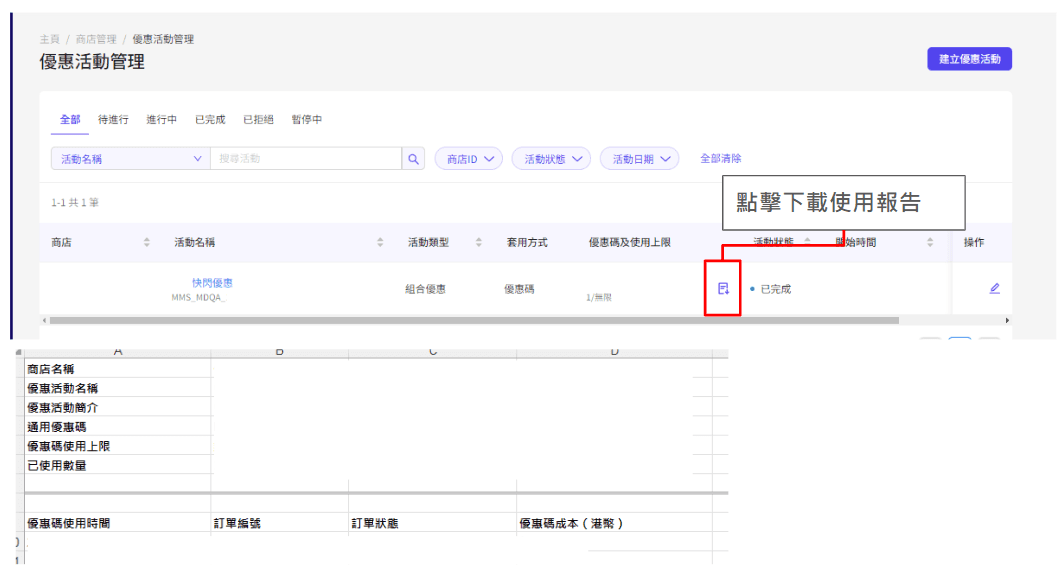
建立優惠活動 - 第7步
點擊圖示下載使用報告
客戶互動
即時對話功能
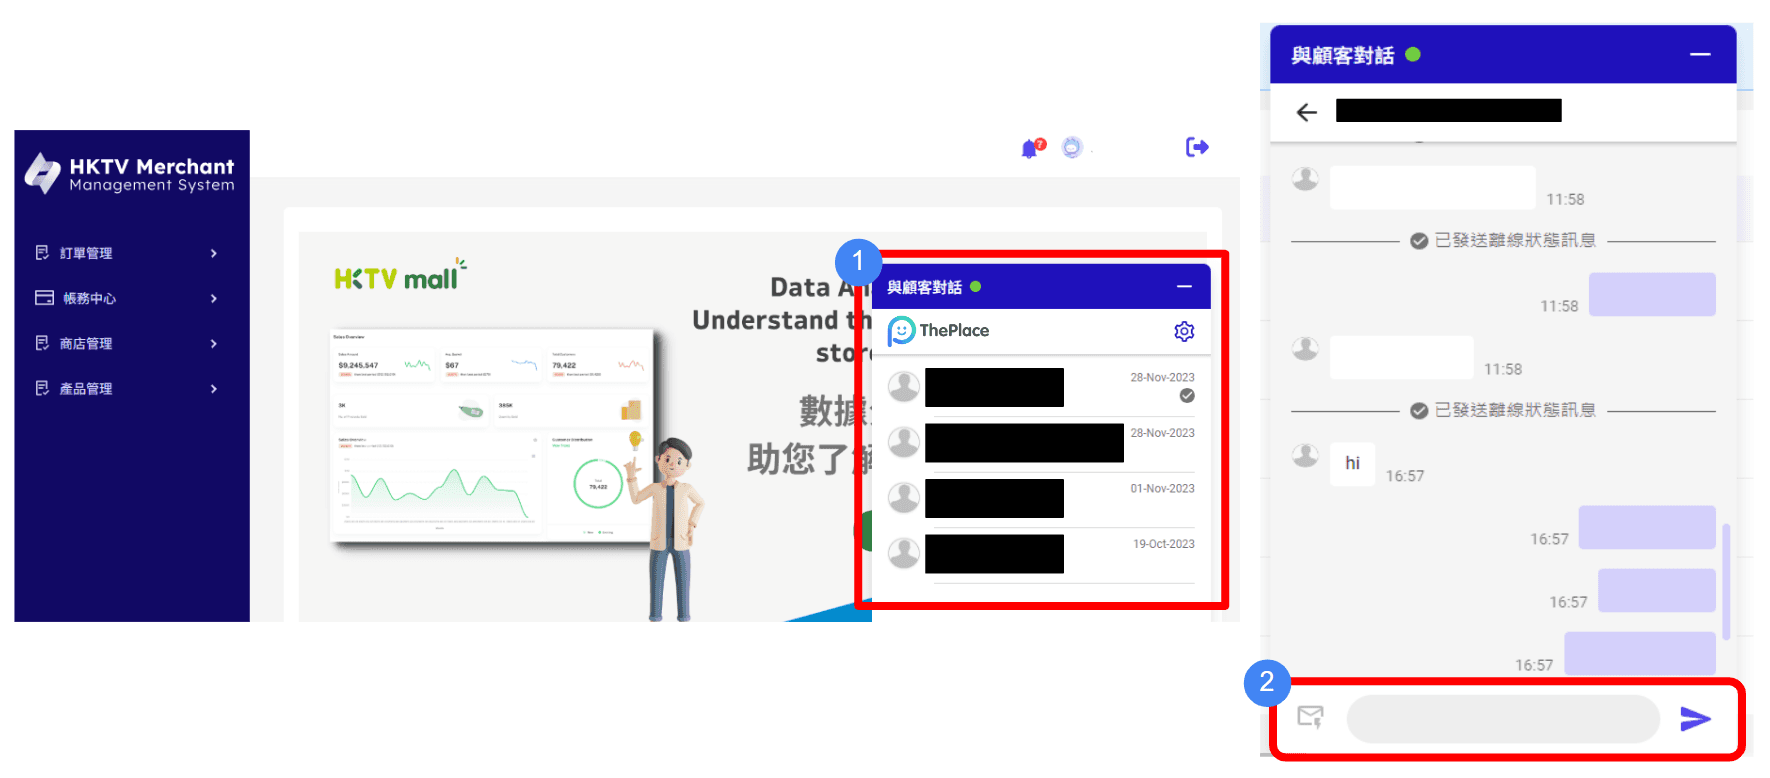
與顧客對話
點擊「與顧客對話」查看所有顧客查詢
您的電郵及後台會收到通知訊息,可點擊對話欄直接回覆
* 即時對話功能用戶指南 (點擊詳閱用戶指南)
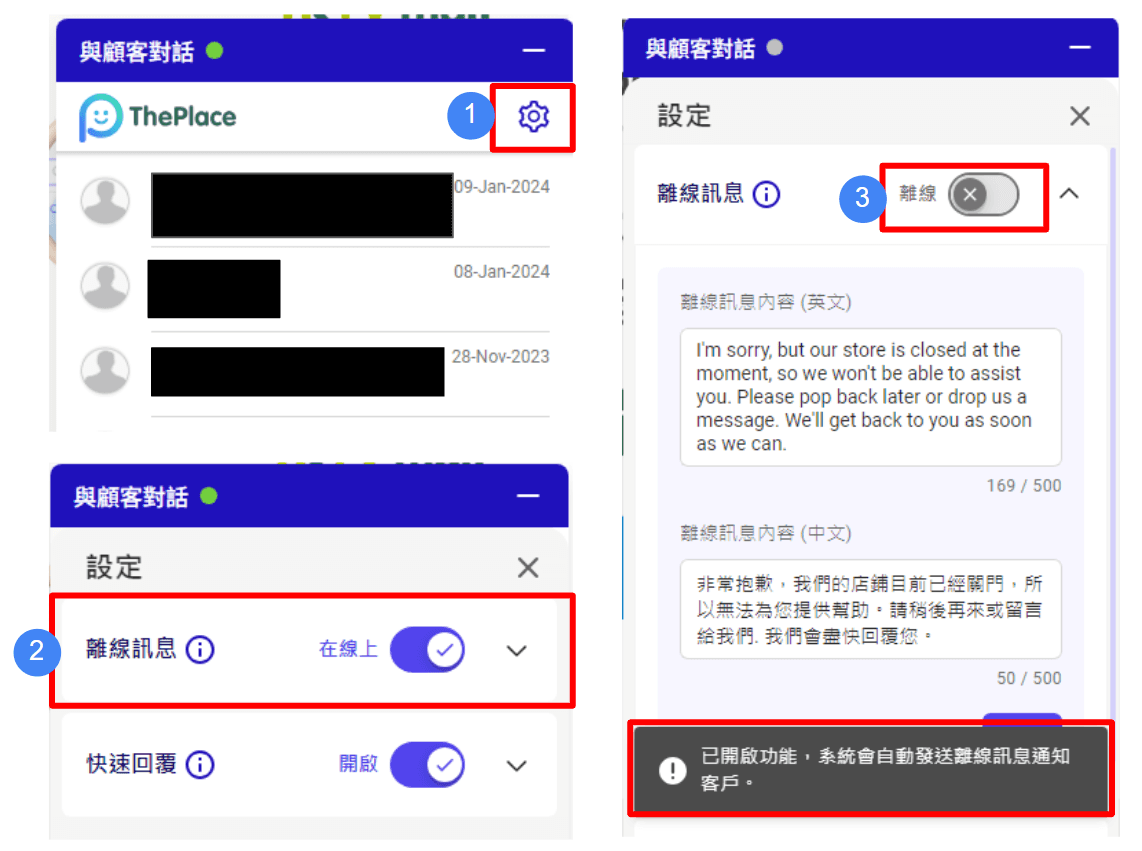
自動離線回覆功能
點擊「設定」查看對話功能
點擊「離線訊息」,輸入離線訊息內容(英文/中文)
設定狀態為「離線」,下方會顯示「已開啟功能,系統會自動發送離線訊息通知客戶」
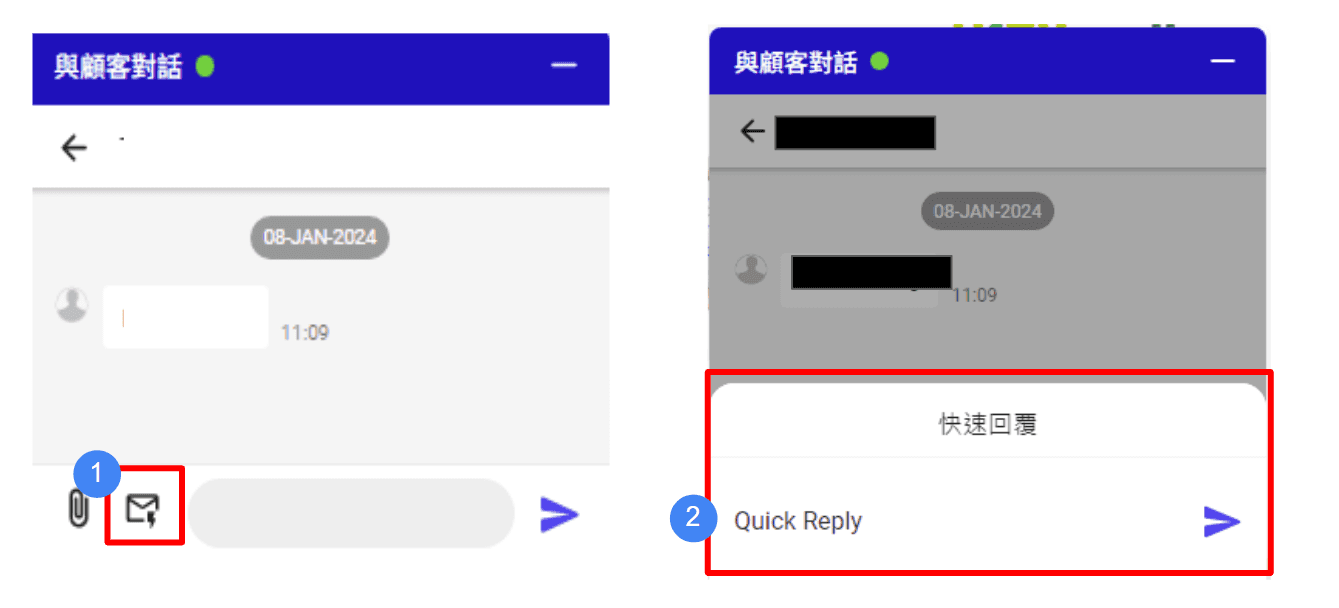
使用快速回覆功能
點擊「快速回覆」按鈕
選擇快速回覆的內容並發送
更多功能
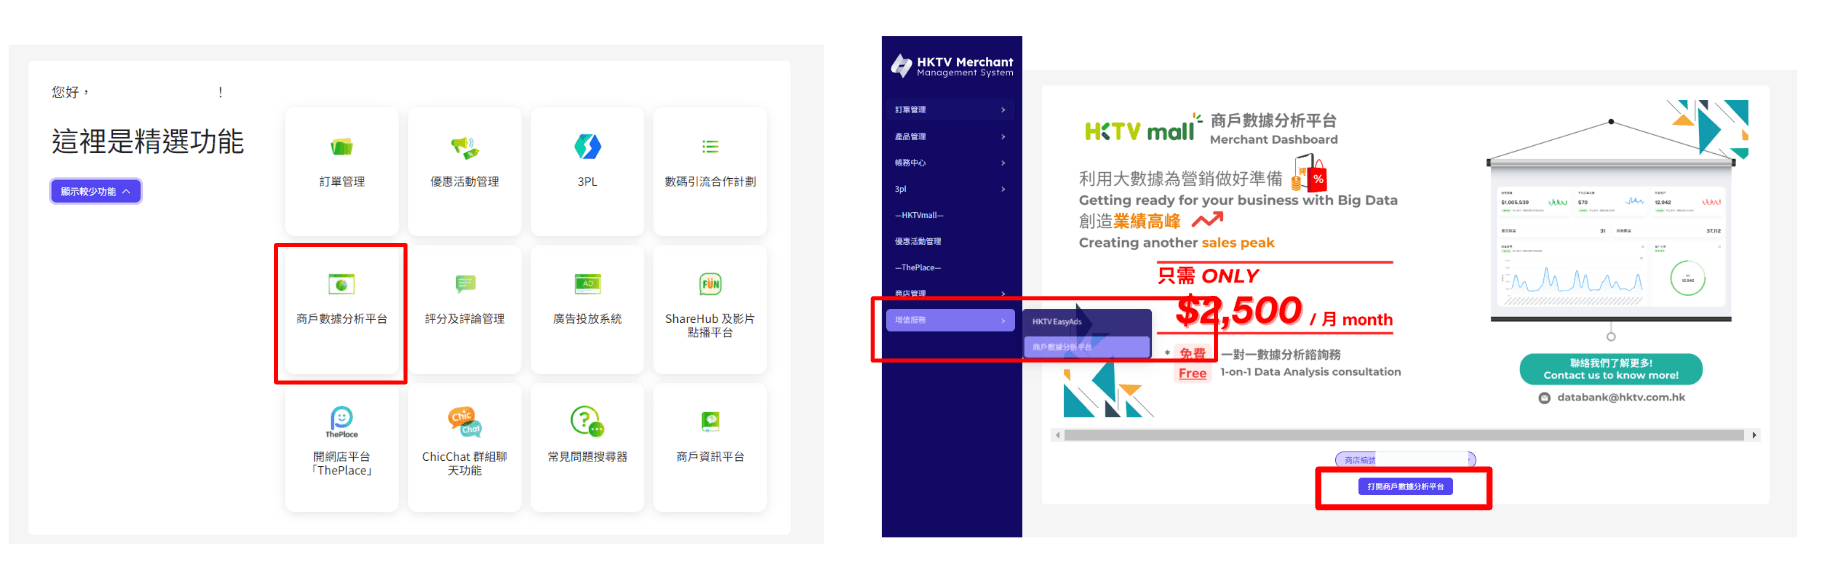
商戶數據分析平台
點選「商戶數據分析平台」或 點選 「增值服務」>「商戶數據分析平台」
點選「打開商戶數據分析平台」
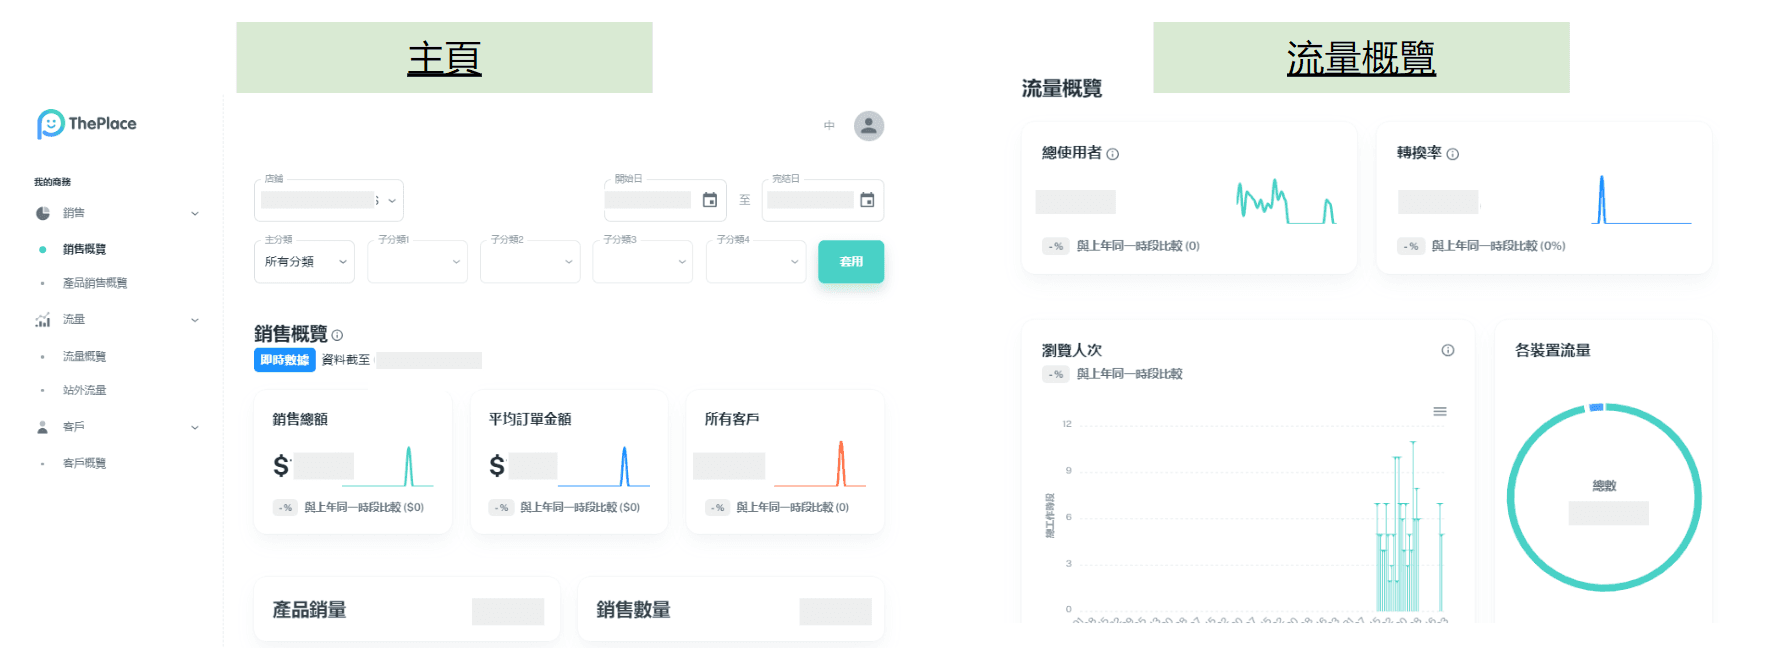
商戶數據分析平台數據包括:
銷售概覽產品
銷售概覽
流量概覽
站內流量
客戶概覽
自訂網域
「ThePlace」商戶擁有預設的免費商店網址(https://www.theplace.shop/[store_code]),商戶可按需要調整商店編號部分的網址 ( 如 https://www.theplace.shop/abc)
進入「商店管理」 > 「網域設定」頁面
點選您的「更改商店網址」
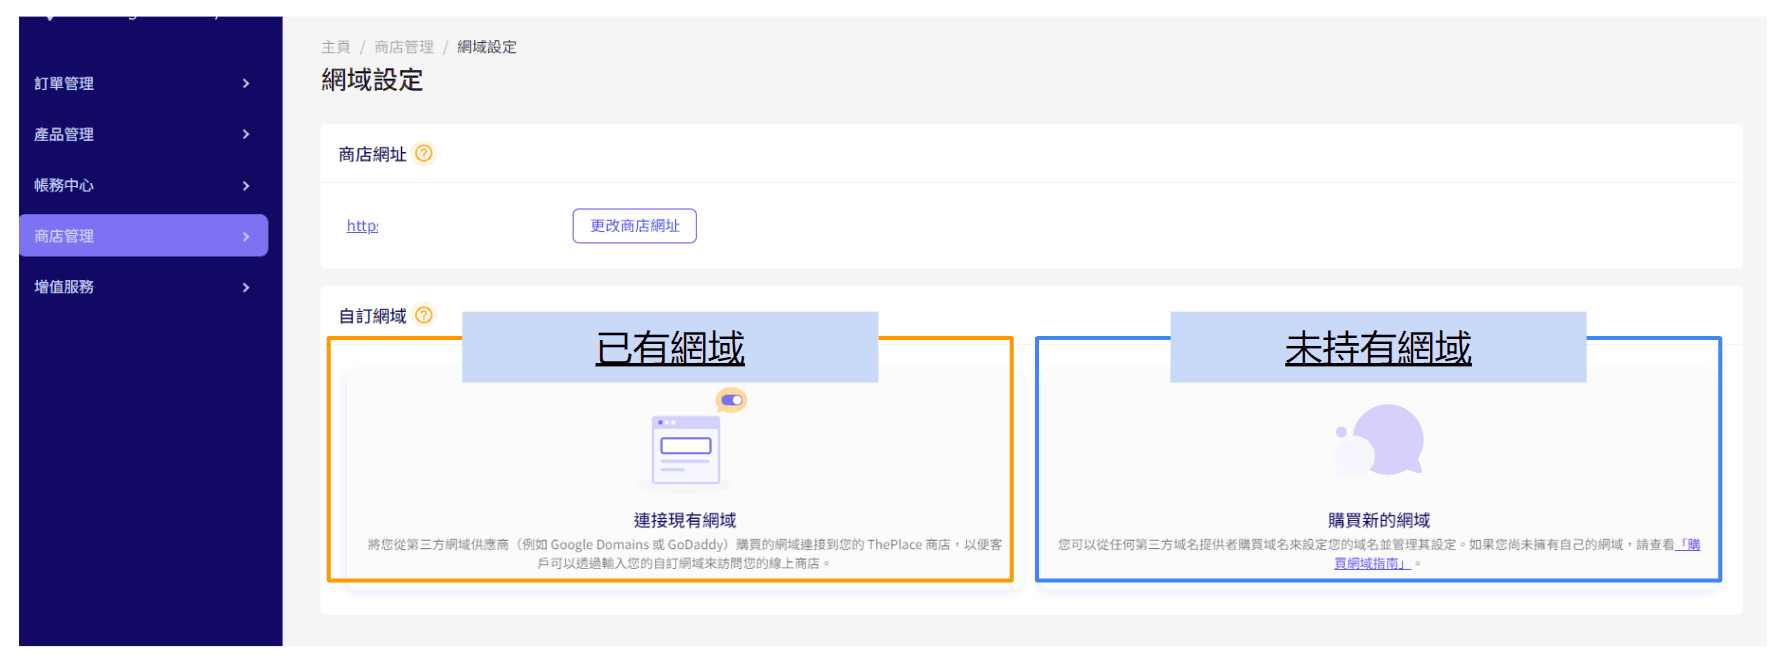
商戶亦可進一步使用與品牌或商店相關的字詞自訂網店的獨有網址(例如:www.example.com),自訂網域設置如下
自訂網域 - 第一步
進入「商店管理」 > 「網域設定」頁面
點選您的自訂網域方式
*經「新業務申請」至「ThePlace」的HKTV商戶,注意需使用「MERCHANT_ADMIN」角色來操作網域設定頁面
** 基於網絡安全考慮,自訂域名只支援DNS記錄。
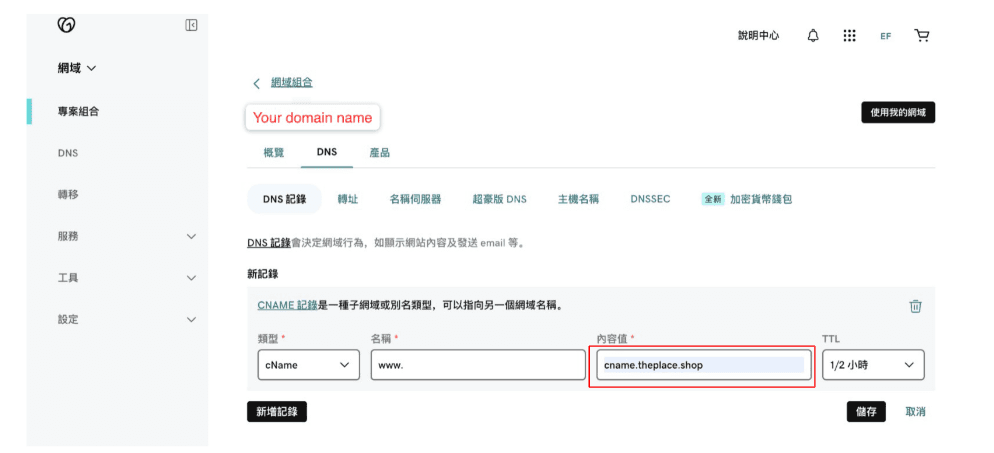
自訂網域 - 第二步
在所選網域代管平台中設定DNS紀錄
輸入“cname.theplace.shop”
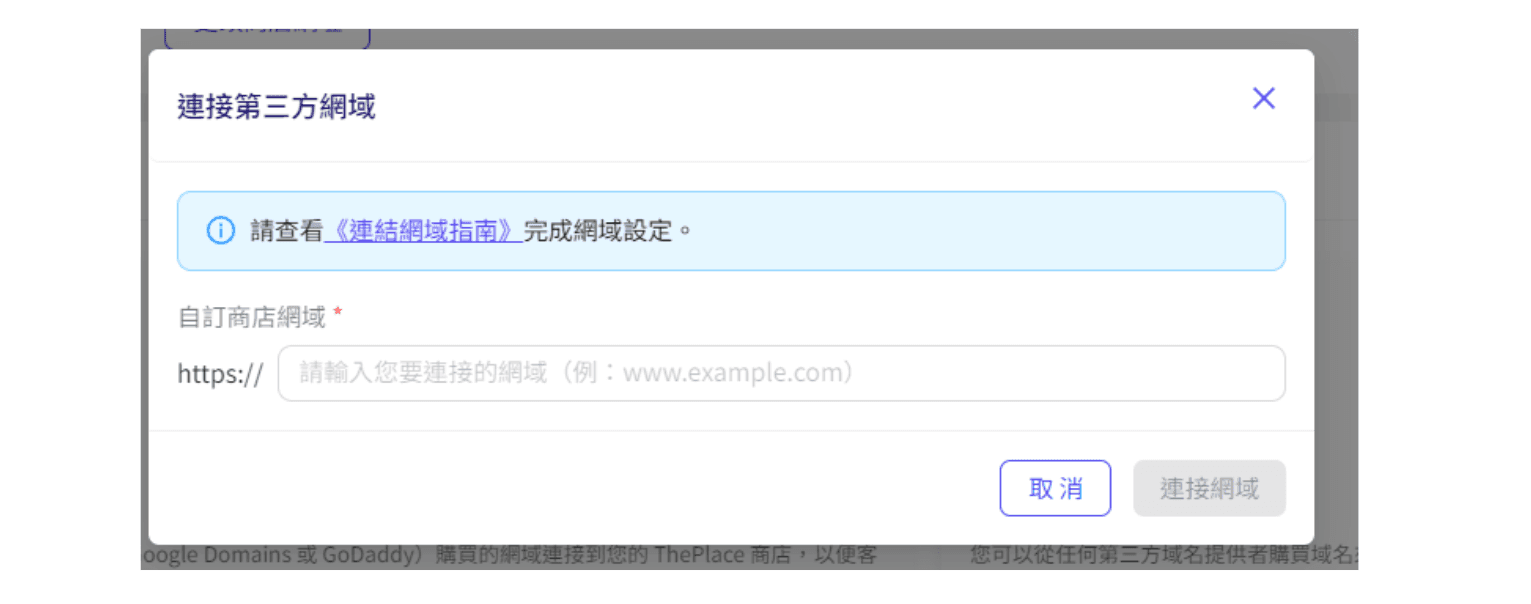
自訂網域 - 第三步
輸入您的網域(例如:www.XXXXXXXXXXXXX)
按 「連接網域」
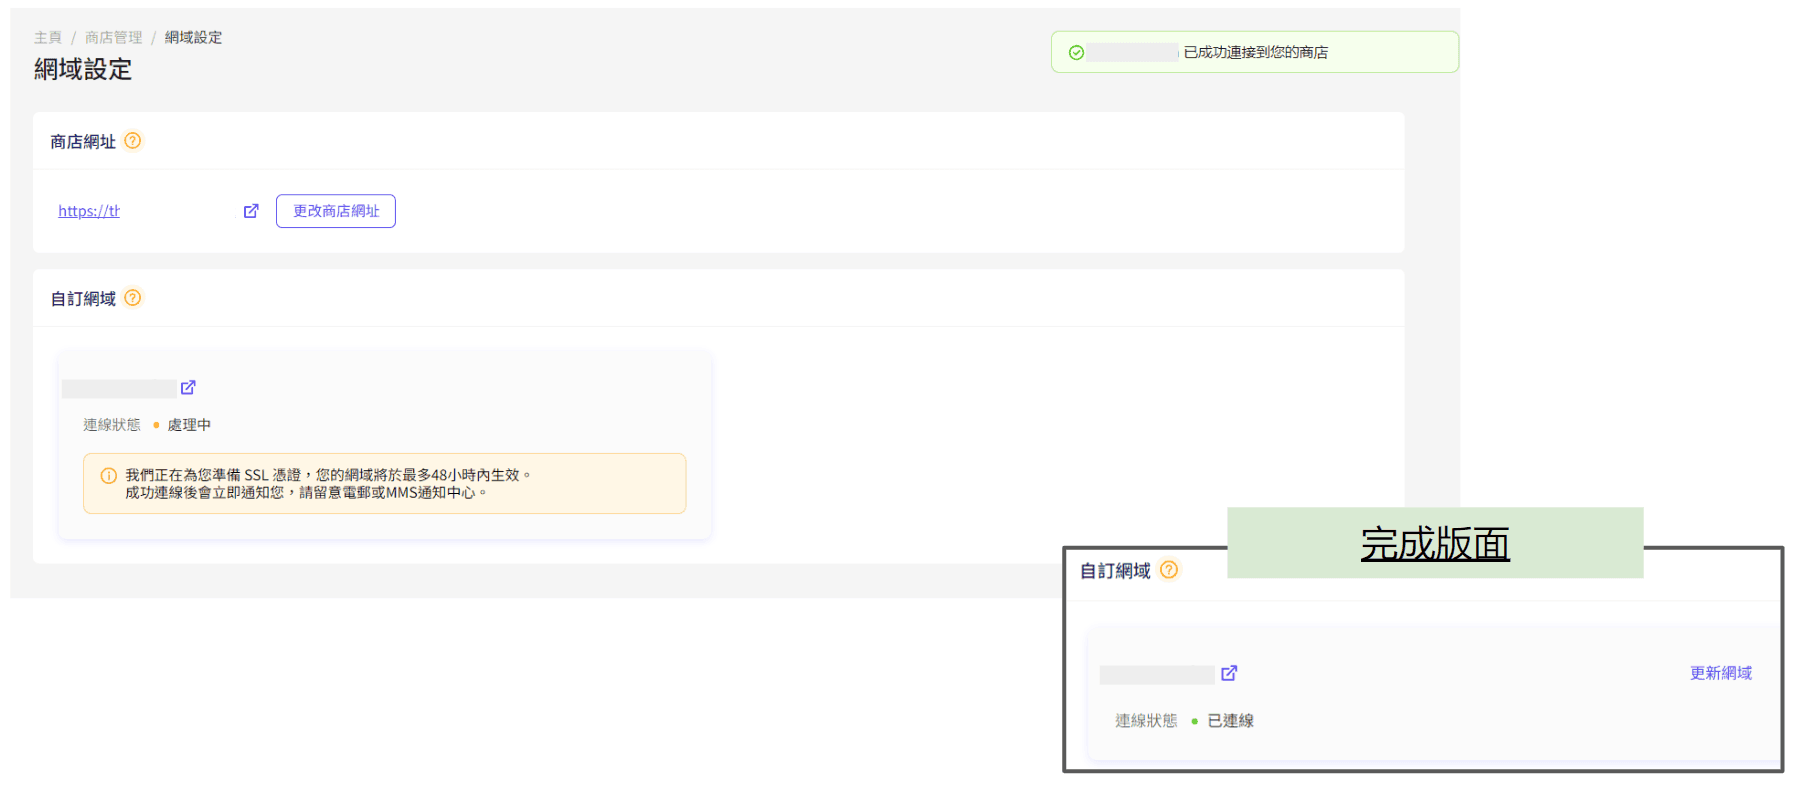
自訂網域 - 第四步
網域需要數小時到 48 小時不等使記錄生效
完成後連線狀態會顯示為 「已連線」
財務查詢
銀行賬戶更新
步驟一 : 商戶資訊
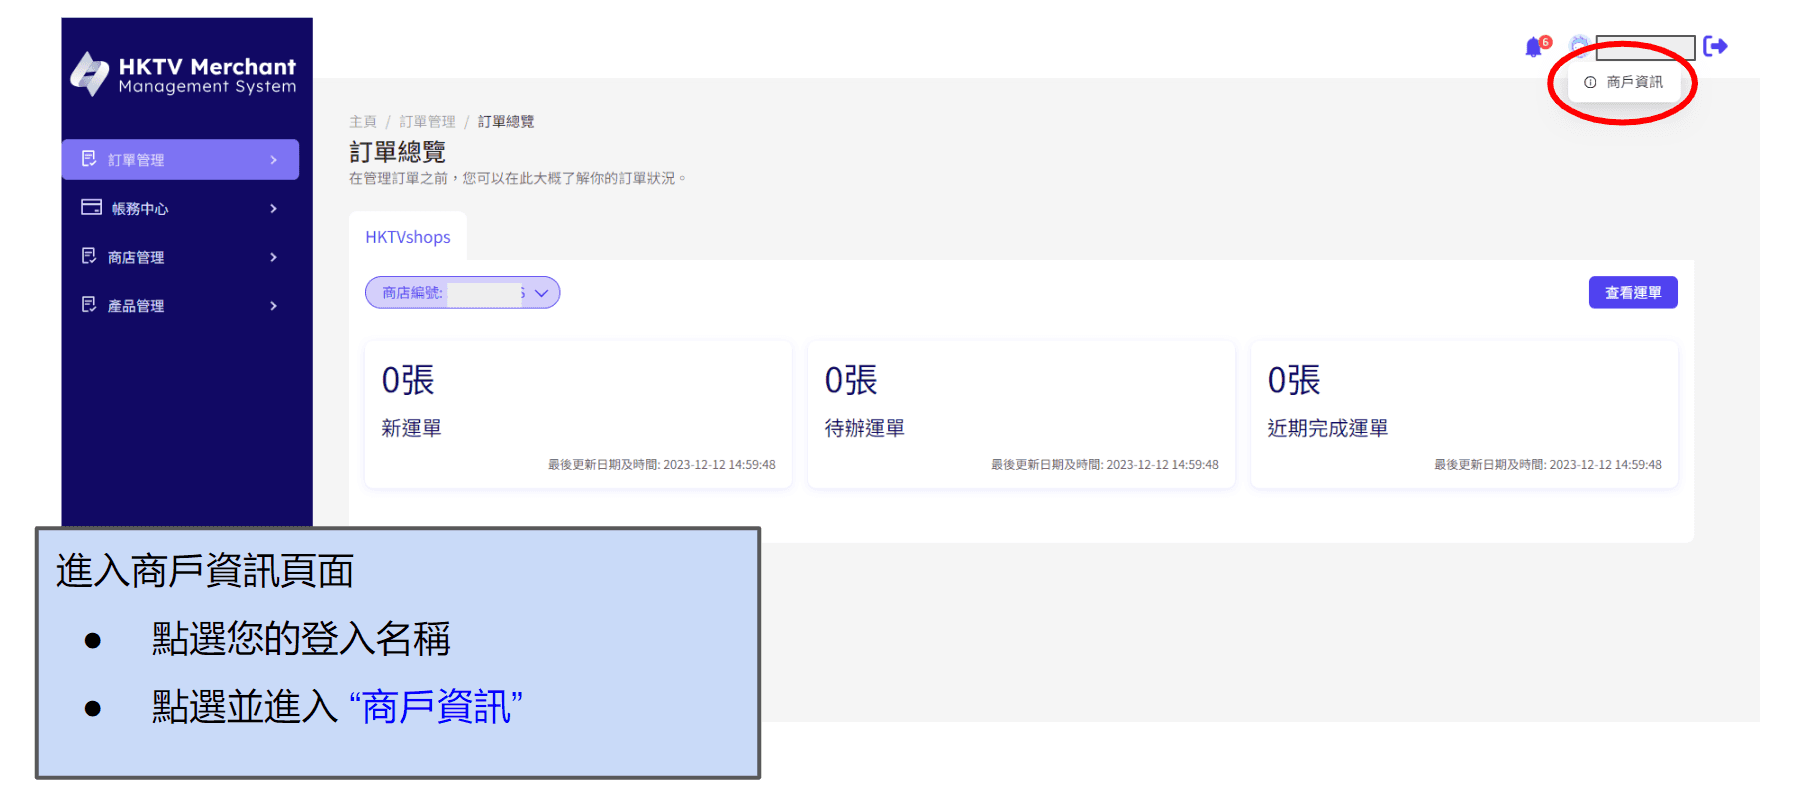
進入商戶資訊頁面
點選您的登入名稱
點選並進入 “商戶資訊”
步驟二 : 帳戶資訊 - 更改戶口
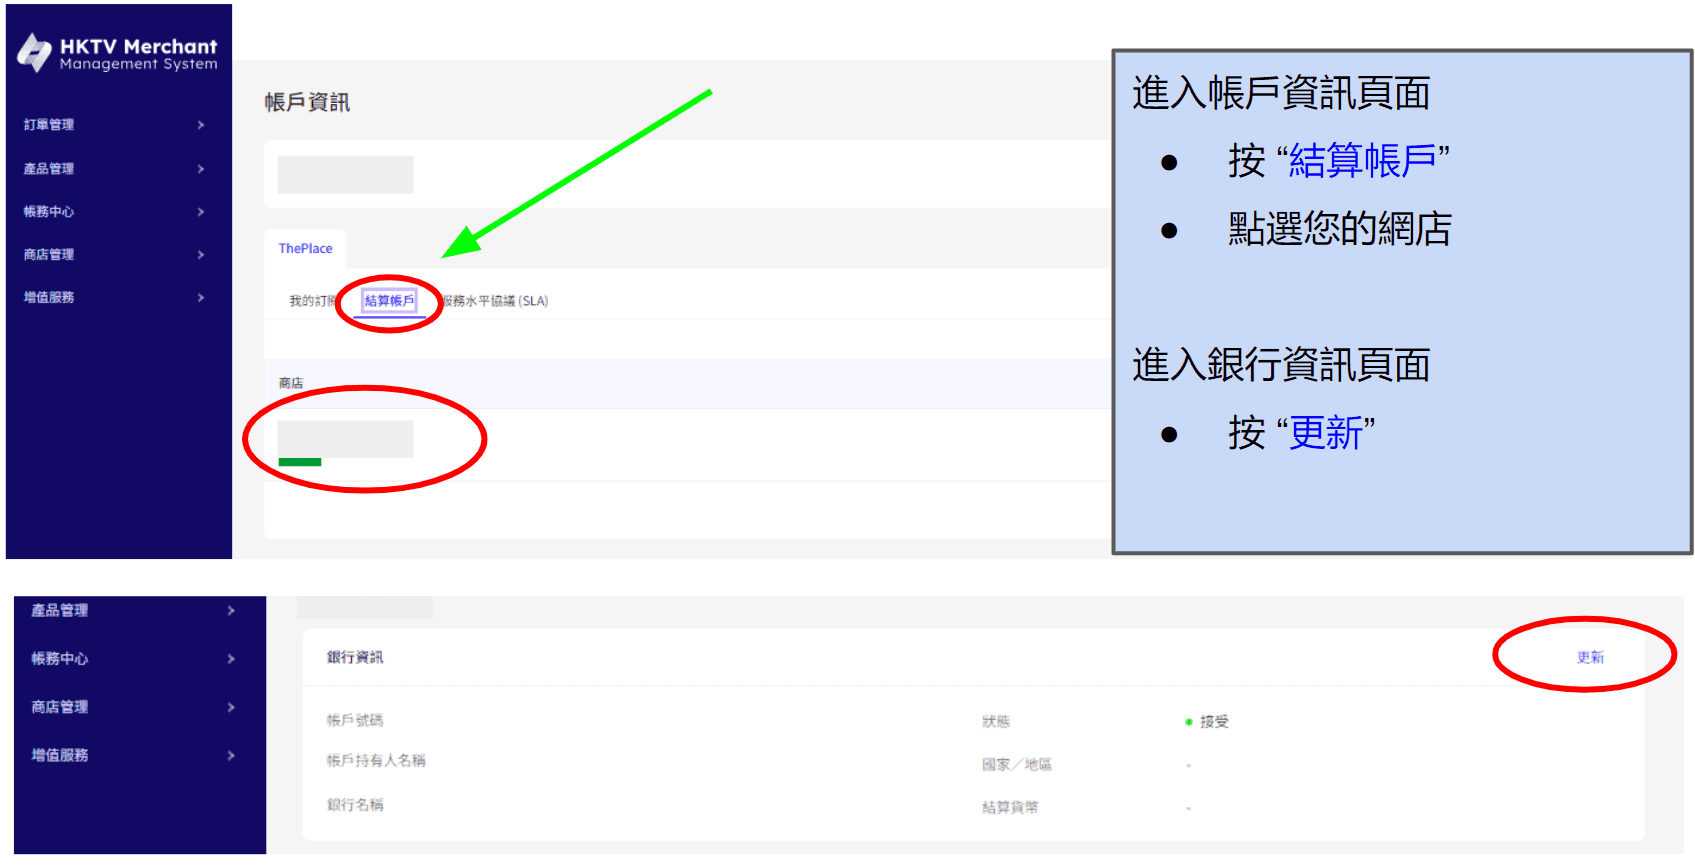
進入帳戶資訊頁面
按 “結算帳戶”
點選您的網店
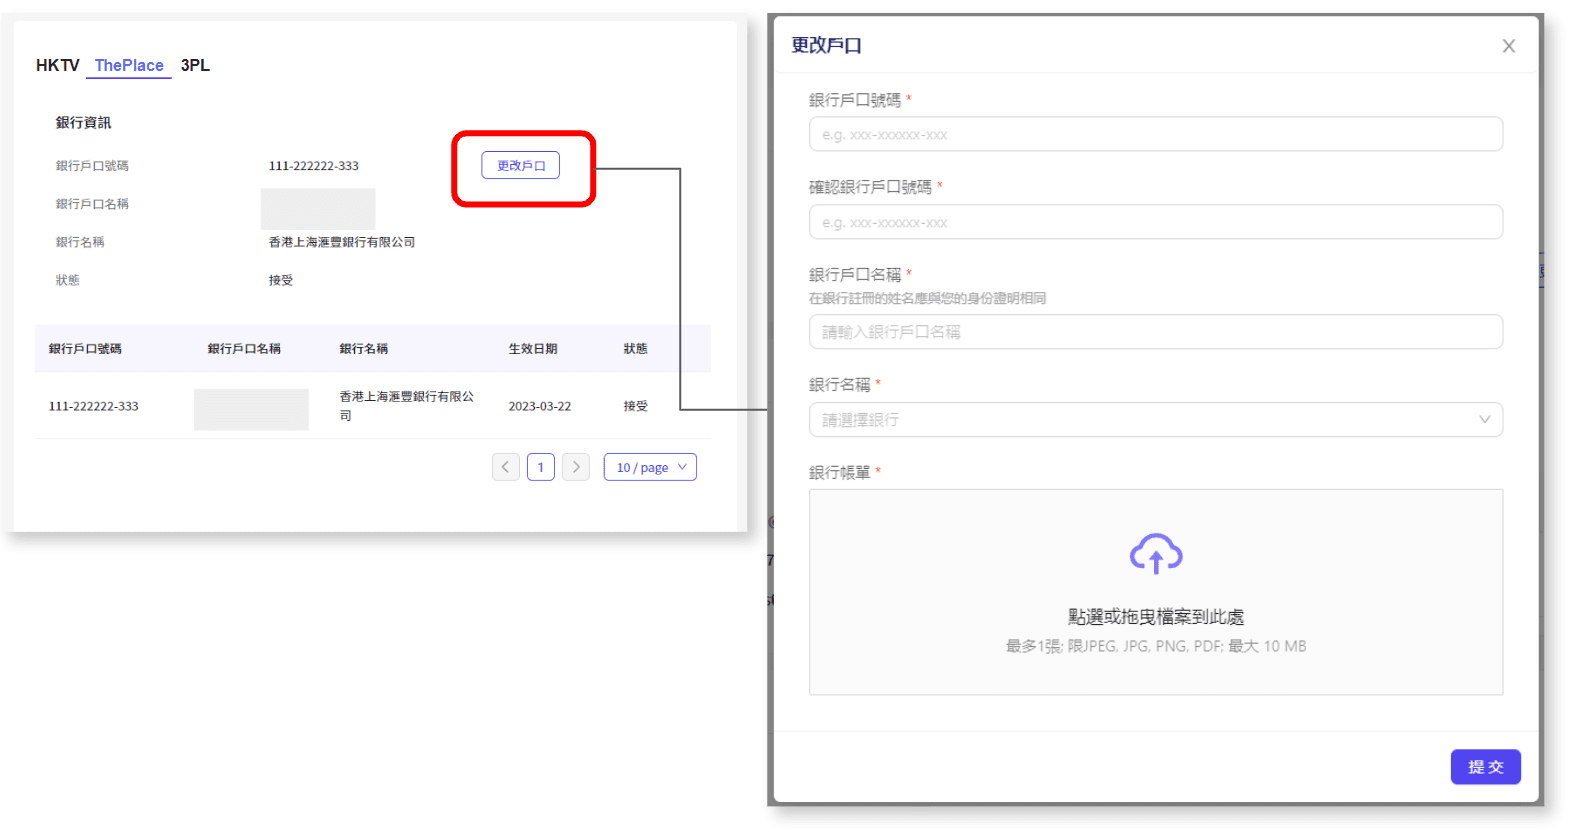
進入銀行資訊頁面
按 “更新”
更新銀行賬戶
必須輸入銀行信息
銀行帳號
重新確認銀行帳號
銀行所有人姓名(必須與聯繫人相同)
銀行名稱
3個月內有效的銀行對賬單
* 請確保所有銀行信息正確無誤,因為付款將結算至該商戶銀行賬戶。
更新後,麻煩請以電郵方式通知財務部。
電郵:hktvmall.fin@hktv.com.hk
貨款及週期報表 (PCR)
如何檢查貨款及週期報表 (PCR)?
ThePlace每月劃分三個付款週期
每月的10日、20日及最後一日為截數日
截數日之後15個工作天後(工作天不包括星期六、星期日及公眾假期),財務部將通過電郵逐步向各商戶發送貨款週期報表
貨款週期報表
由財務部發出:hktvmall.fin@hktv.com.hk
電郵標題:HKTVmall - [store code] - [Company Name] - [Payment Cycle Date] PAYMENT CYCLE REPORT
內容:貨款週期內的結算及佣金
如有關財務問題, 可聯絡hktvmall.fin@hktv.com.hk
*注意:非本地銀行為一個月結算一次
*非本地銀行如商戶貸款少於1,000港元,會累積至滿1,000港元發放
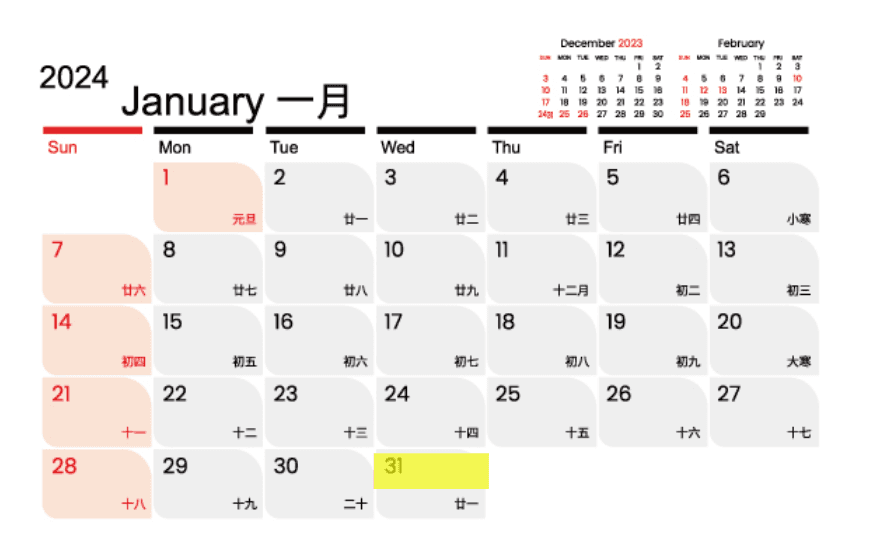
以2024年1月份為例,首個截數日為1月10日,預期你將在1月31日或之後收到截數日為1月10日的週期報表,及HKTVmall隨後會提交貨款予銀行
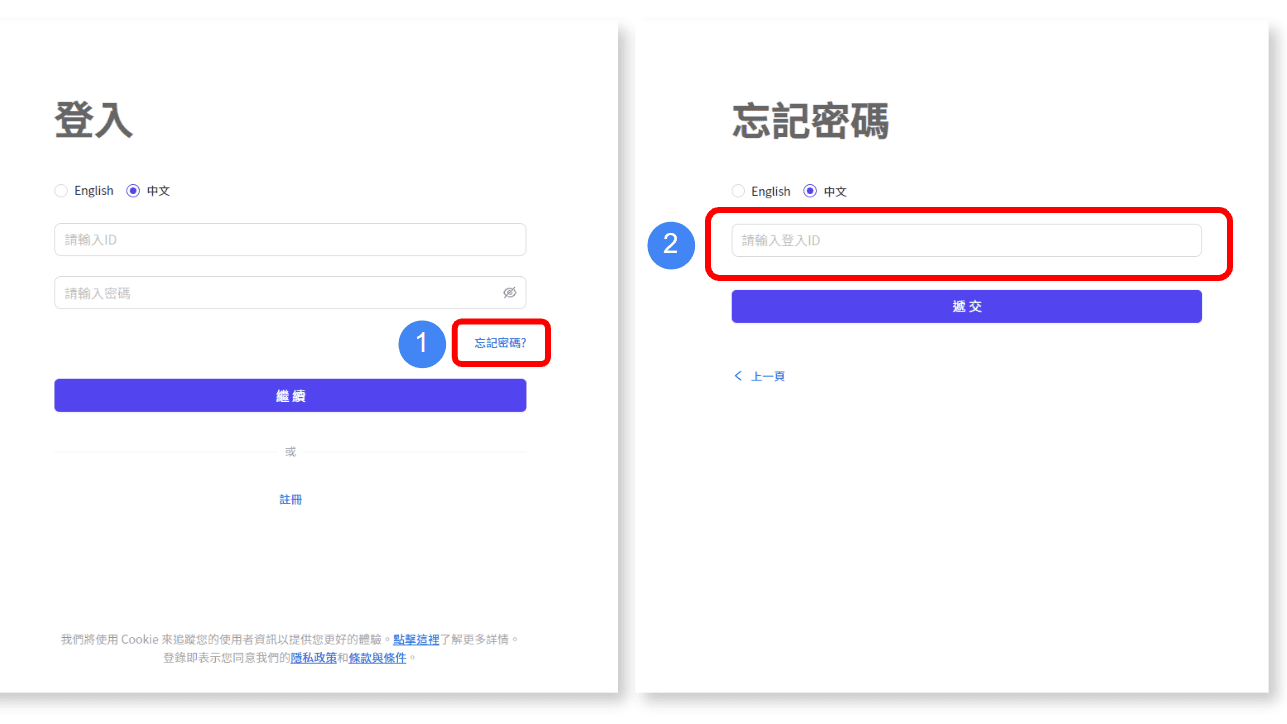
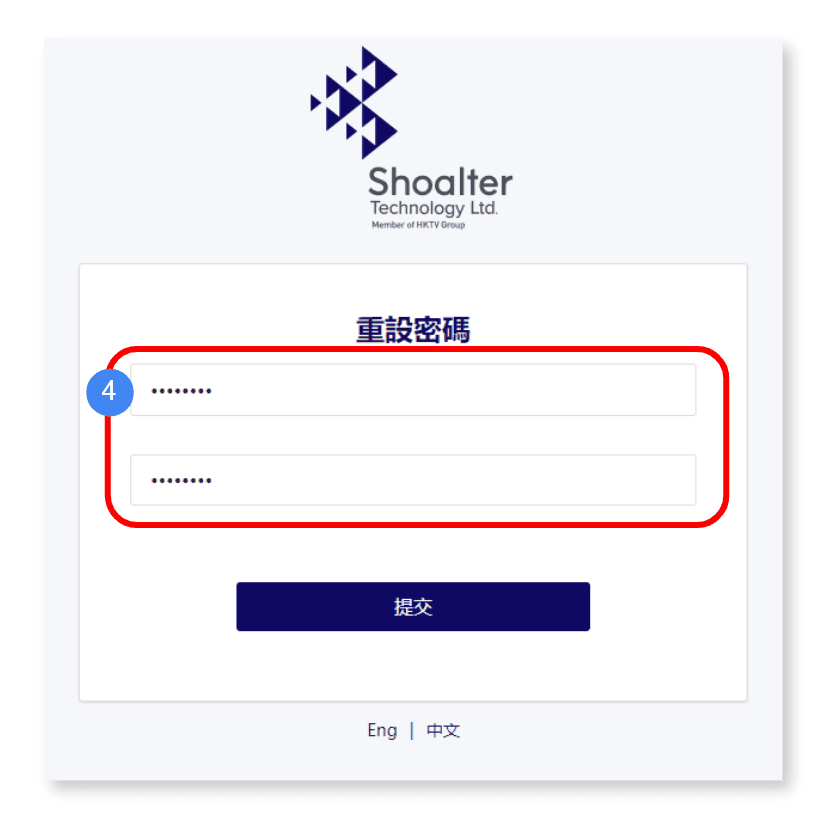
忘記密碼
點擊「忘記密碼」
輸入登入ID並點擊提交
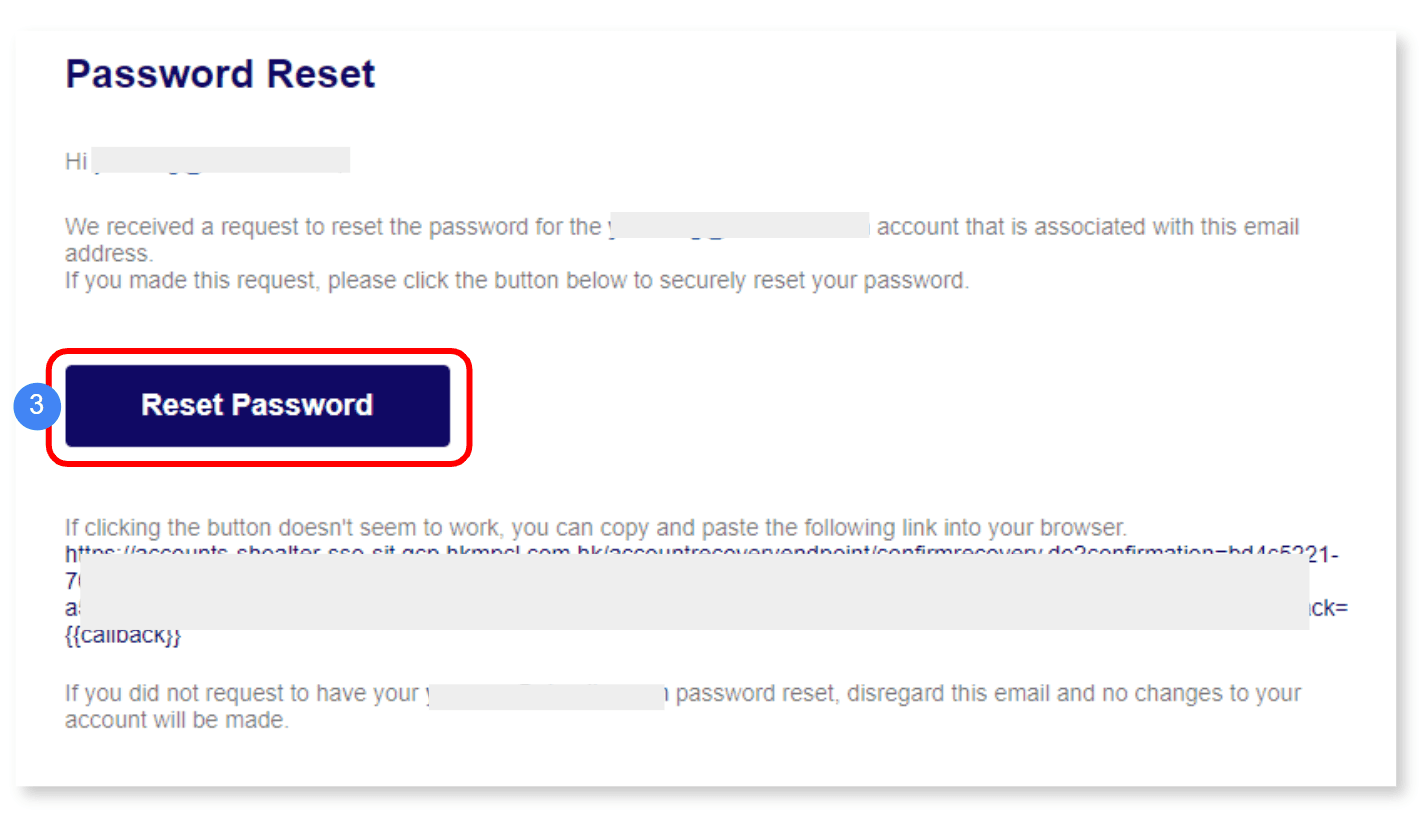
提交後,您應該會收到一封重設密碼的電子郵件
輸入並再次確認新密碼,然後提交
HKTVLive
有關HKTVLive詳情,可以聯絡以下部門:
Whatsapp: 6013 3392 (星期一至五早上10點至下午7點,公眾假期除外)
Email: adv_enquiry@hktv.com.hk
如果您有任何疑問,請隨時聯繫我們,電子郵件地址是 enquiry@theplace.shop。為確保郵件能夠成功發送,請將我們的電子郵件地址添加到您的電子郵件聯繫人中。